Knobbler4
Features

Read all about Knobbler's features in detail here. You can use the navigation on the right to jump to different parts of this long document.
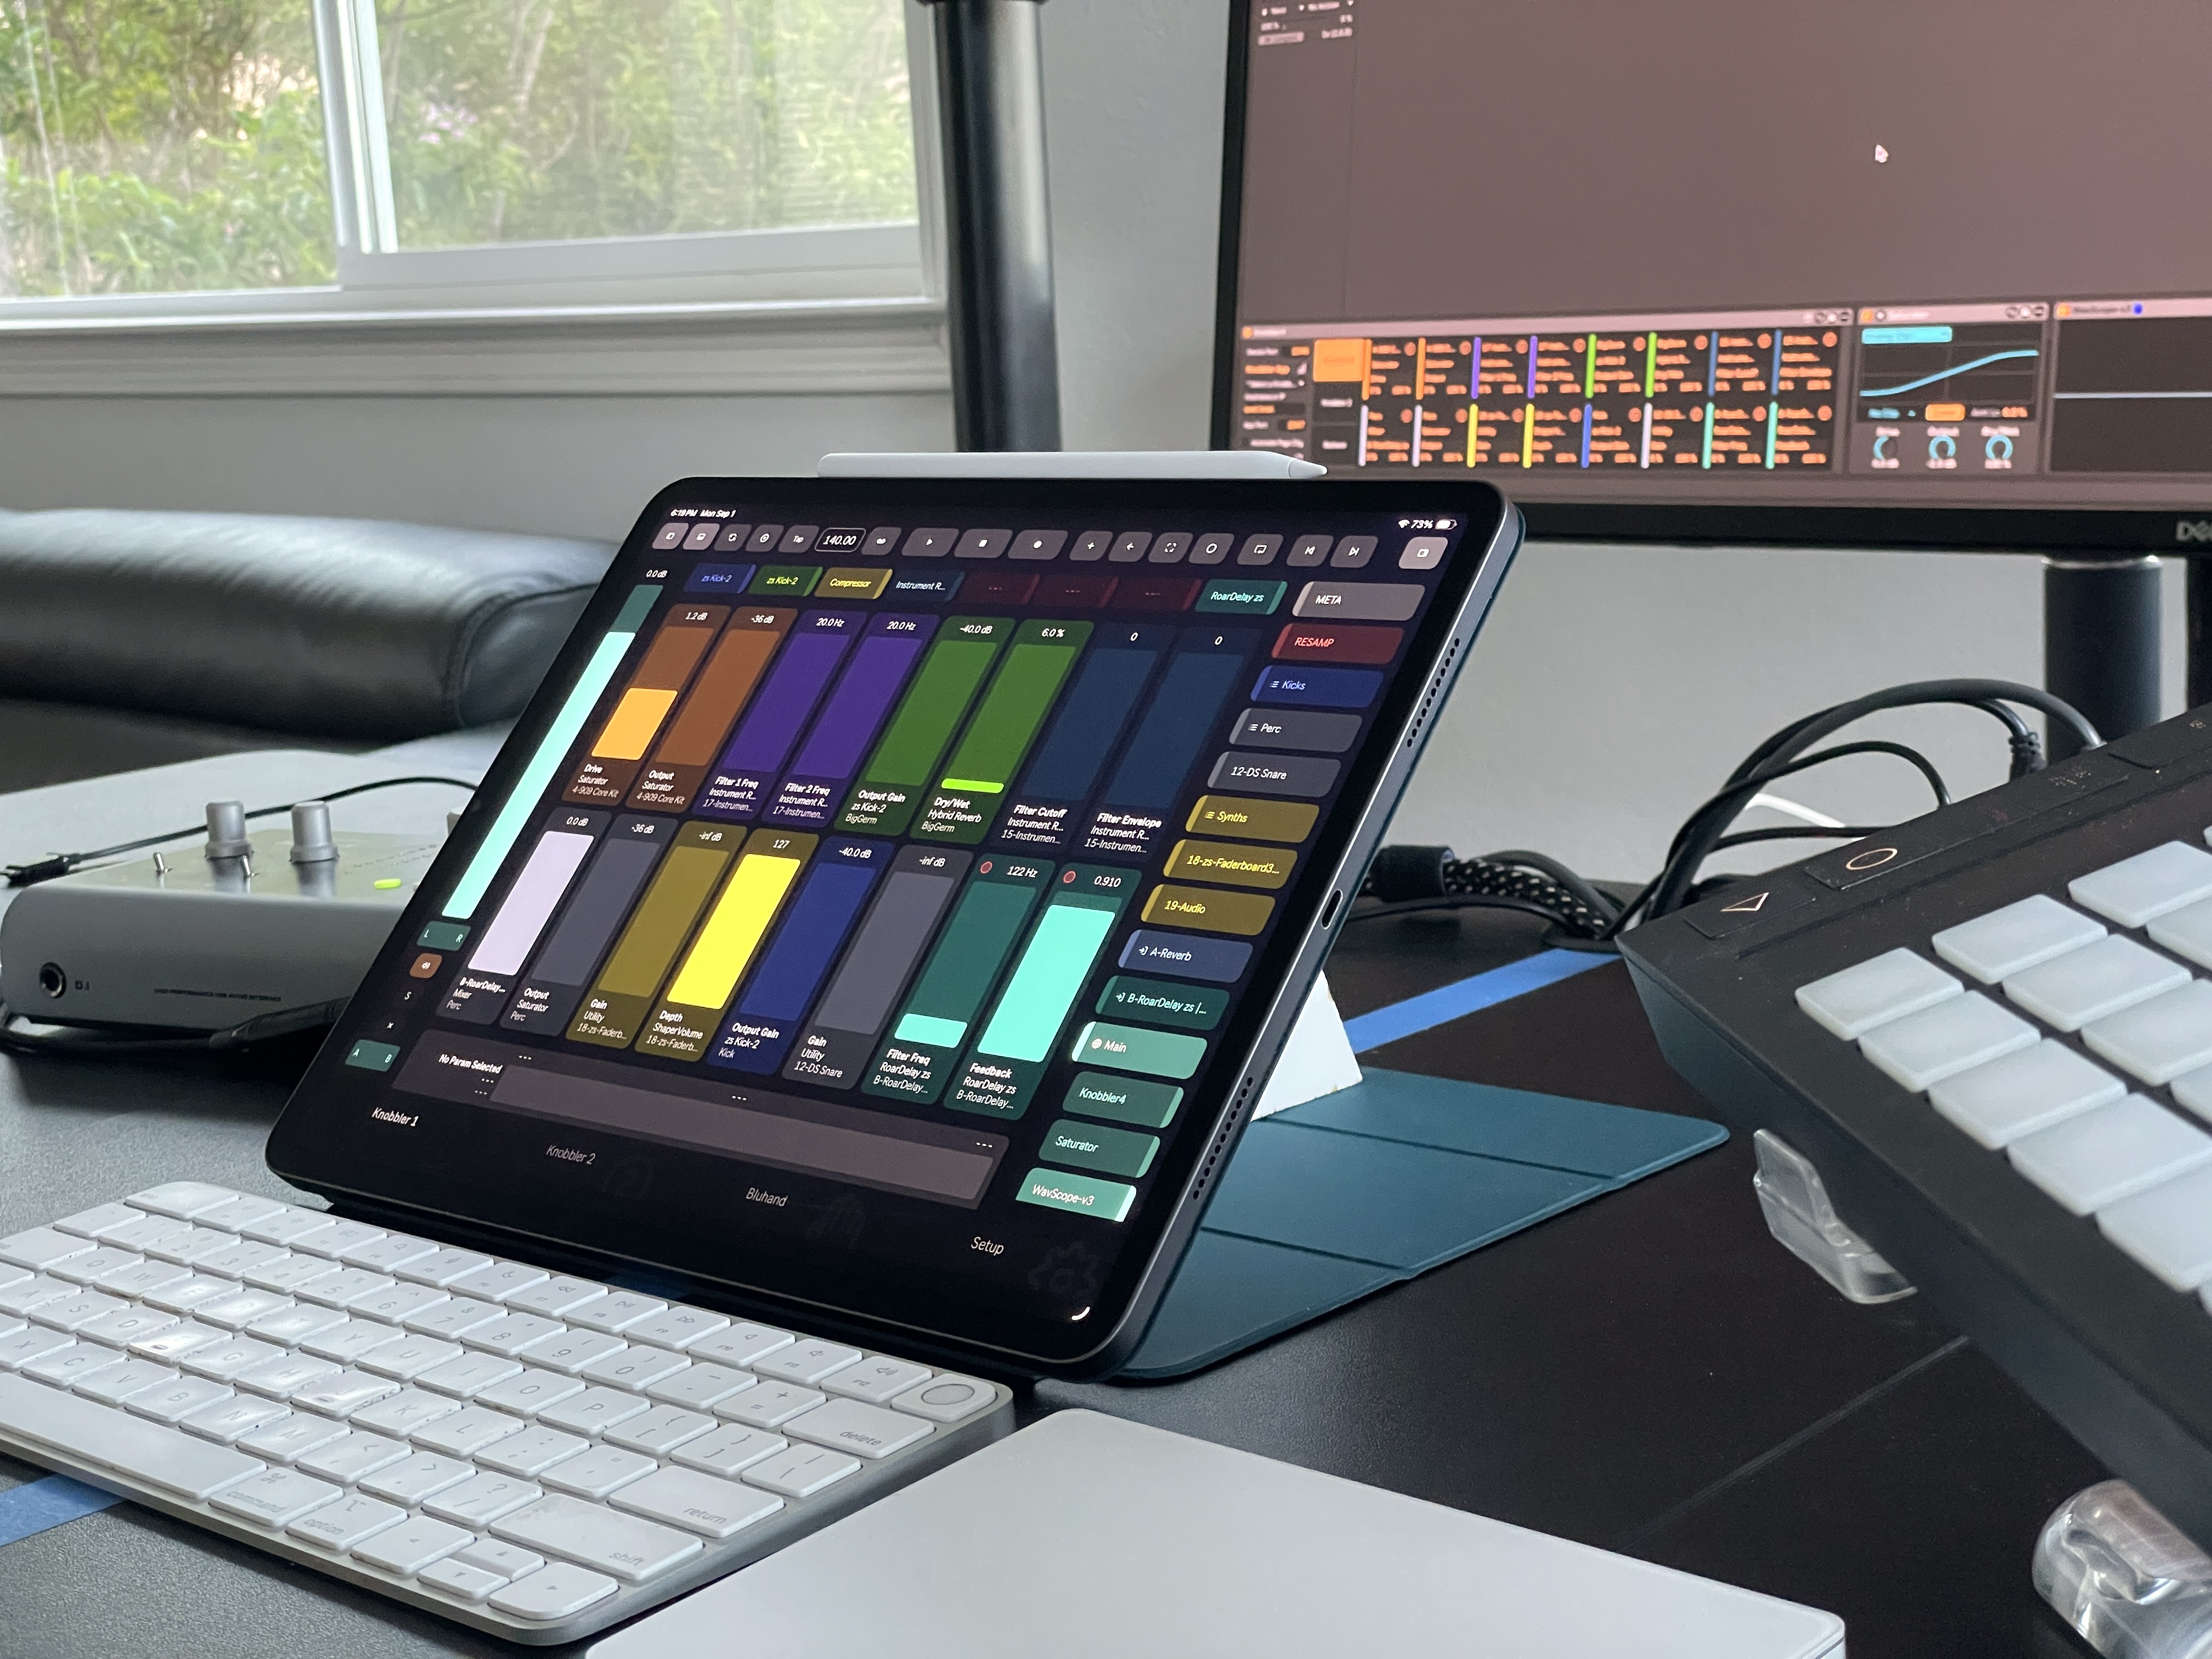
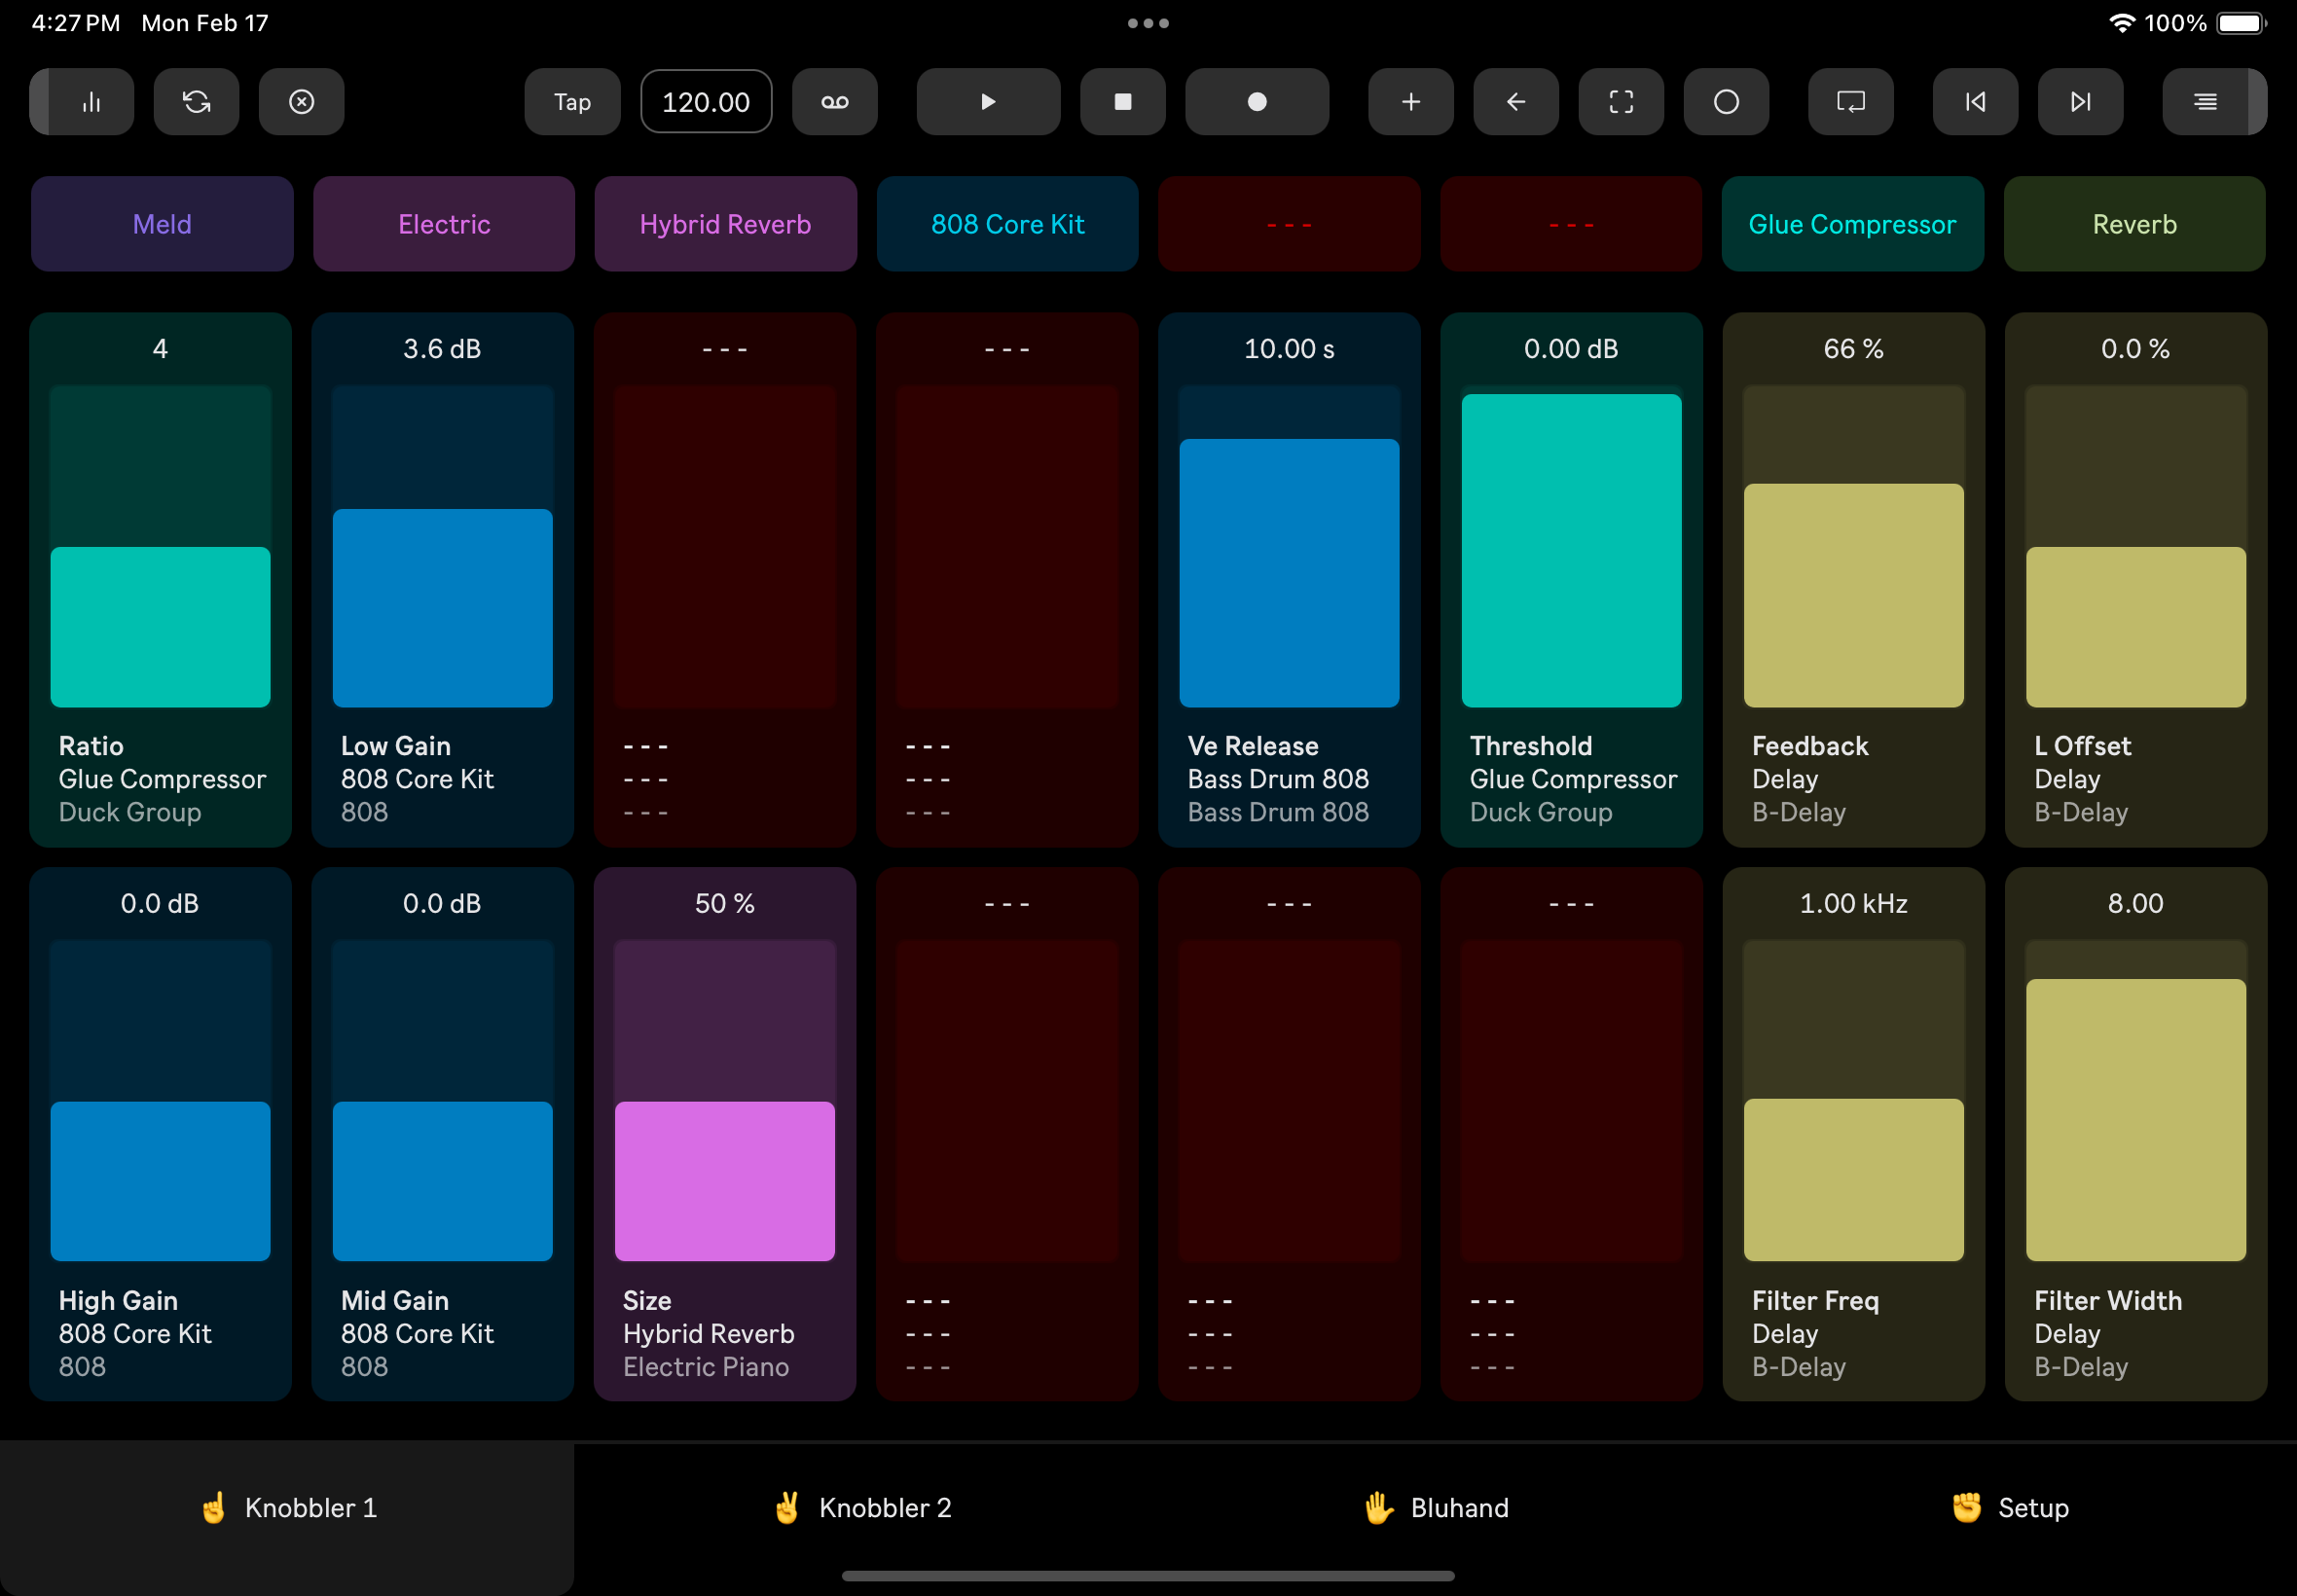
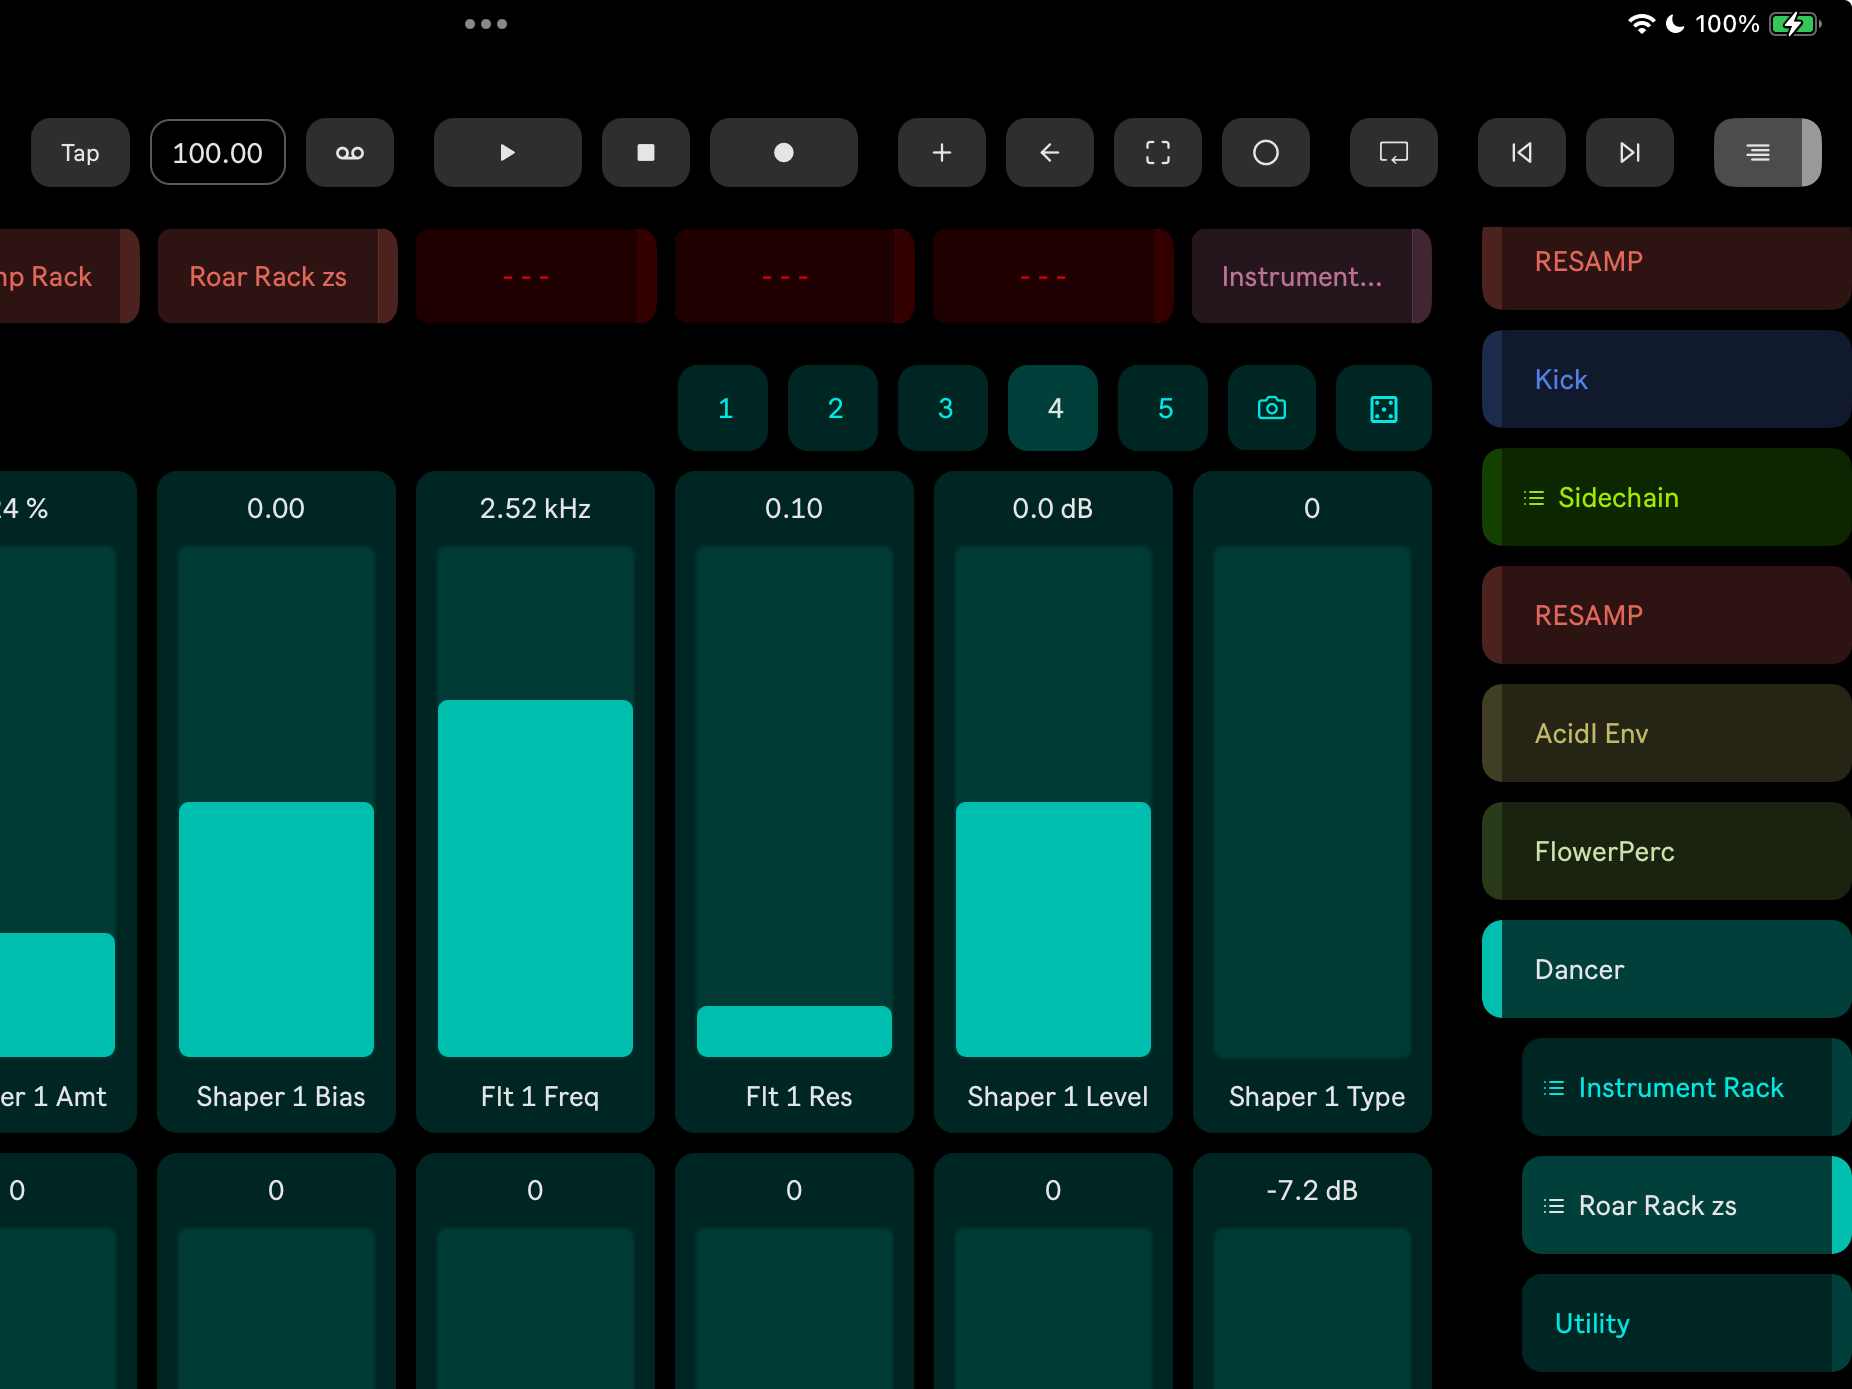
Knobbler Knobs
Knobbler's knobs are pretty self-explanatory. They're very high-resolution (500 steps) and operate at a latency that is lower than MIDI. The full multitouch capabilities of your device are at your fingertips.
Knob States
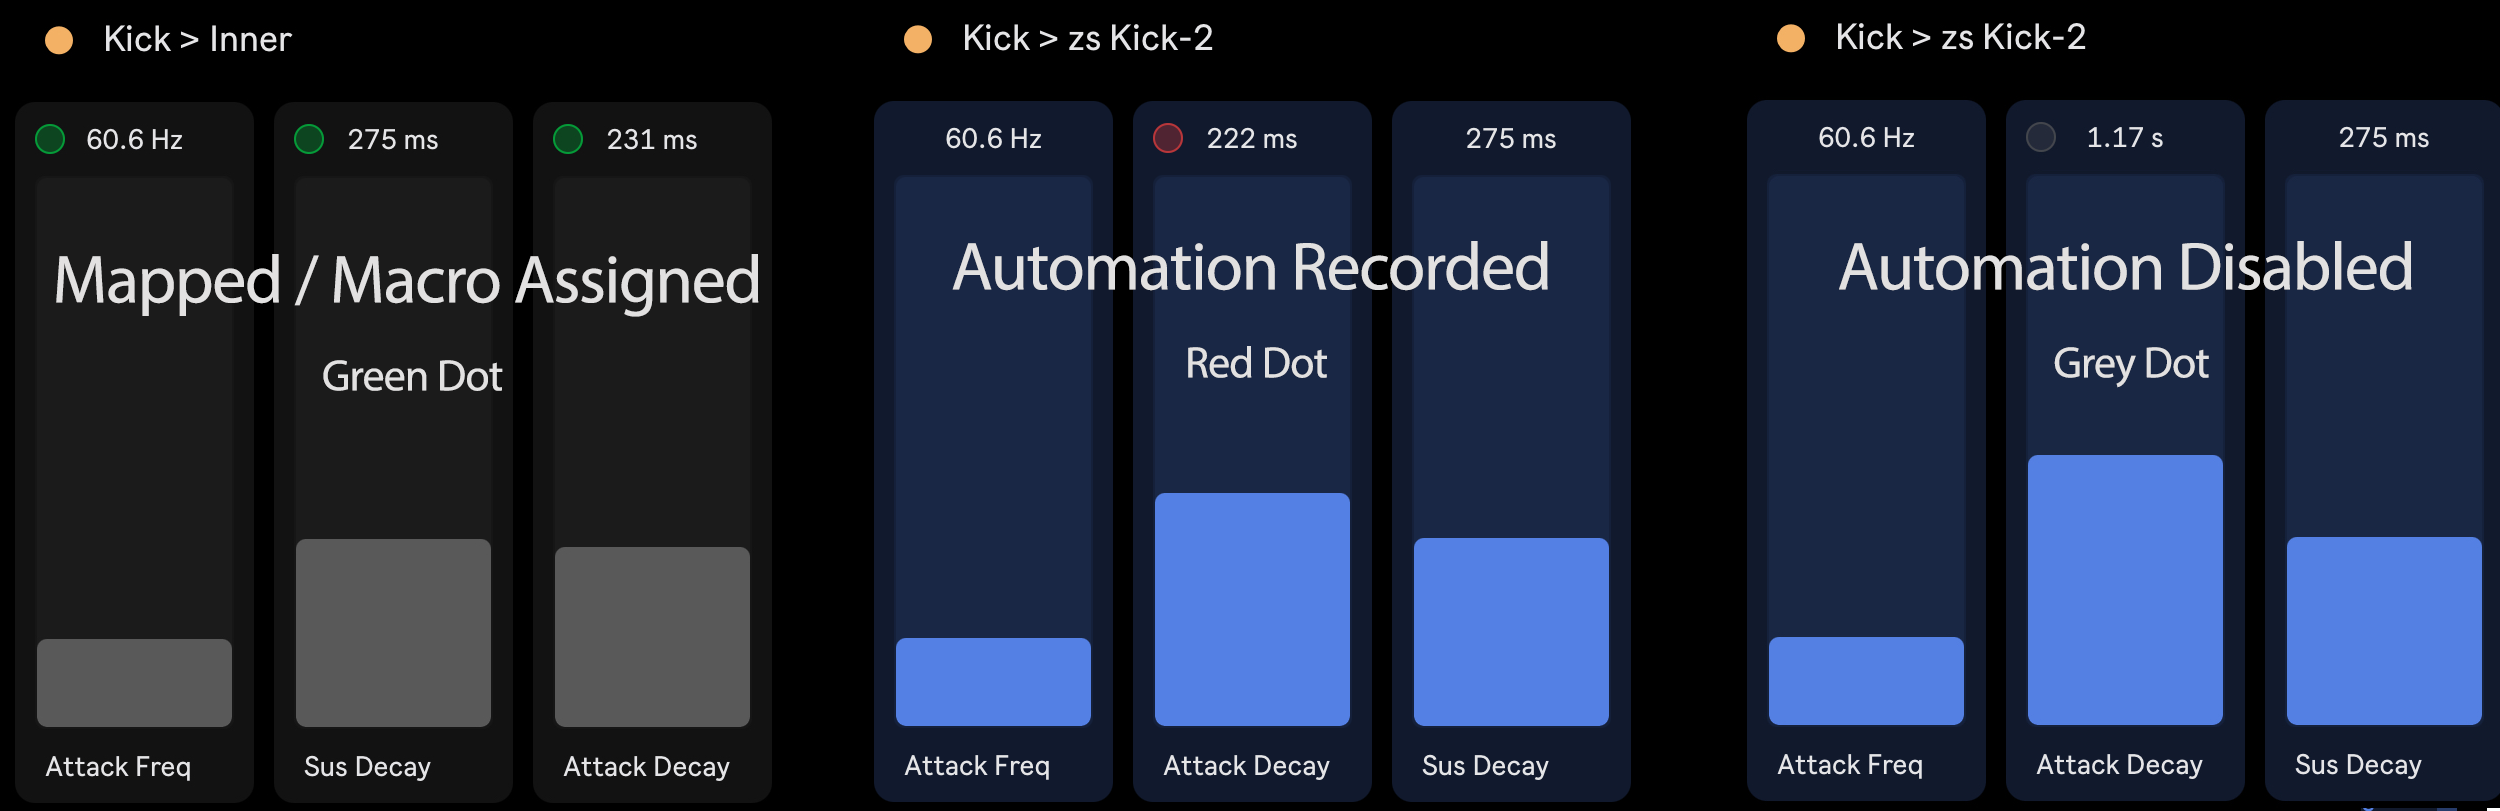
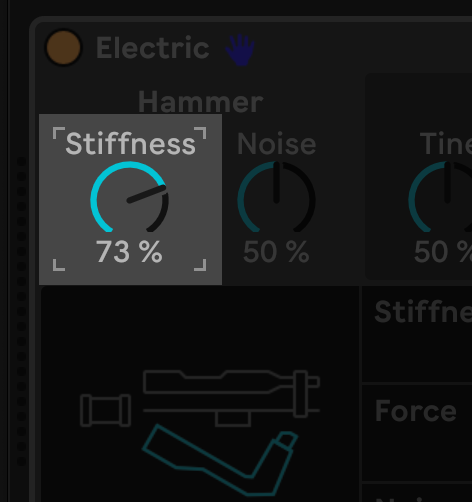
Knobbler knobs indicate their state with a dot in the upper left corner, similar to how it is presented in Ableton Live.
- Green Dot = The parameter is controlled by another device, or is mapped to a macro knob. The slider will also be greyed out.
- Red Dot = Automation has been recorded for this parameter.
- Grey Dot = Automation has been overridden for this parameter (i.e. automation was recorded, but the parameter was changed manually.) Tap the Re-Enable Automation button in the toolbar to re-enable the automation.
Knobbler Pages
This was Knobbler's first feature -- as a page of sliders that you can map to whatever you like. If you'd like to read the history of Knobbler, check it out!
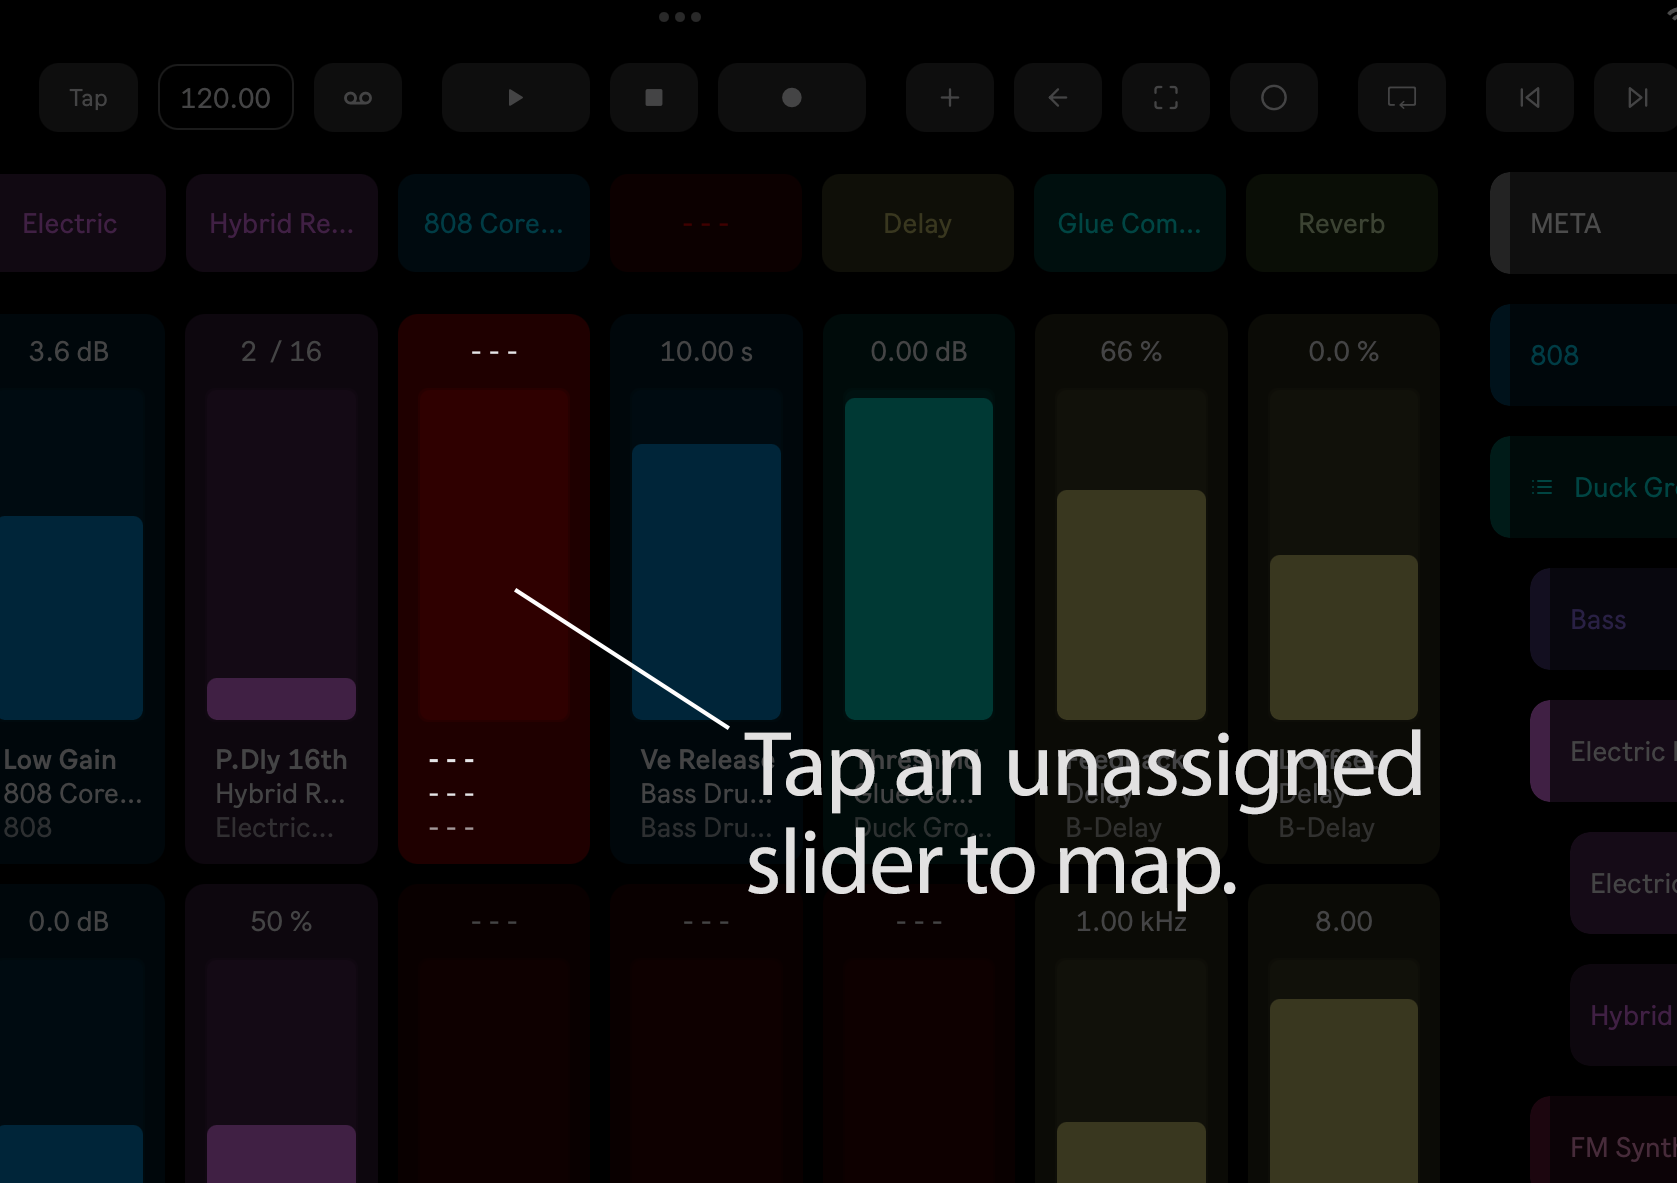
There are two ways to map a Knobbler slider.
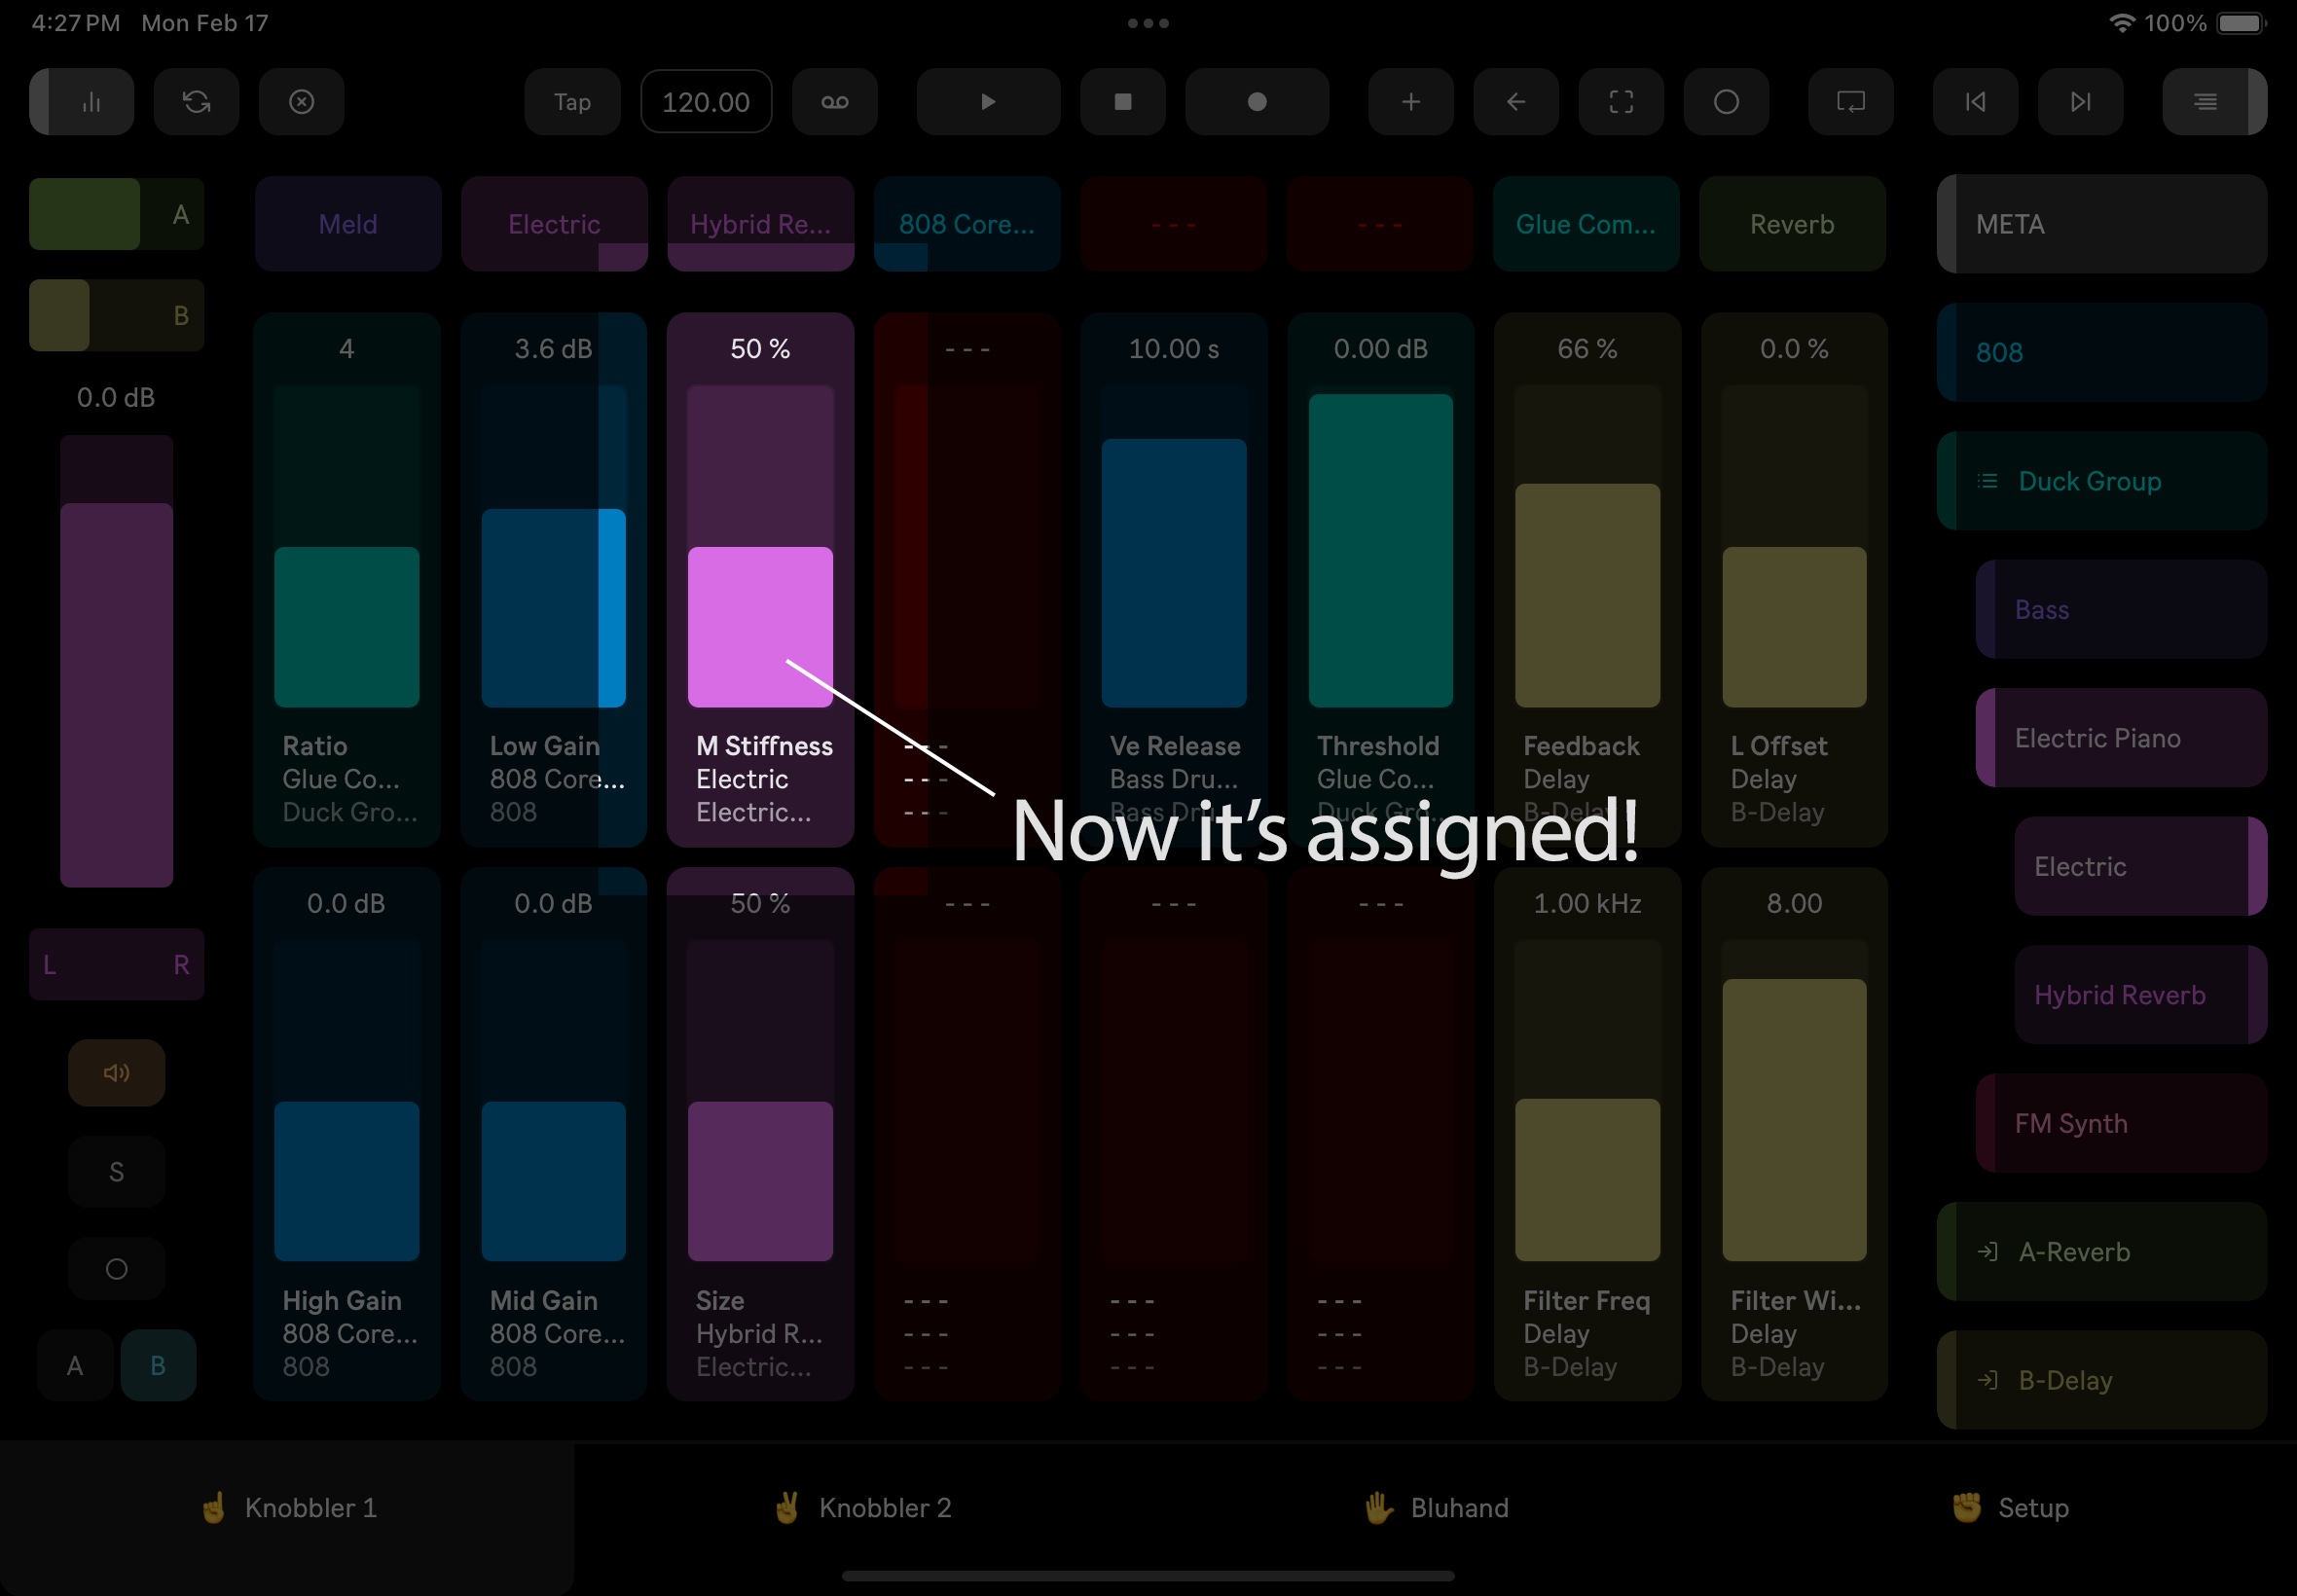
Mapping 1: Selected Param
The original way is to click a parameter on the computer screen, which highlights that parameter by highlighting its corners.
Then tap any unassigned Knobbler slider, and the mapping is done. No modes to enter or exit, and the control remains available to be controlled with the mouse or modulated by another device in the set.
Mapping 2: Direct from Bluhand
The other way to map a Knobbler slider is from the Bluhand page.
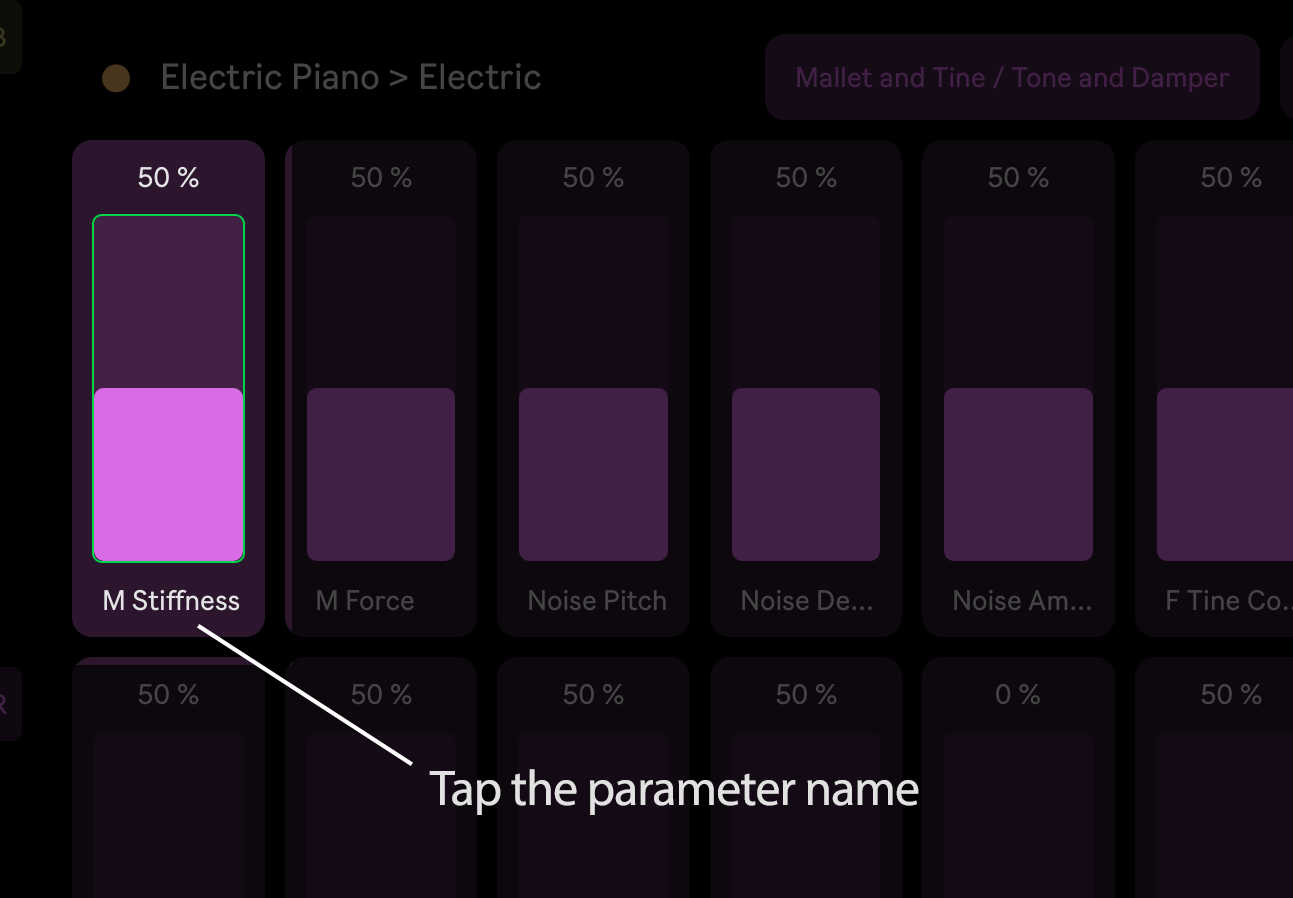
On the Bluhand page, tap a parameter name. The parameter's slider will get a green outline.
Then go to a Knobbler page. All of the sliders will be highlighted in green. Tap any of them (even one that is already mapped) and it will be replaced.
The Knobbler mappings are saved with the Live Set, making recall instant, and enabling you to work on many songs at once without having to remember "what does this knob do???"
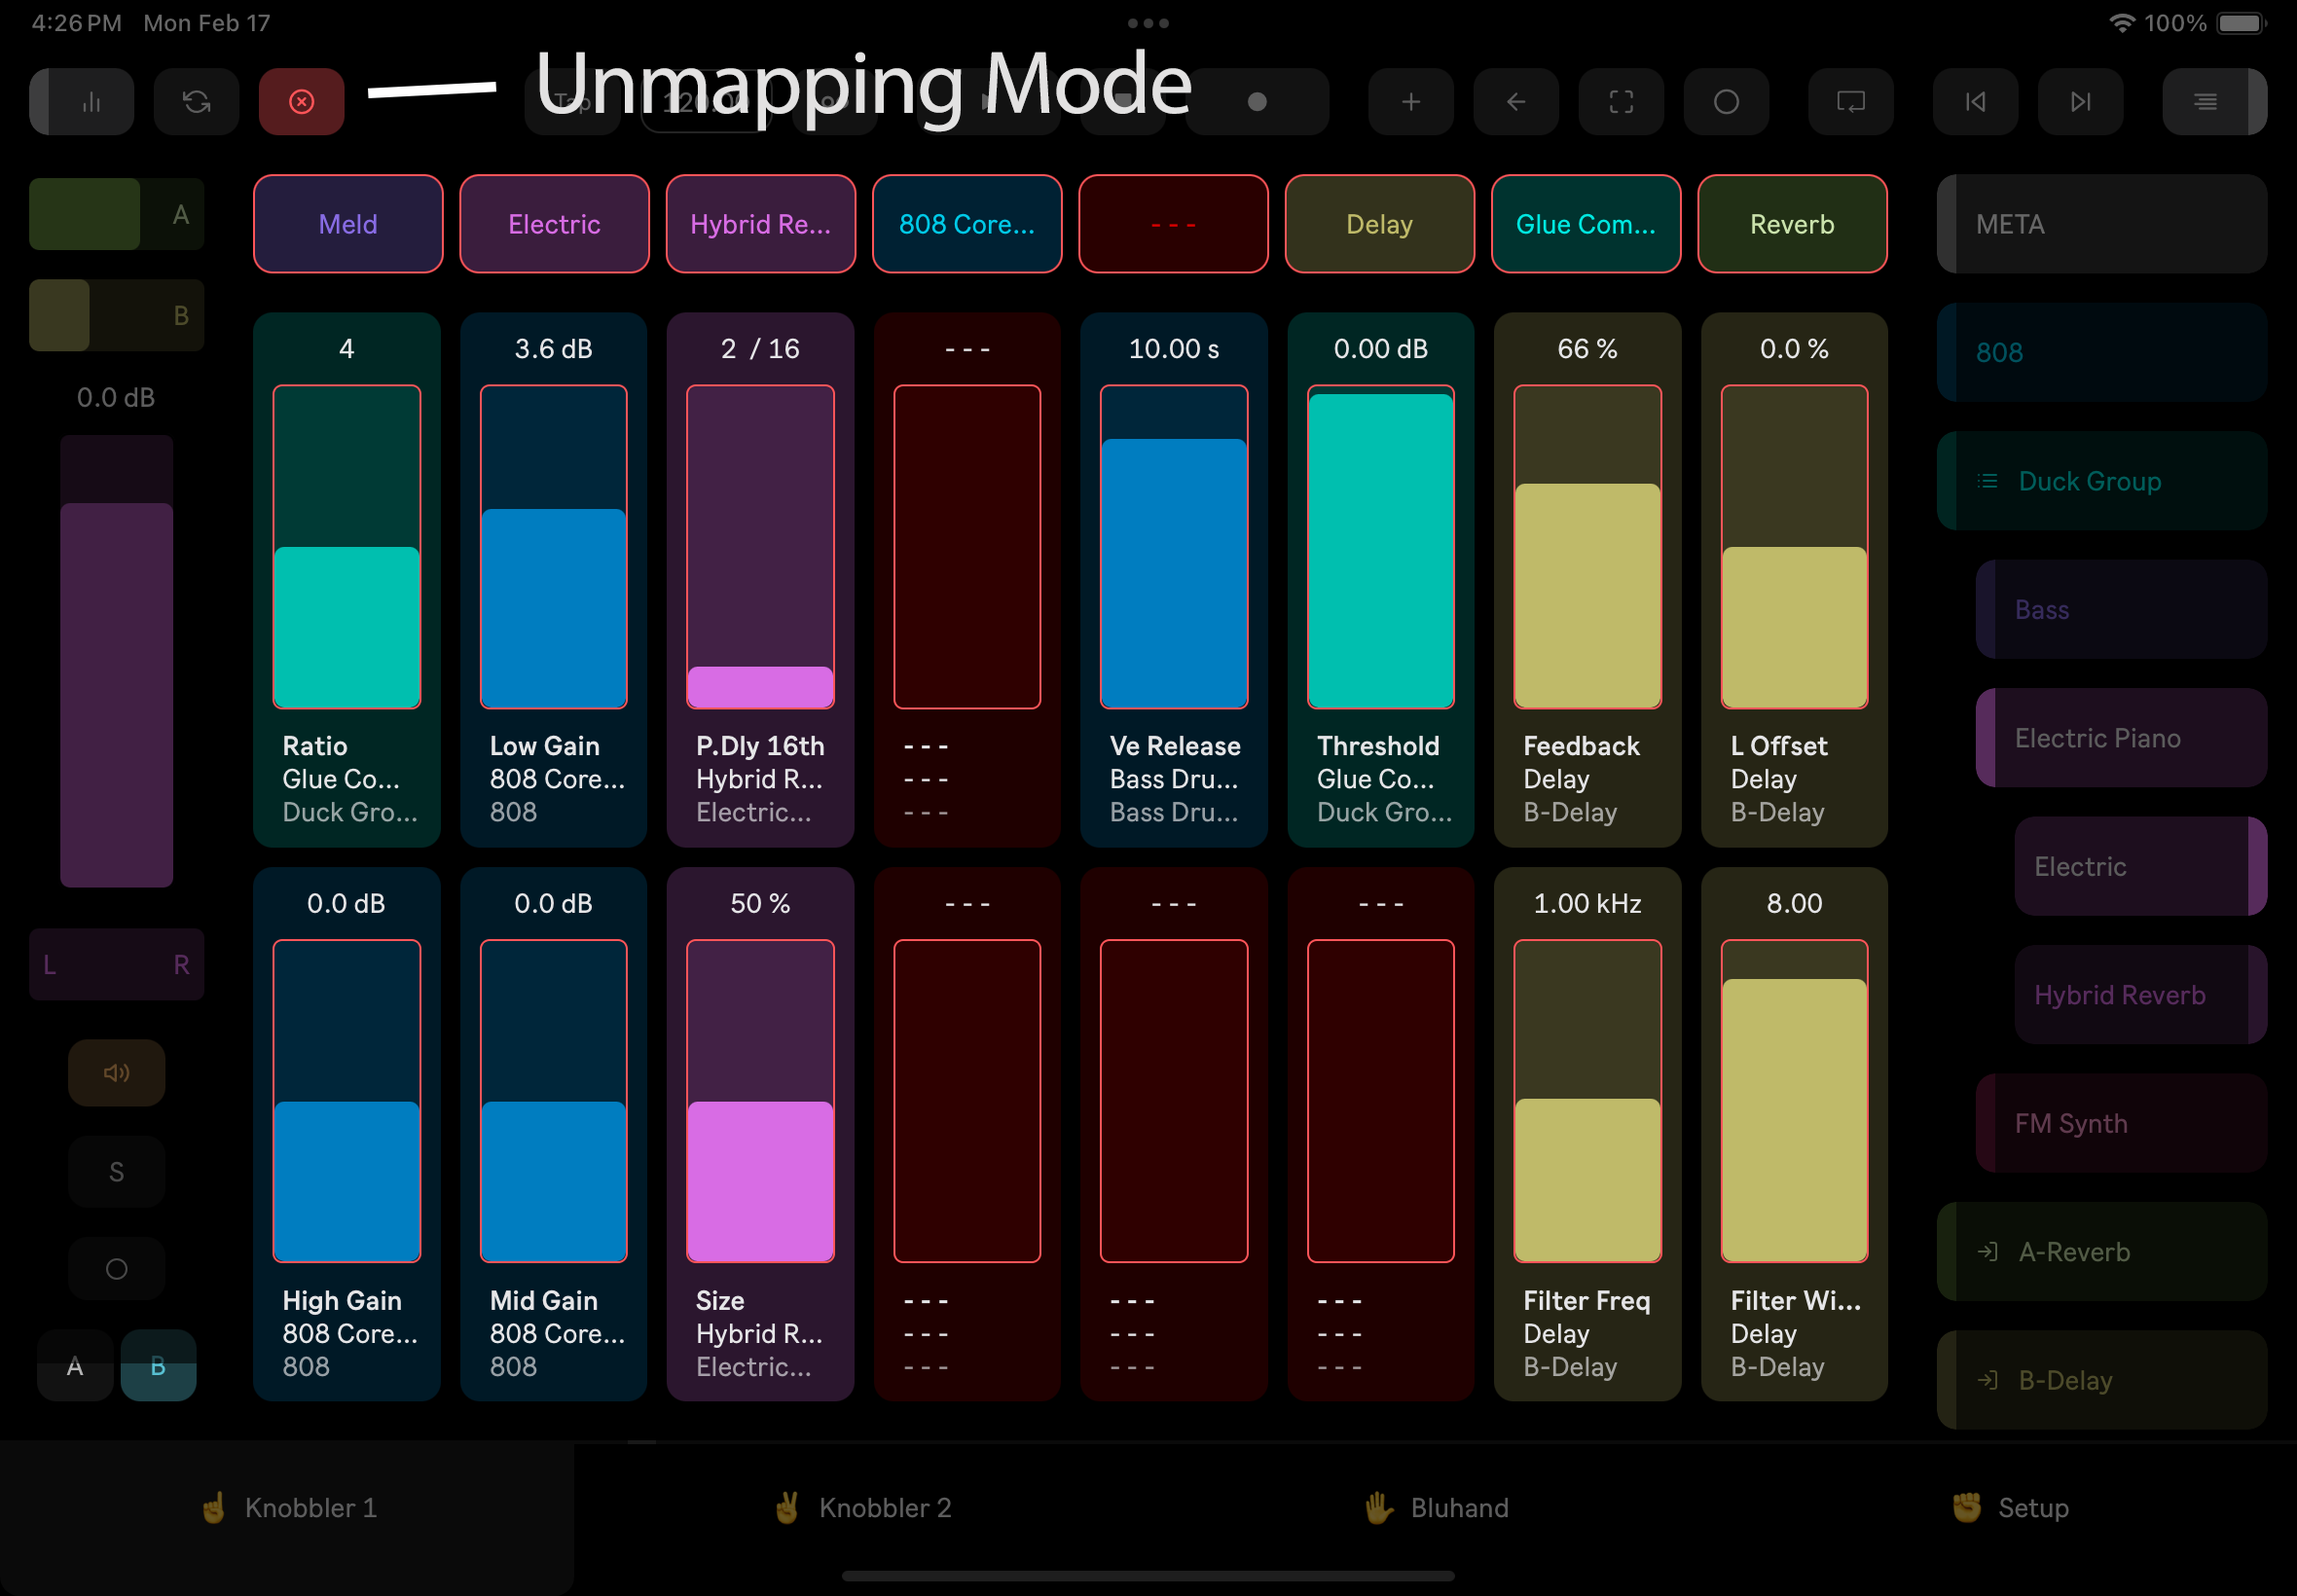
Unmapping
To unmap a Knobbler slider, tap the Unmap button in the Toolbar. All of the Knobbler sliders will get a red outline. Tap the slider(s) you wish to unmap, then tap the Unmap button again to exit unmapping mode.
Default Value
All sliders in Knobbler respond to a double-tap by resetting the parameter to its default value. Double-tap to default.
Fine Control
Use two fingers on any slider for 10x precision. This works on all sliders throughout the app — Knobbler pages, Bluhand, Channel Strip, Multi-Track Mixer, and Current Parameter.
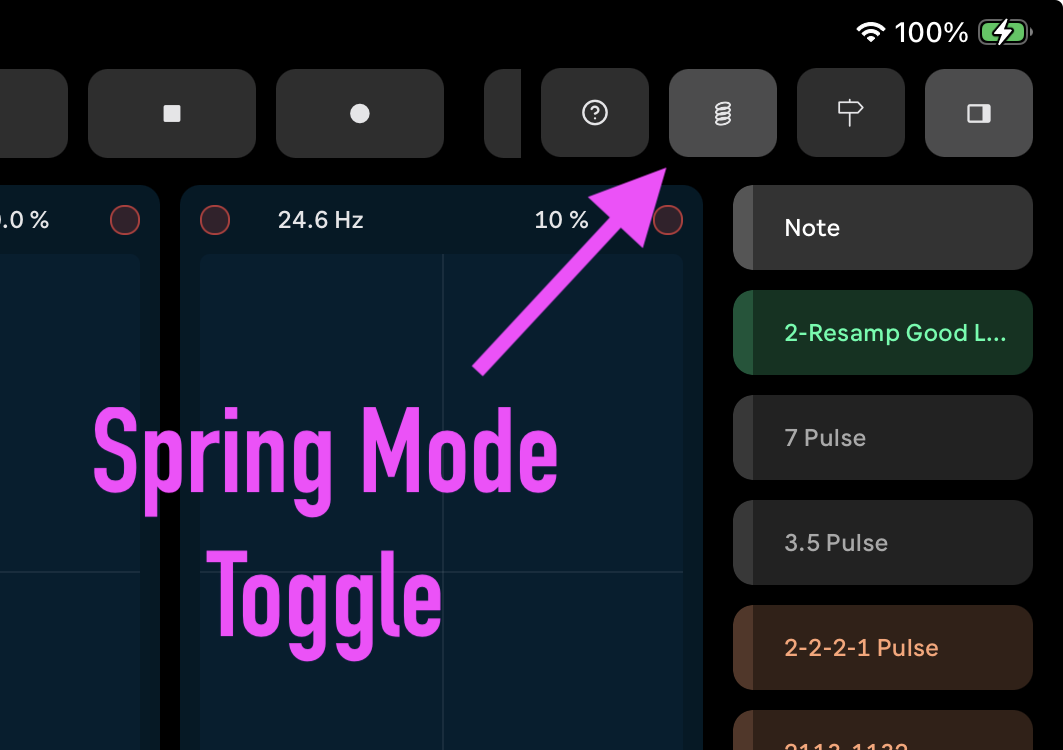
Spring (Momentary) Mode
Enable Spring mode from the toolbar to make sliders momentary. Touch a slider, drag to a new value, then release — the slider springs back to the value it had when you first touched it. It's a quick way to audition a change, ride a parameter during a performance, or add a one-shot emphasis without having to manually return to where you started.
Spring mode works on Knobbler sliders, X-Y pads, and mixer faders (volume, pan, and sends). Your Spring mode setting is remembered across app restarts.
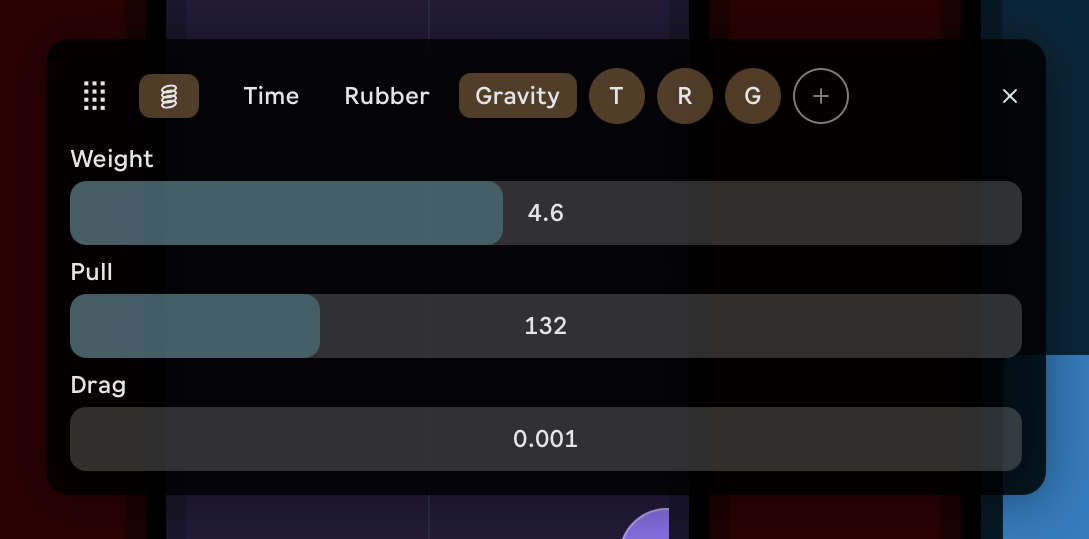
Experimental Spring Physics
Spring Physics adds a new layer of interaction on top of sliders and X-Y pads. Fling a slider or X-Y pad and it responds with gravity and rubber-band simulation, carrying the underlying parameter value along with it -- momentum, bounce, and settle, all driving the parameter in real time.
This is an experimental feature and is labeled as such in the app. Try it on resonance, filter cutoff, or an X-Y pad of effect sends and see what falls out.
Using Spring Physics
-
Tap the Spring button in the toolbar to toggle Spring mode on and off.
-
Long-press the Spring button to open the Spring Physics overlay, where you can choose between Time, Rubber, and Gravity behaviors and dial in Weight, Pull, and Drag.
-
Store the current settings as a preset by tapping the + icon in the overlay. Stored presets appear as small lettered chips (T / R / G) you can recall later.
-
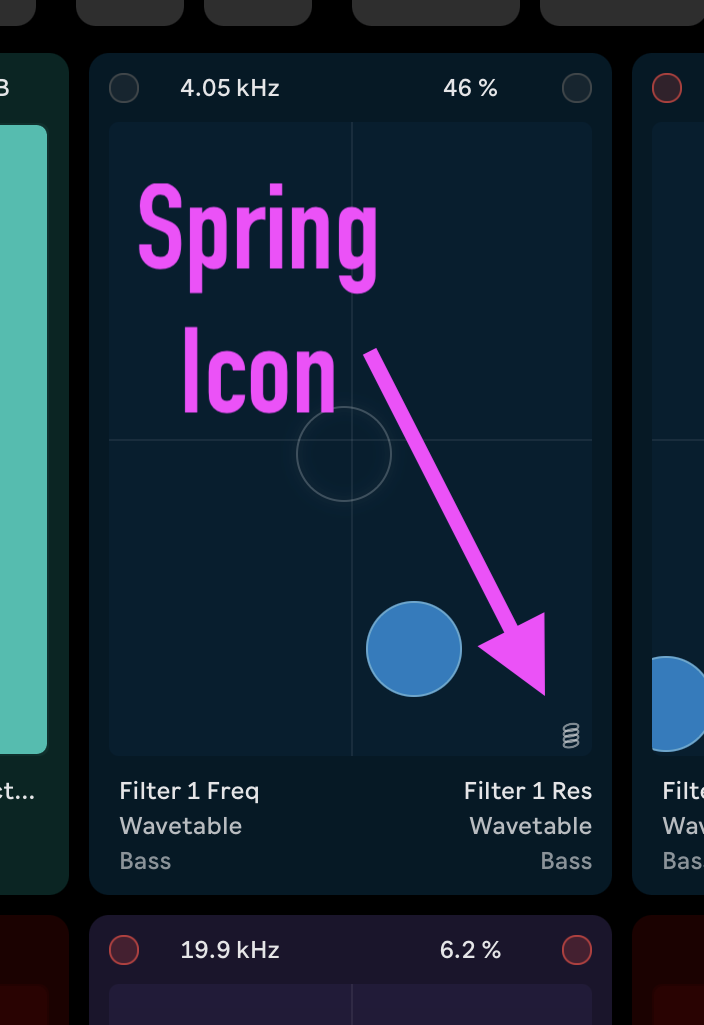
Recall a stored preset for a specific parameter by tapping the spring icon next to that parameter (shown above in the corner of an X-Y pad).
-
Double-tap the spring icon to cancel an in-flight animation on that parameter.
X-Y Pads
Two adjacent Knobbler sliders can be linked into an X-Y pad, giving you two-dimensional control over a pair of parameters with a single finger.
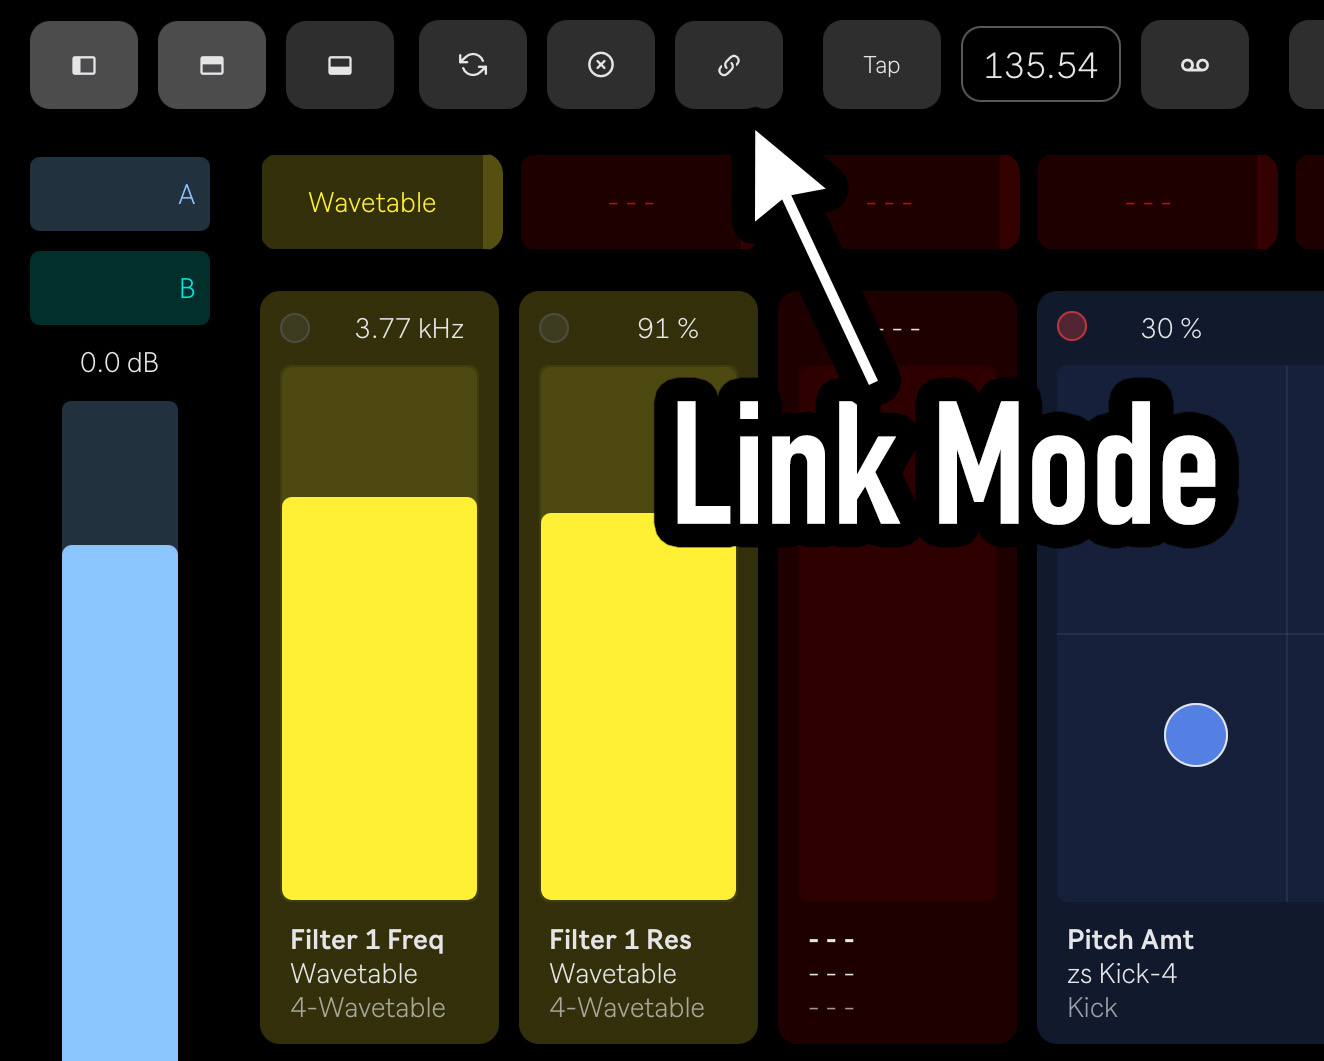
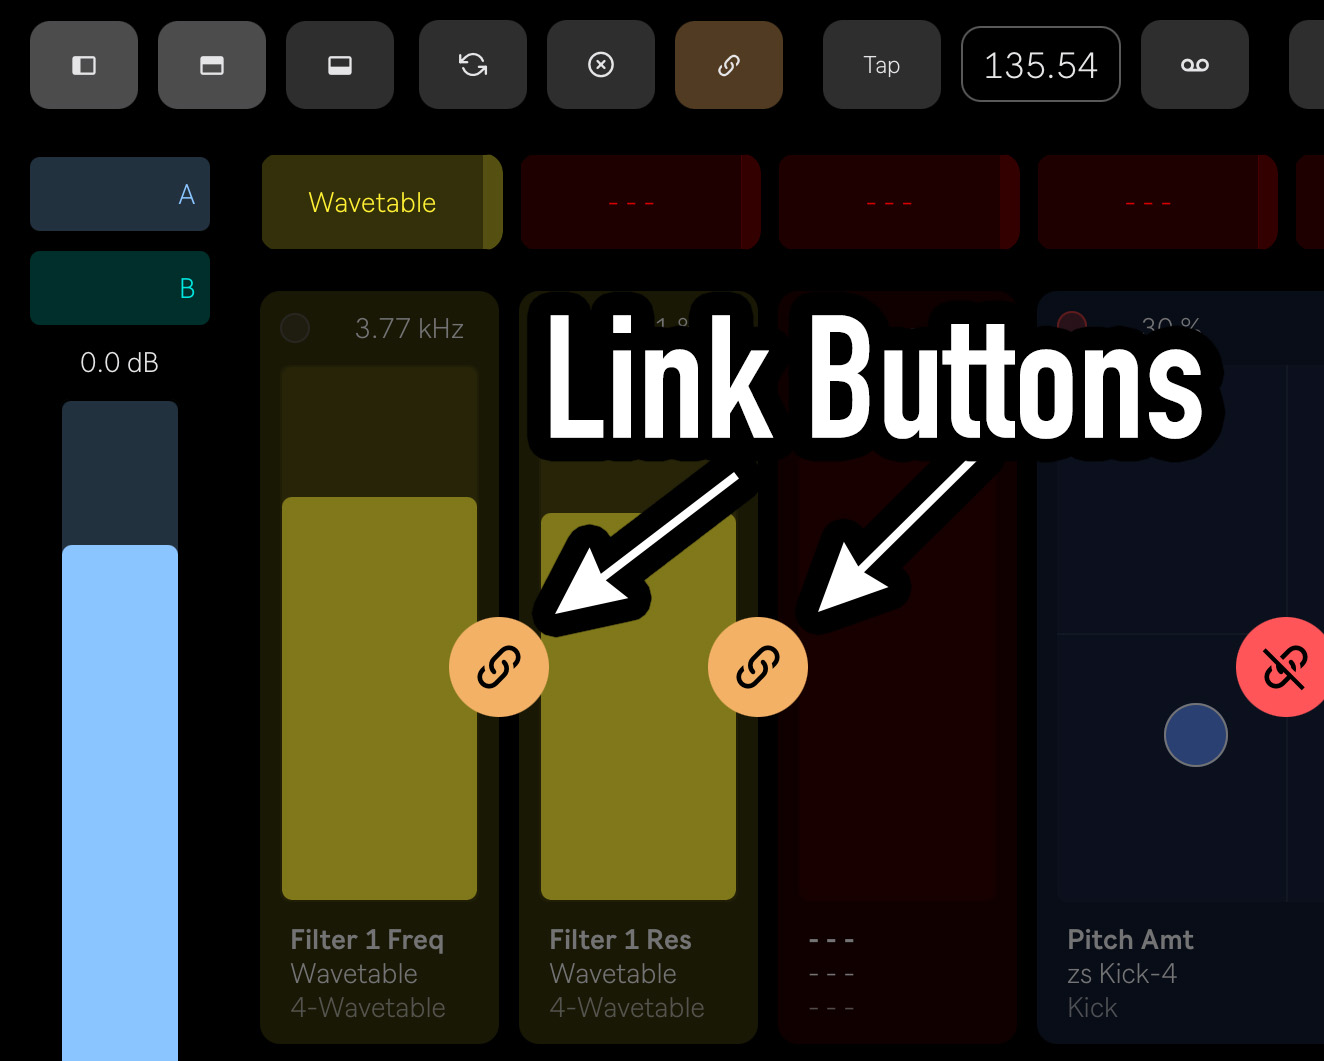
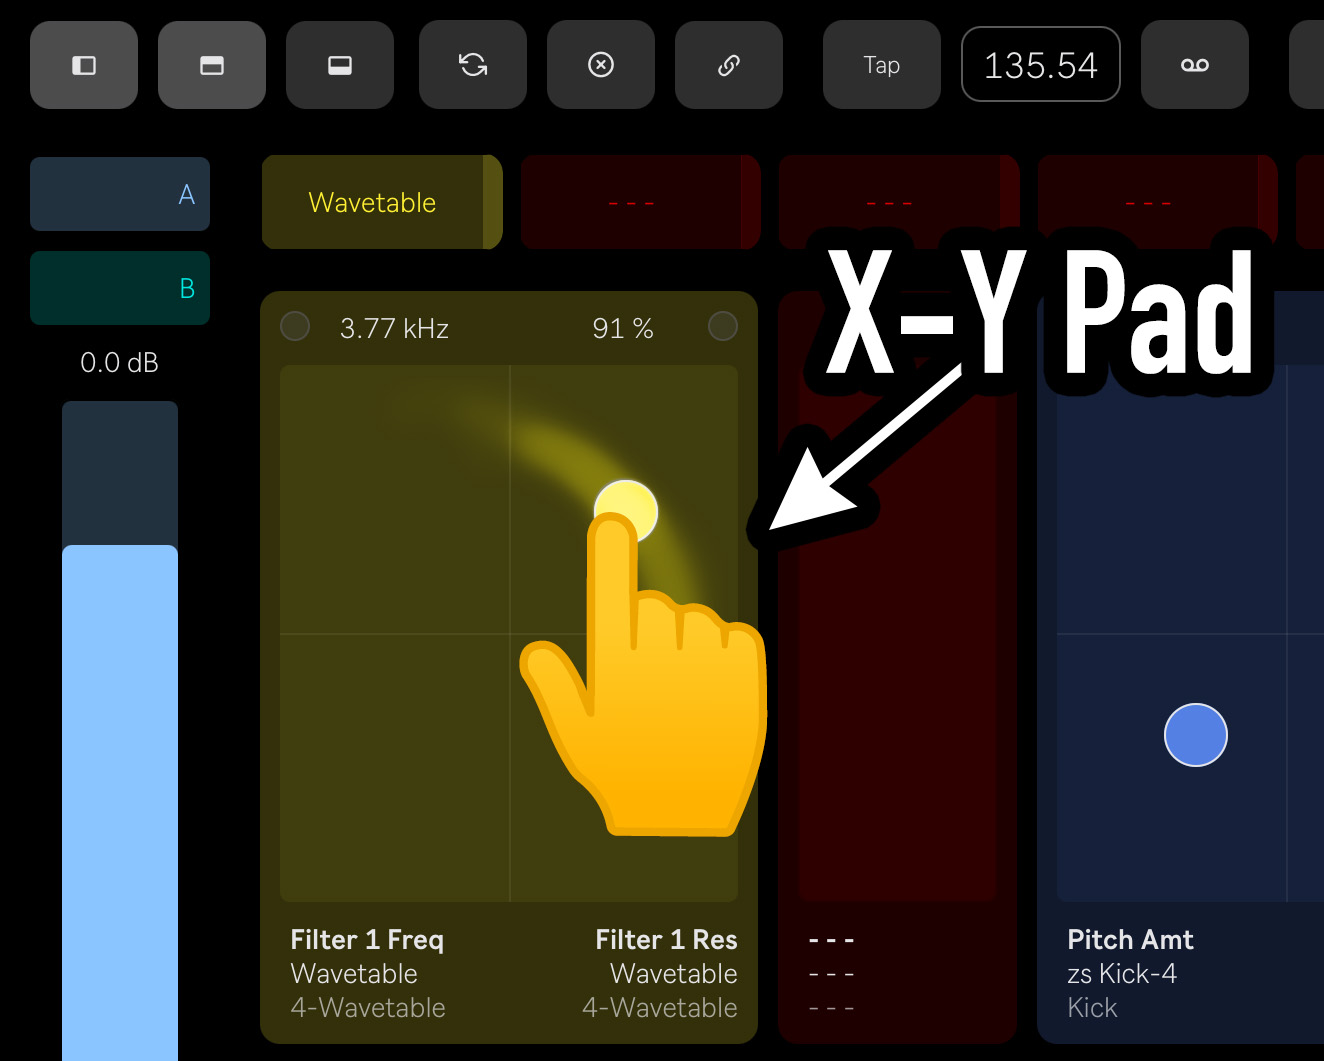
To create an X-Y pad, tap the Link button in the toolbar, then tap between two adjacent sliders to combine them. The two sliders will be replaced with an X-Y pad. The left slider controls the X axis and the right slider controls the Y axis.
To split an X-Y pad back into two individual sliders, tap the Link button in the toolbar, then tap the X-Y pad you want to split.
X-Y pad assignments are saved per page and persist with your Live Set.
Select Track
Tap anywhere in the text area below a Knobbler slider or X-Y pad (track name, parameter name, or value) to select that track in Live, which will update the channel strip on the left side of the screen. This is a convenient way to access the mixer controls for a parameter you have mapped.
Bluhand Page
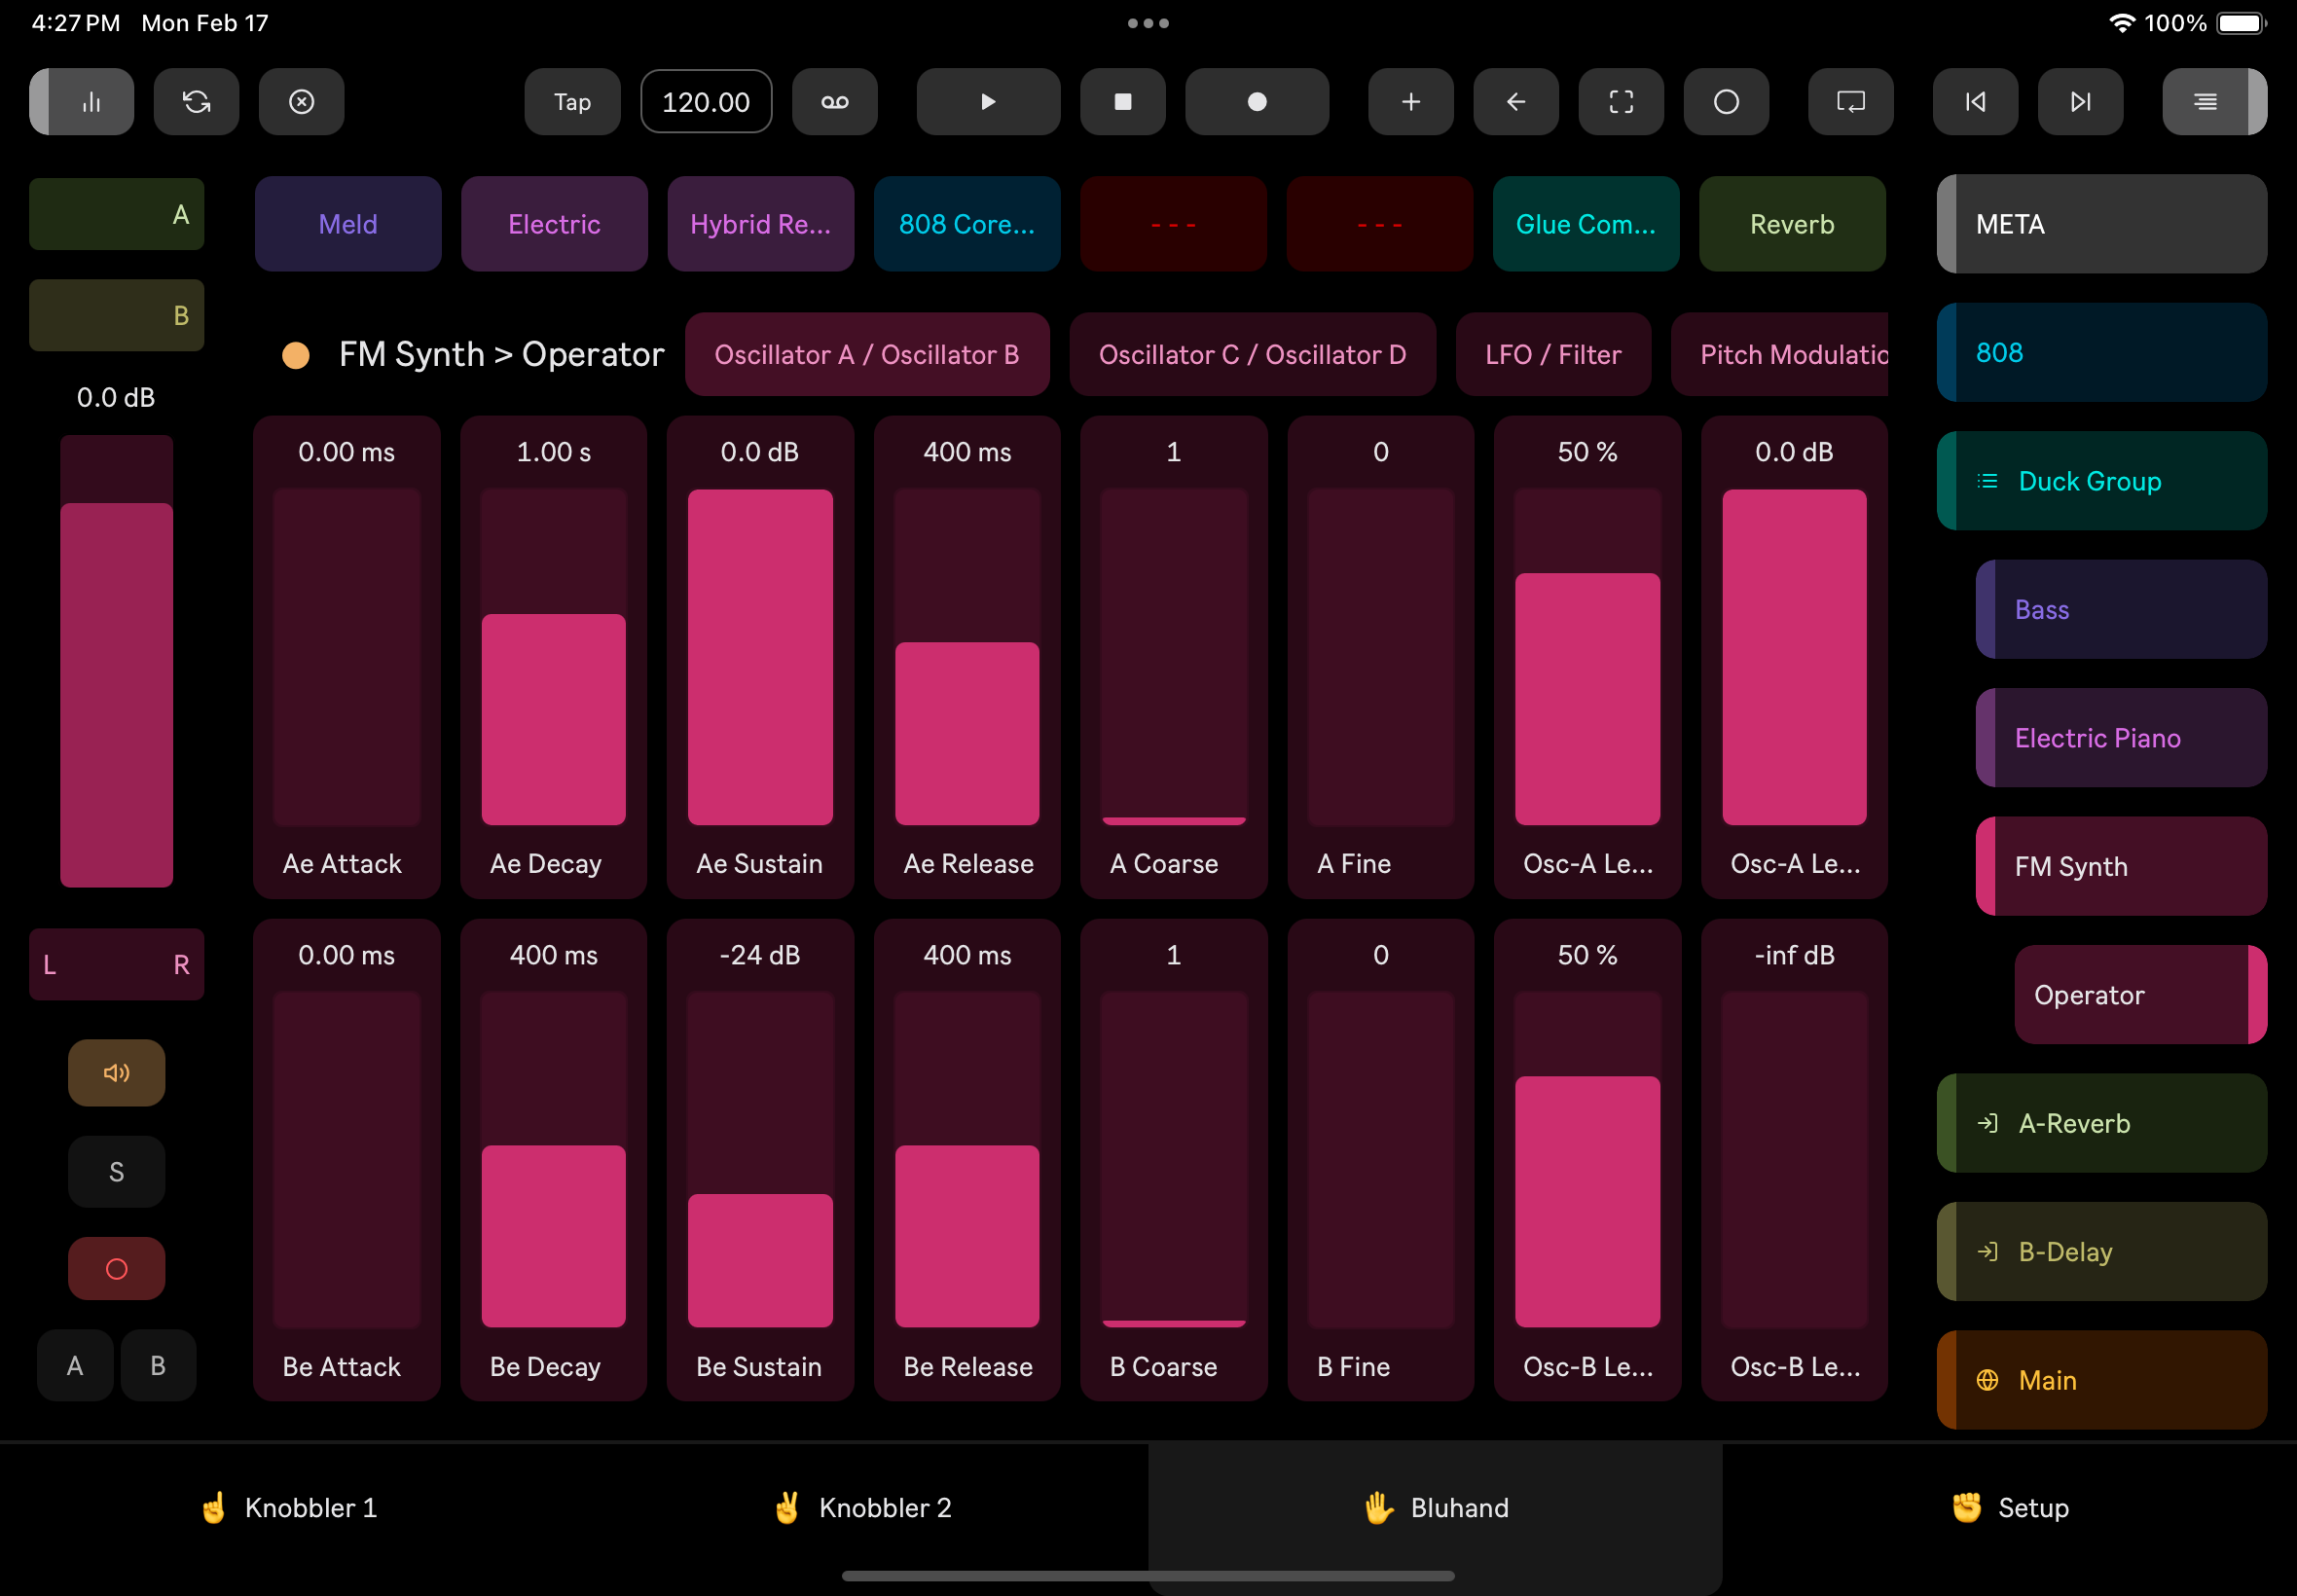
Bluhand gives you a parameter-focused view of the currently selected device.
Parameter banks are shown above the sliders. In the case of racks, Variations controls are shown.
The device can be toggled off and on with the orange button next to the device title.
Make sure you do not turn off the Knobbler device! Otherwise you will have to turn it back on using the mouse. :)
Default Value
All sliders in Knobbler respond to a double-tap by resetting the parameter to its default value. Double-tap to default.
Variations Support
When a Rack is selected, the space normally used for Parameter Banks changes to show Variations controls.
Stored variations are shown with the numbered buttons. Unfortunately, Ableton Live does not provide apps like Knobbler access to the variation name.
The selected variation is shown with a brighter button.
Tap the Camera icon to store a new variation.
Tap the Dice icon to randomize the Rack's Macro controls.
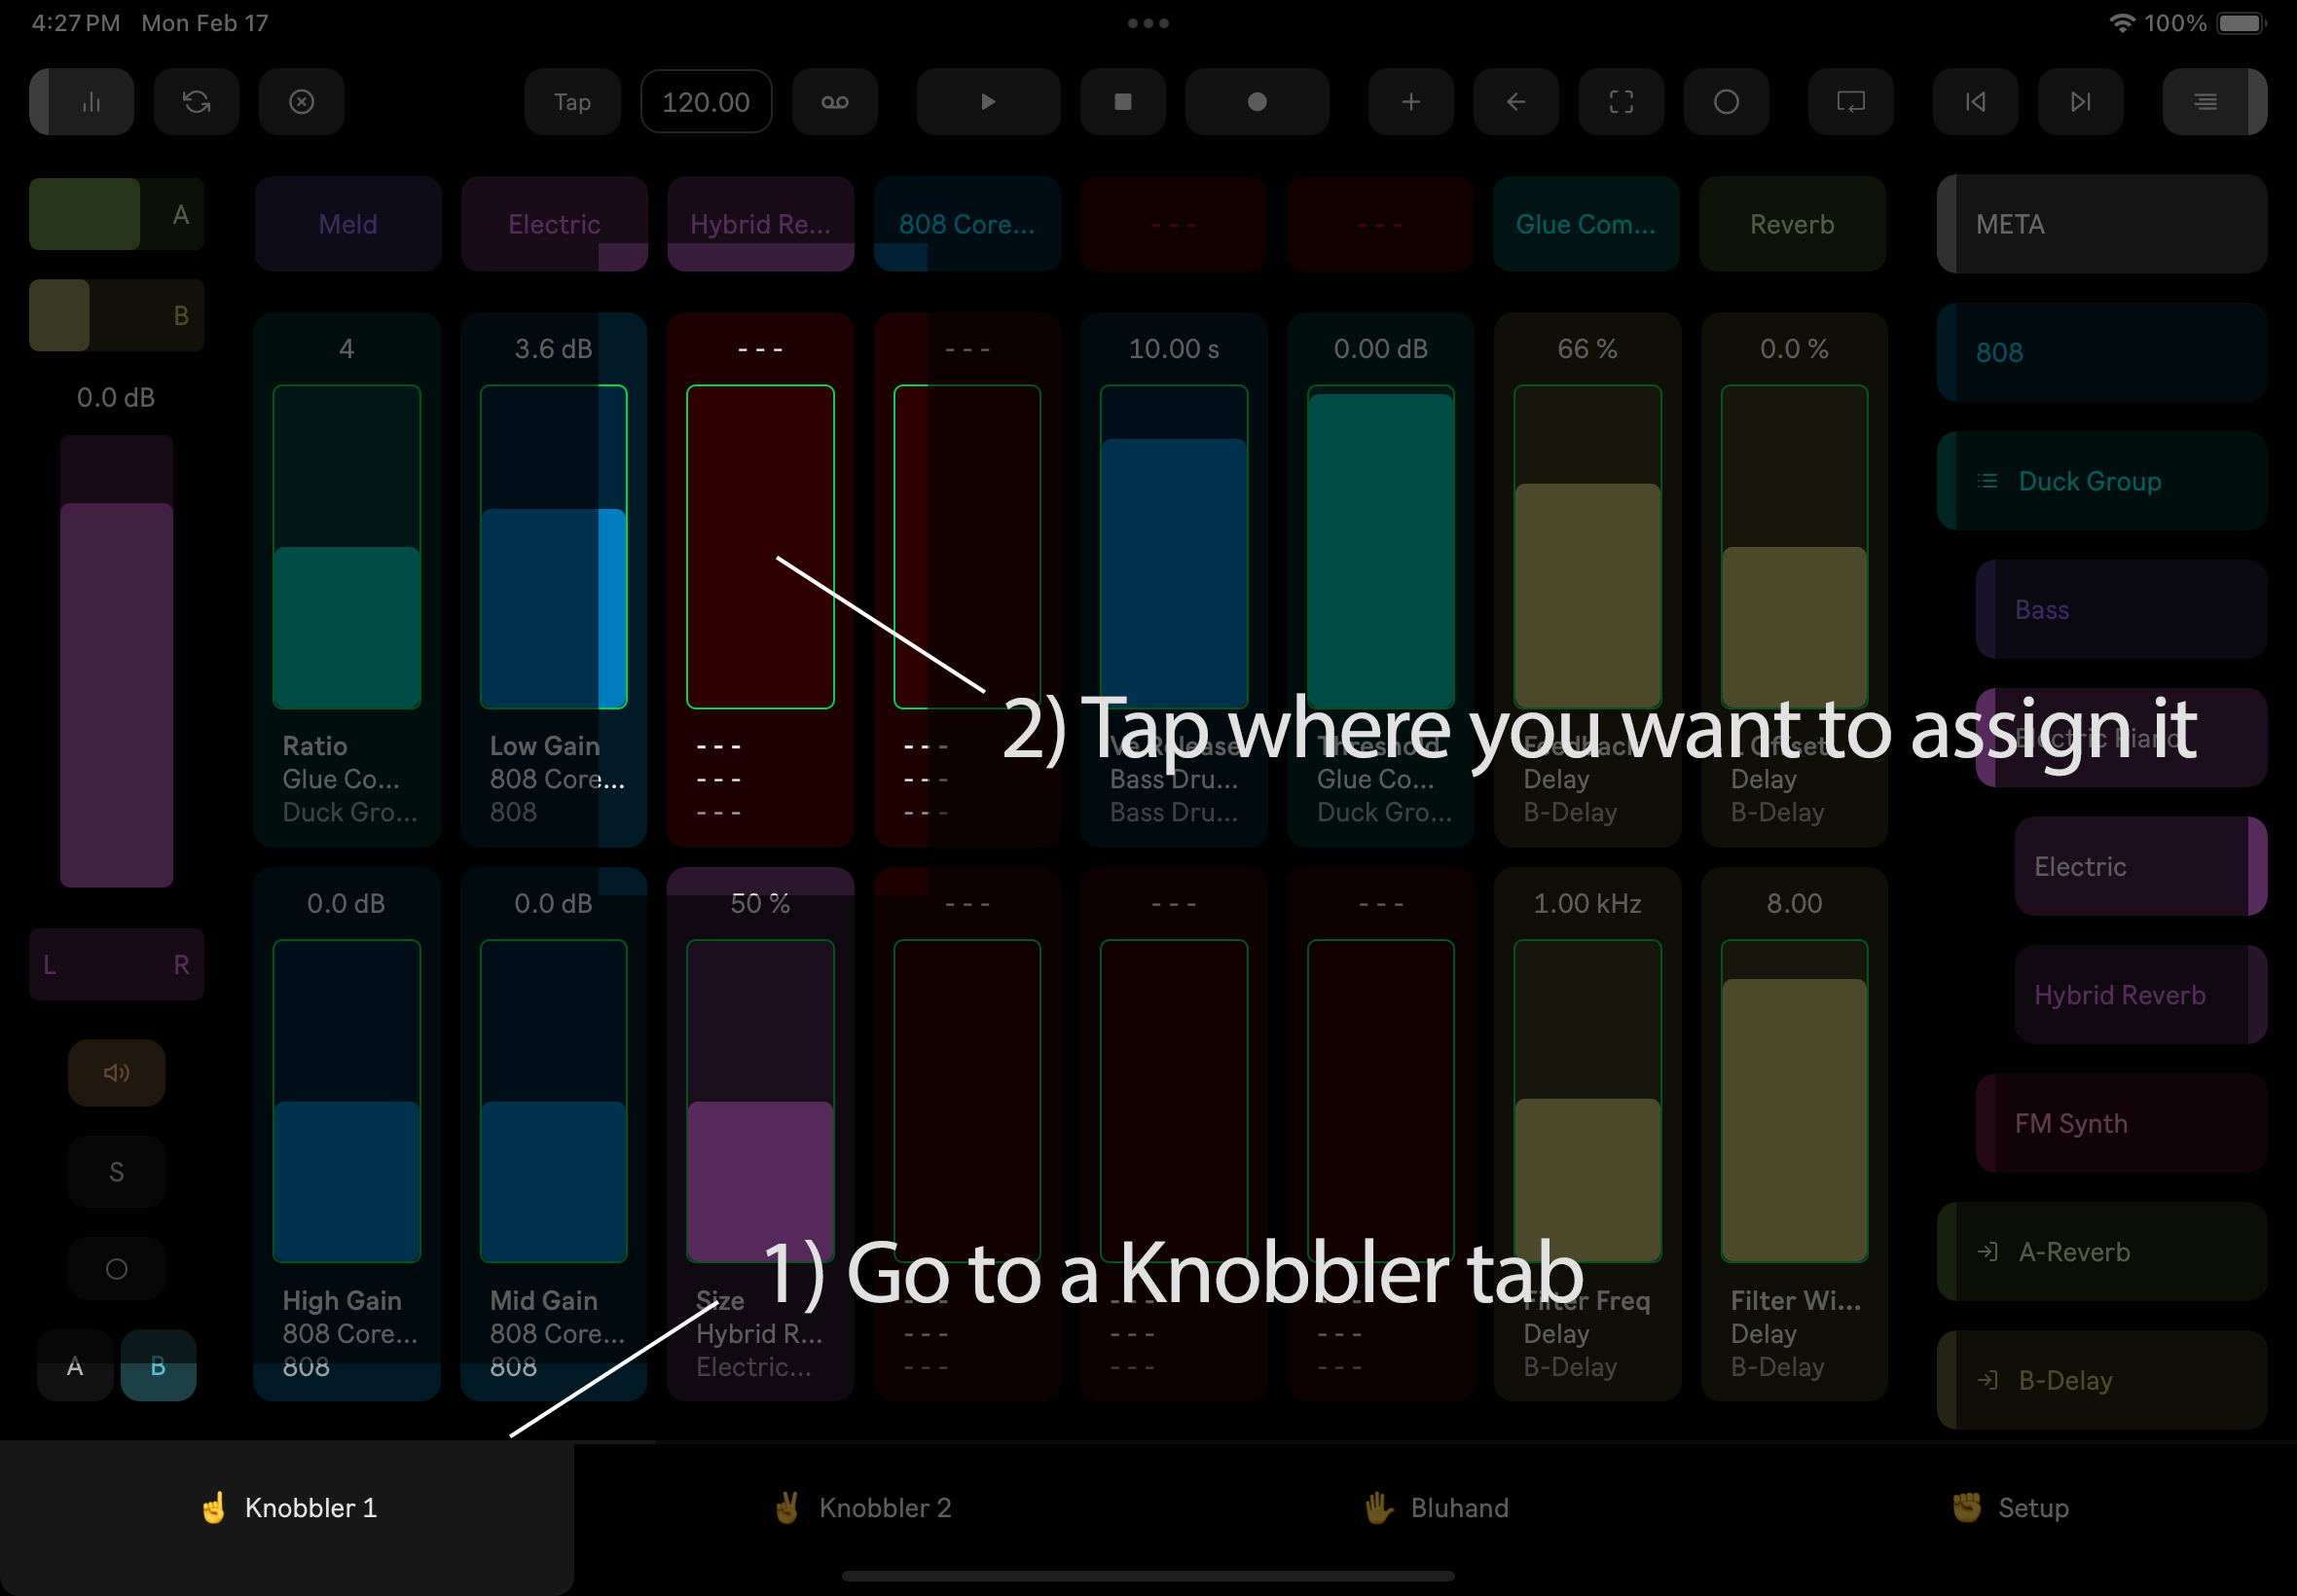
Fast Mapping to Knobbler
Tap a parameter name on a Bluhand slider to enter Knobbler mapping mode. The slider above that parameter name will get a bright green border. Then if you visit the Knobbler 1 or Knobbler 2 page, every slider there will have the same green border. Tap one of those sliders to map that parameter to that Knobbler fader. Fast!
Step by step:
On the Bluhand page, tap a parameter name. The parameter's slider will get a green outline.
Then go to a Knobbler page. All of the sliders will be highlighted in green. Tap any of them (even one that is already mapped) and it will be replaced.
Device Shortcuts
Toward the top of the Knobbler and Bluhand pages, there are eight buttons that you can use to instantly jump to the most important devices in your Live Set.
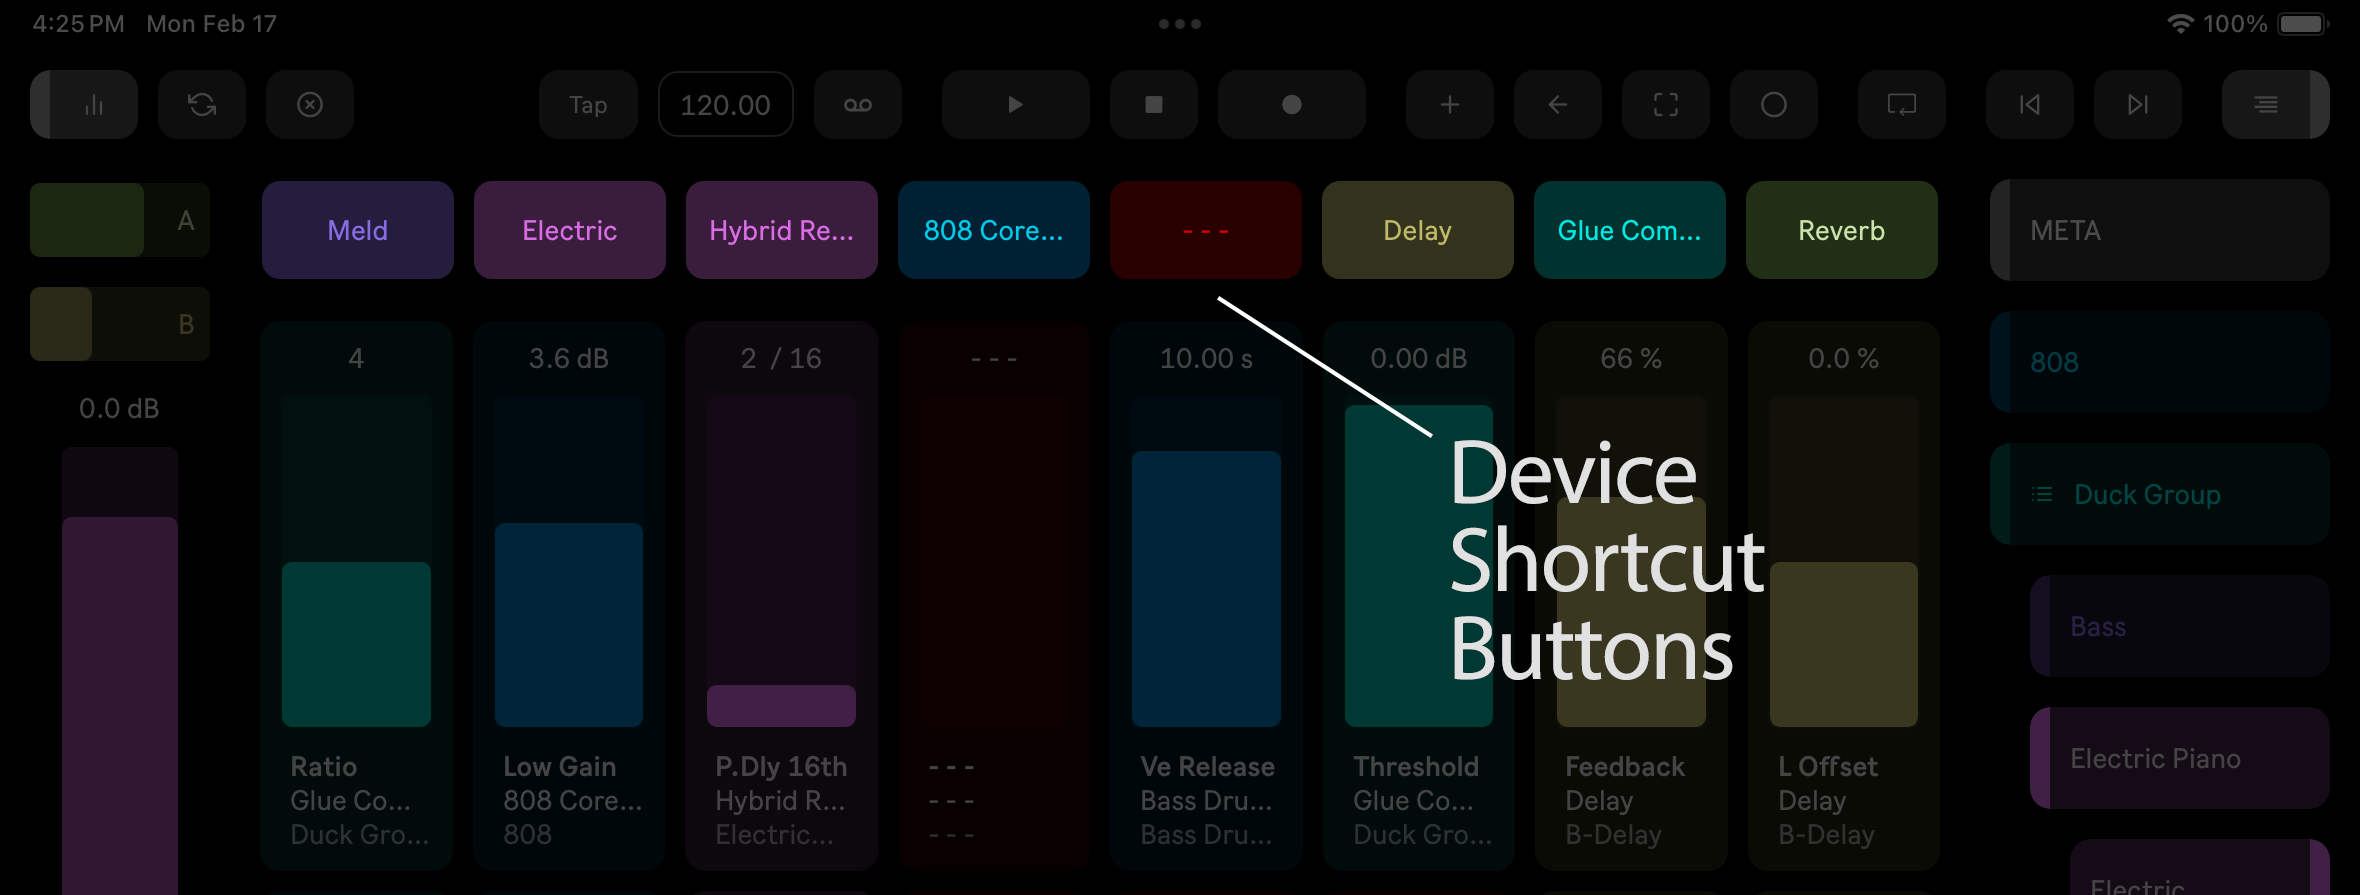
Mapping
With the device you would like to map to a button shown in the Bluhand page, tap an unassigned button. You're done!
Unmapping
Tap the Unmap button in the toolbar to enter Unmapping mode. All of the shortcut buttons will be given a red border.
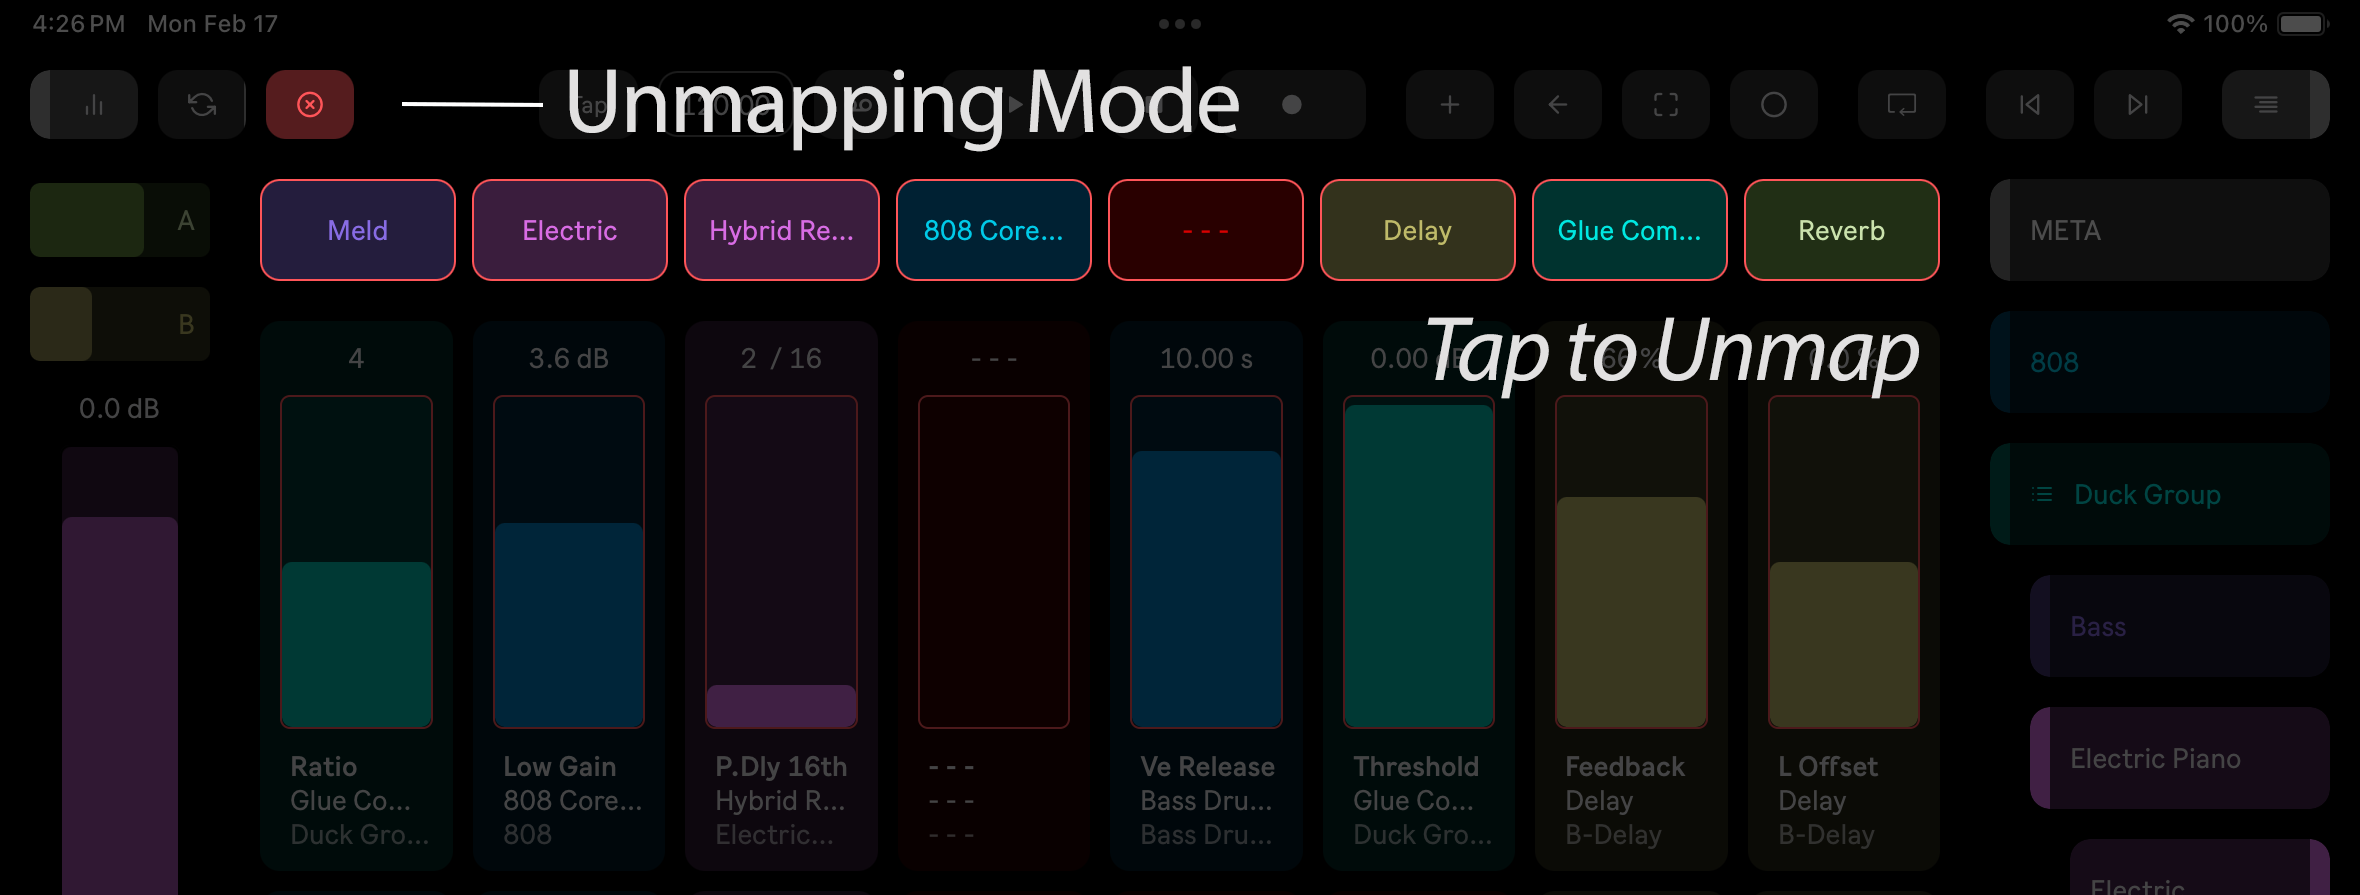
Tap any of the buttons to unmap them.
Tap the Unmap button again to exit Unmapping mode.
Using the Shortcut Buttons
Regardless of whether you are on a Bluhand or Knobbler page, tapping a shortcut button will take you to the Bluhand page with that device selected.
Current Parameter
The current parameter display shows information about whichever parameter is currently selected in Live. When you click a parameter in Ableton, the app automatically updates to show the parameter name, device name, track name, track color, current value, and the min/max range.
The current parameter display is always visible on the Navigation page, giving you constant feedback as you work.
Lock
You can lock the display to a specific parameter so it stays visible even as you click around in Live. Unlock to resume following the selected parameter.
Control
The current parameter can be adjusted directly from the app via a slider. Double-tap to reset to the default value.
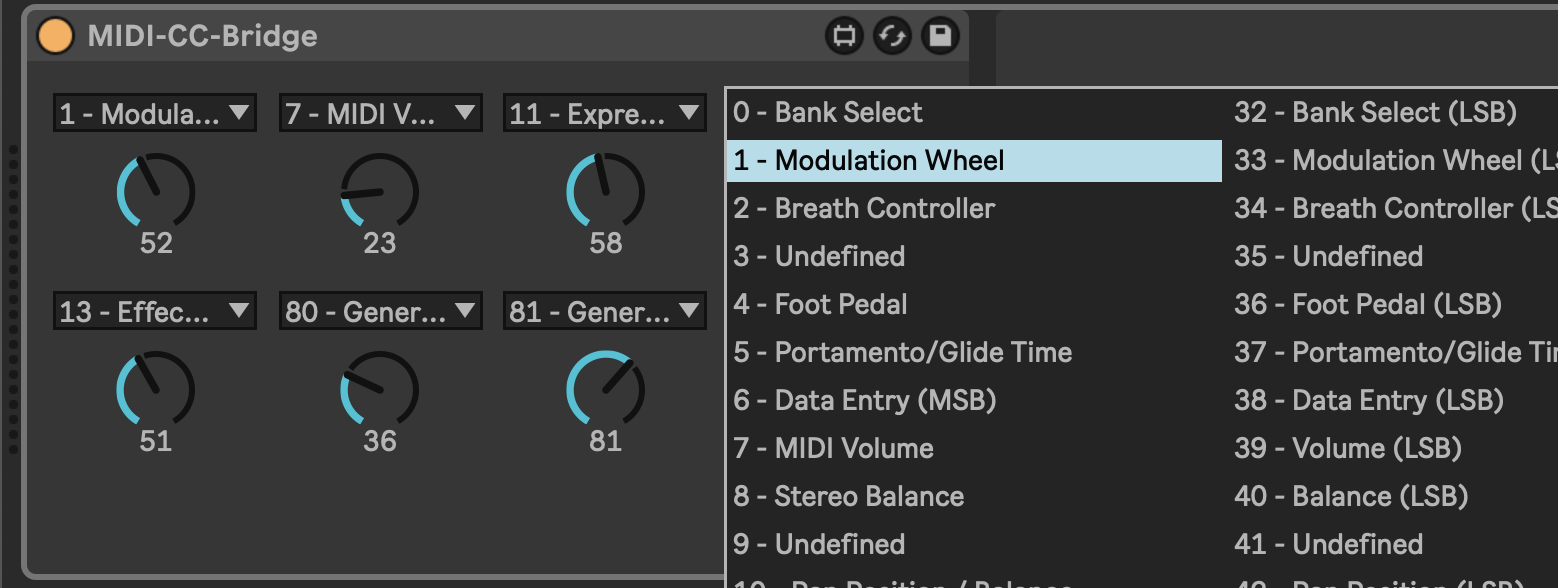
External Hardware
You can use Knobbler with external hardware in conjunction with a device like the CC Control device that comes with Live 12. Note that as of what is shipped in Live 12.1, CC Control has a defective API implementation and does not work properly with Knobbler. Until that device is fixed, you can download and use my free device called MIDI CC Bridge.
Navigation

Move around your Live Set with more speed and ease than ever before!
Tap a track to open it. Tap a device to select it and show its parameters in the Bluhand page.
Tracks have a highlight on their left edge, devices are highlighted on the right.
Group tracks and racks are indicated with a list icon. Tap a Rack to show its chains. Tap a chain to see devices inside that chain.
Sometimes track colors or names may get out of sync. Tap the Refresh button in the Toolbar to fix this.
Channel Strip
Take full control over the mixer controls for the currently selected track.
Tap the button to show the Channel Strip, or swipe it in from the left side.
Sends
Each send track in your set is represented, including its color. If there is not enough space to display all of the sends, then you can swipe up and down to scroll between them.
Slide left and right to increase or decrease the amount sent.
Volume
This is the mixer volume for the track. Its color will be the same as the selected track color.
Pan
Slide left and right to control the pan position.
Mute
Toggle whether the track is muted.
Solo
Toggles the track's solo state. Respects the user preference around exclusive solo.
Record Arm
Tap to toggle this track's record arm state. Respects the user preference around exclusive arm.
Toggle Record Enable
A long press on the Record Arm button will disable input entirely. This is useful if you are in Arrangement view and you want to record automation over existing MIDI clips and you do not want to change the clips. Otherwise, the MIDI clips are all merged into a single clip and it gets annoying. Tap the record arm button again to re-enable inputs and arm the track for recording.
Crossfader Controls
On tracks and return tracks, an A or B button are shown, which allows you to assign that track to one side of the crossfader or another.
If you select the Main track, the A/B buttons are replaced with a crossfader slider.
Default Value
All sliders in Knobbler respond to a double-tap by resetting the parameter to its default value. Double-tap to default.
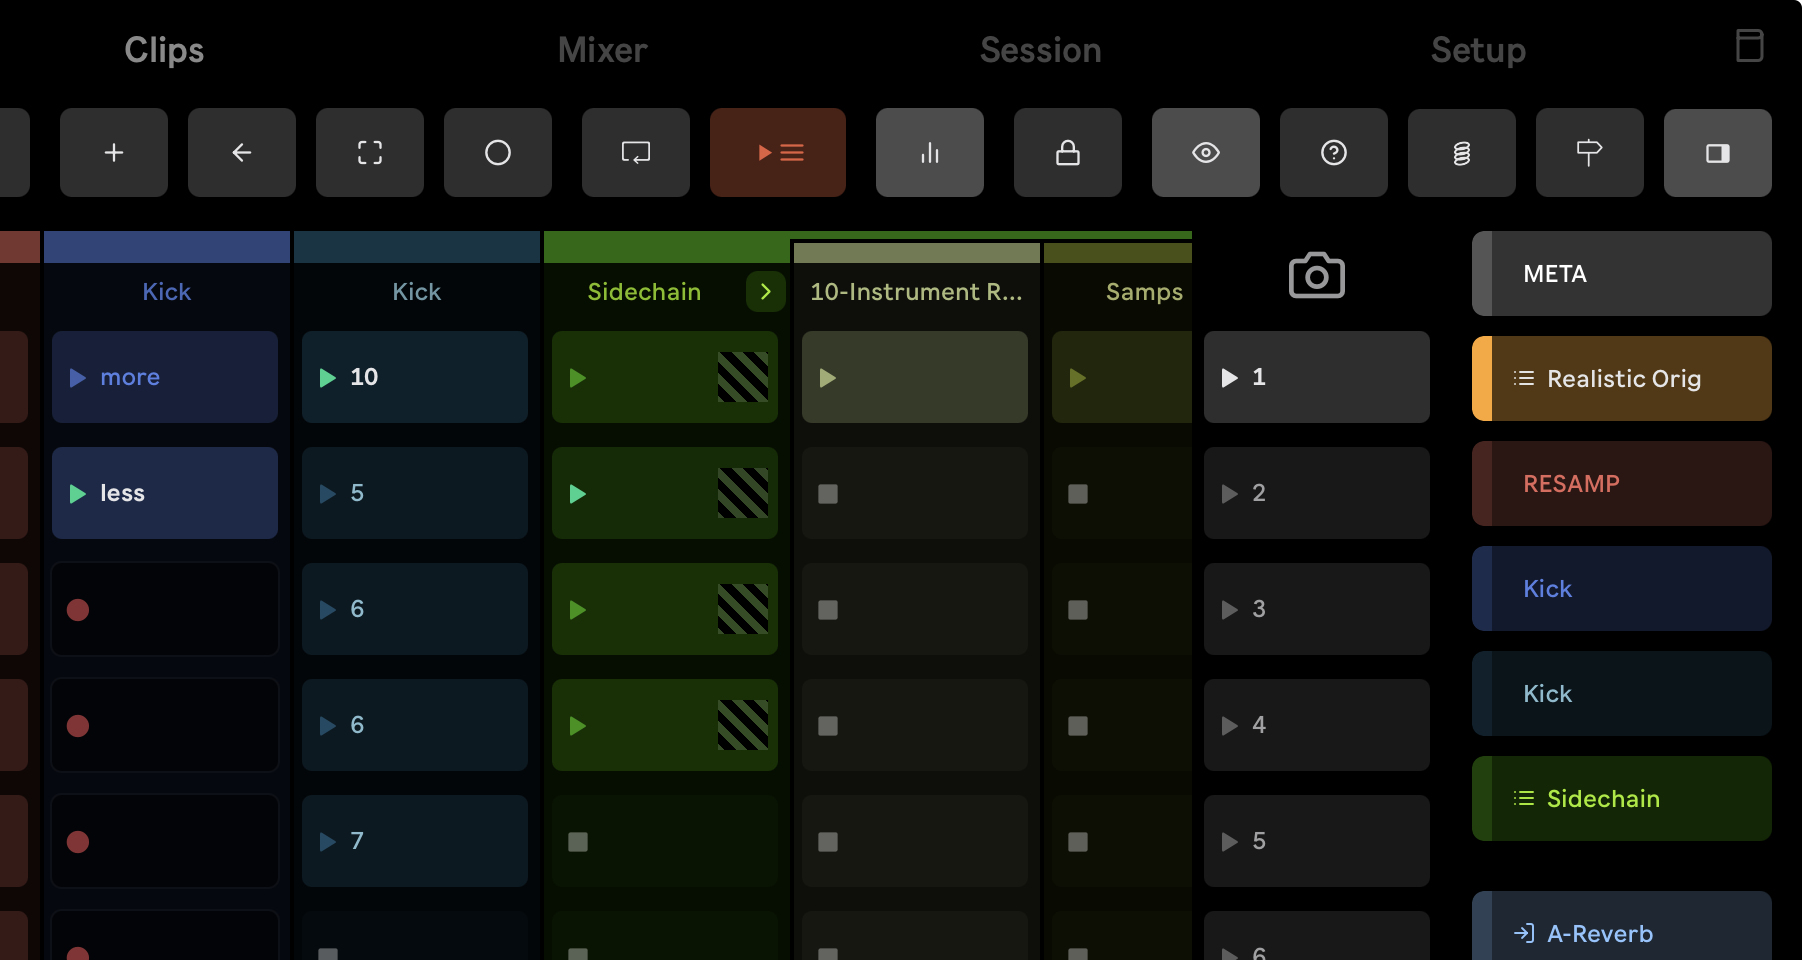
Session View Clips
A full session view clip grid right on your device. Launch, record, rename, and color clips and scenes without touching your mouse. Real-time playback state, group track folding, scene management, and more.
Multi-Track Mixer
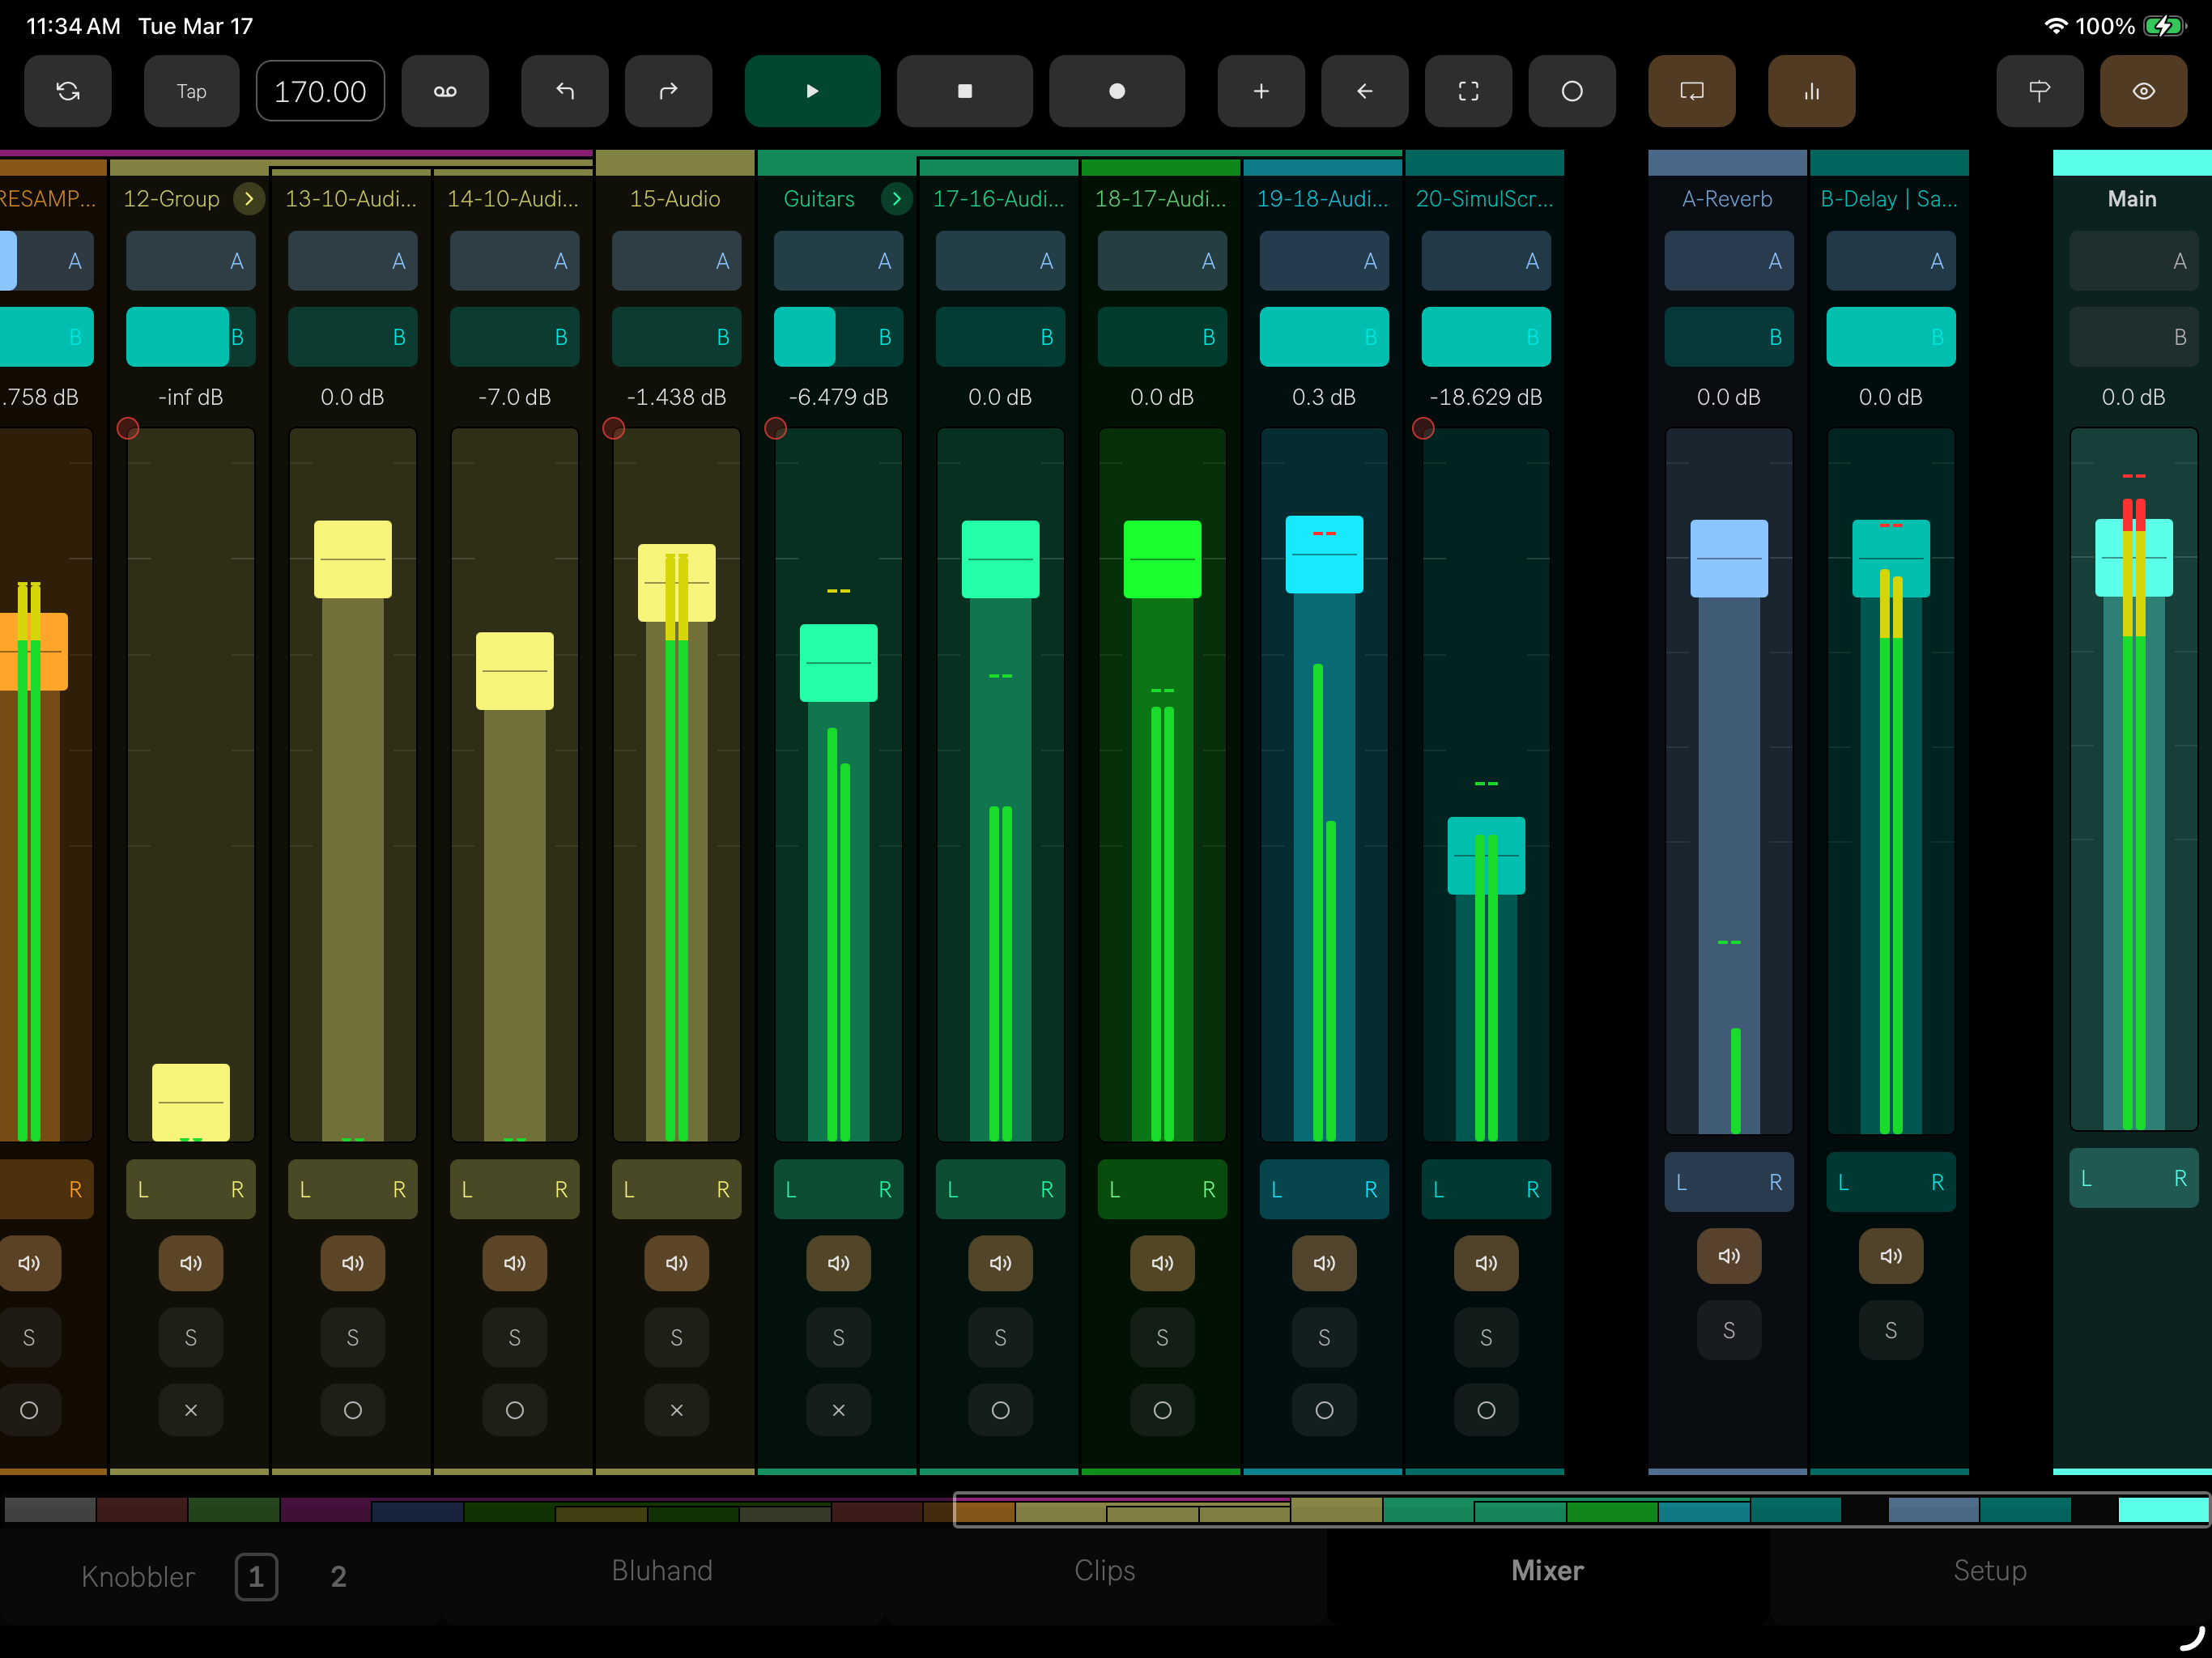
The multi-track mixer provides a full-screen, horizontally scrollable view of all tracks in your Live Set. It gives you hands-on control of volume, pan, mute, solo, record arm, sends, and crossfader assignments across multiple tracks at once. Only the tracks visible on screen are actively monitored, so it stays responsive even with large sets.
Volume and Pan
Each strip has a volume fader and pan control. Double-tap to reset either to its default value. Volume automation state is shown with a colored indicator, matching the same automation dot colors used on Knobbler knobs (green for controlled, red for recorded automation, grey for overridden).
Tap the volume value to open a dedicated pan and send control window.
Mute, Solo, and Record Arm
Toggle mute, solo, and record arm per strip. Record arm respects the exclusive arm preference. Disabling input is also supported for recording automation over existing MIDI clips.
Sends
Send levels for up to 12 return tracks are available per strip. Send colors match their corresponding return track colors.
Crossfader
Assign tracks to crossfader side A or B directly from the mixer.
Meters
Output level meters are shown for all visible strips, displaying left channel, right channel, and combined output levels in real time. Toggle their display with the Meters button in the toolbar (on the right, looks like a graph).
Cue Points & Transport
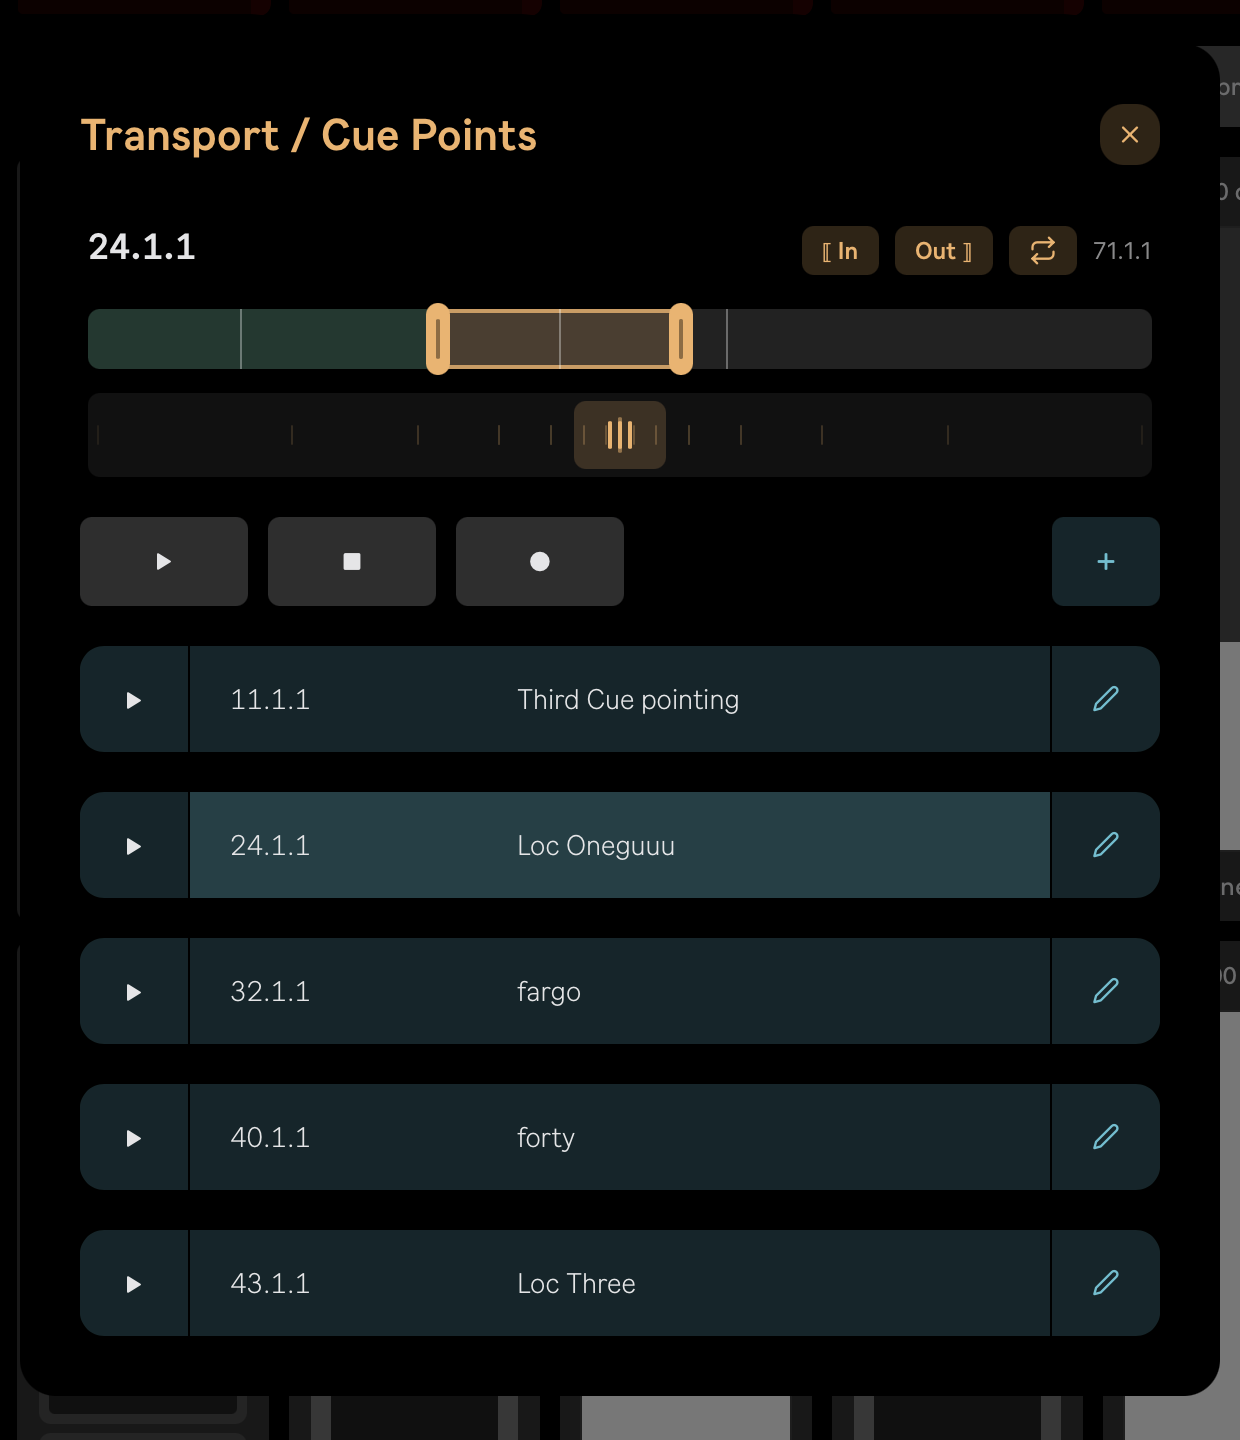
Tap the Cue Points button in the Toolbar to open the Transport / Cue Points window — a focused view of the Arrangement timeline, its loop, and its locators. (Requires Knobbler device v63 or newer.)
Playhead and Scrubbing
The current playhead position is shown at the top left in bar.beat.16th and updates live as the song plays; the total song length is shown on the right. Drag the timeline to scrub the playhead to any point in the arrangement, or use the jog strip below it to nudge the position for finer placement.
Transport
Play, Stop, and Record are available right in the window, so you can start, audition, and capture a section without leaving the page.
Loop
The Arrangement loop region is drawn as a brace on the timeline. Drag either handle to move the loop's start or end. The ⟦ In and Out ⟧ buttons snap the corresponding loop edge to the current playhead position, and the loop toggle (the cycle icon) turns the Arrangement loop on and off.
Cue Points (Locators)
Every Arrangement locator is listed with its position and name, and the one the playhead currently sits in is highlighted:
- Tap the play icon on a row to jump the playhead to that cue point.
- Tap Set Cue (the + button) to drop a new locator at the current playhead position.
- Tap the pencil icon to rename a cue point — or delete it — from the edit view.
Cue points and the playhead position are re-sent whenever the app reconnects, so the window always reflects the current state of your set.
Toolbar
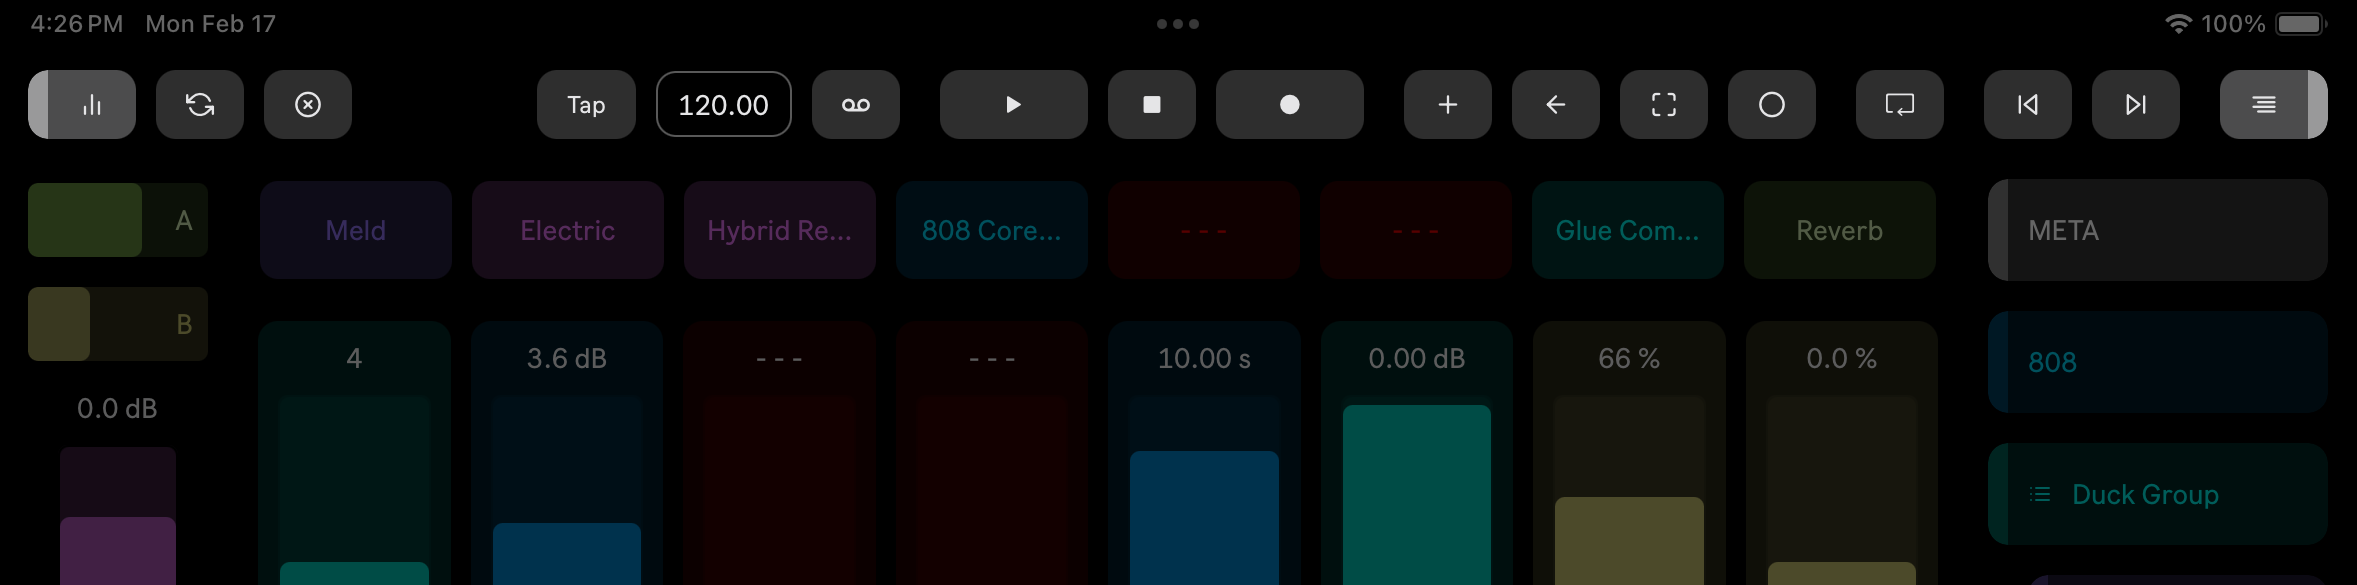
Knobbler's toolbar echoes a lot of the items Ableton Live's toolbar, with some Knobbler-specific additions.
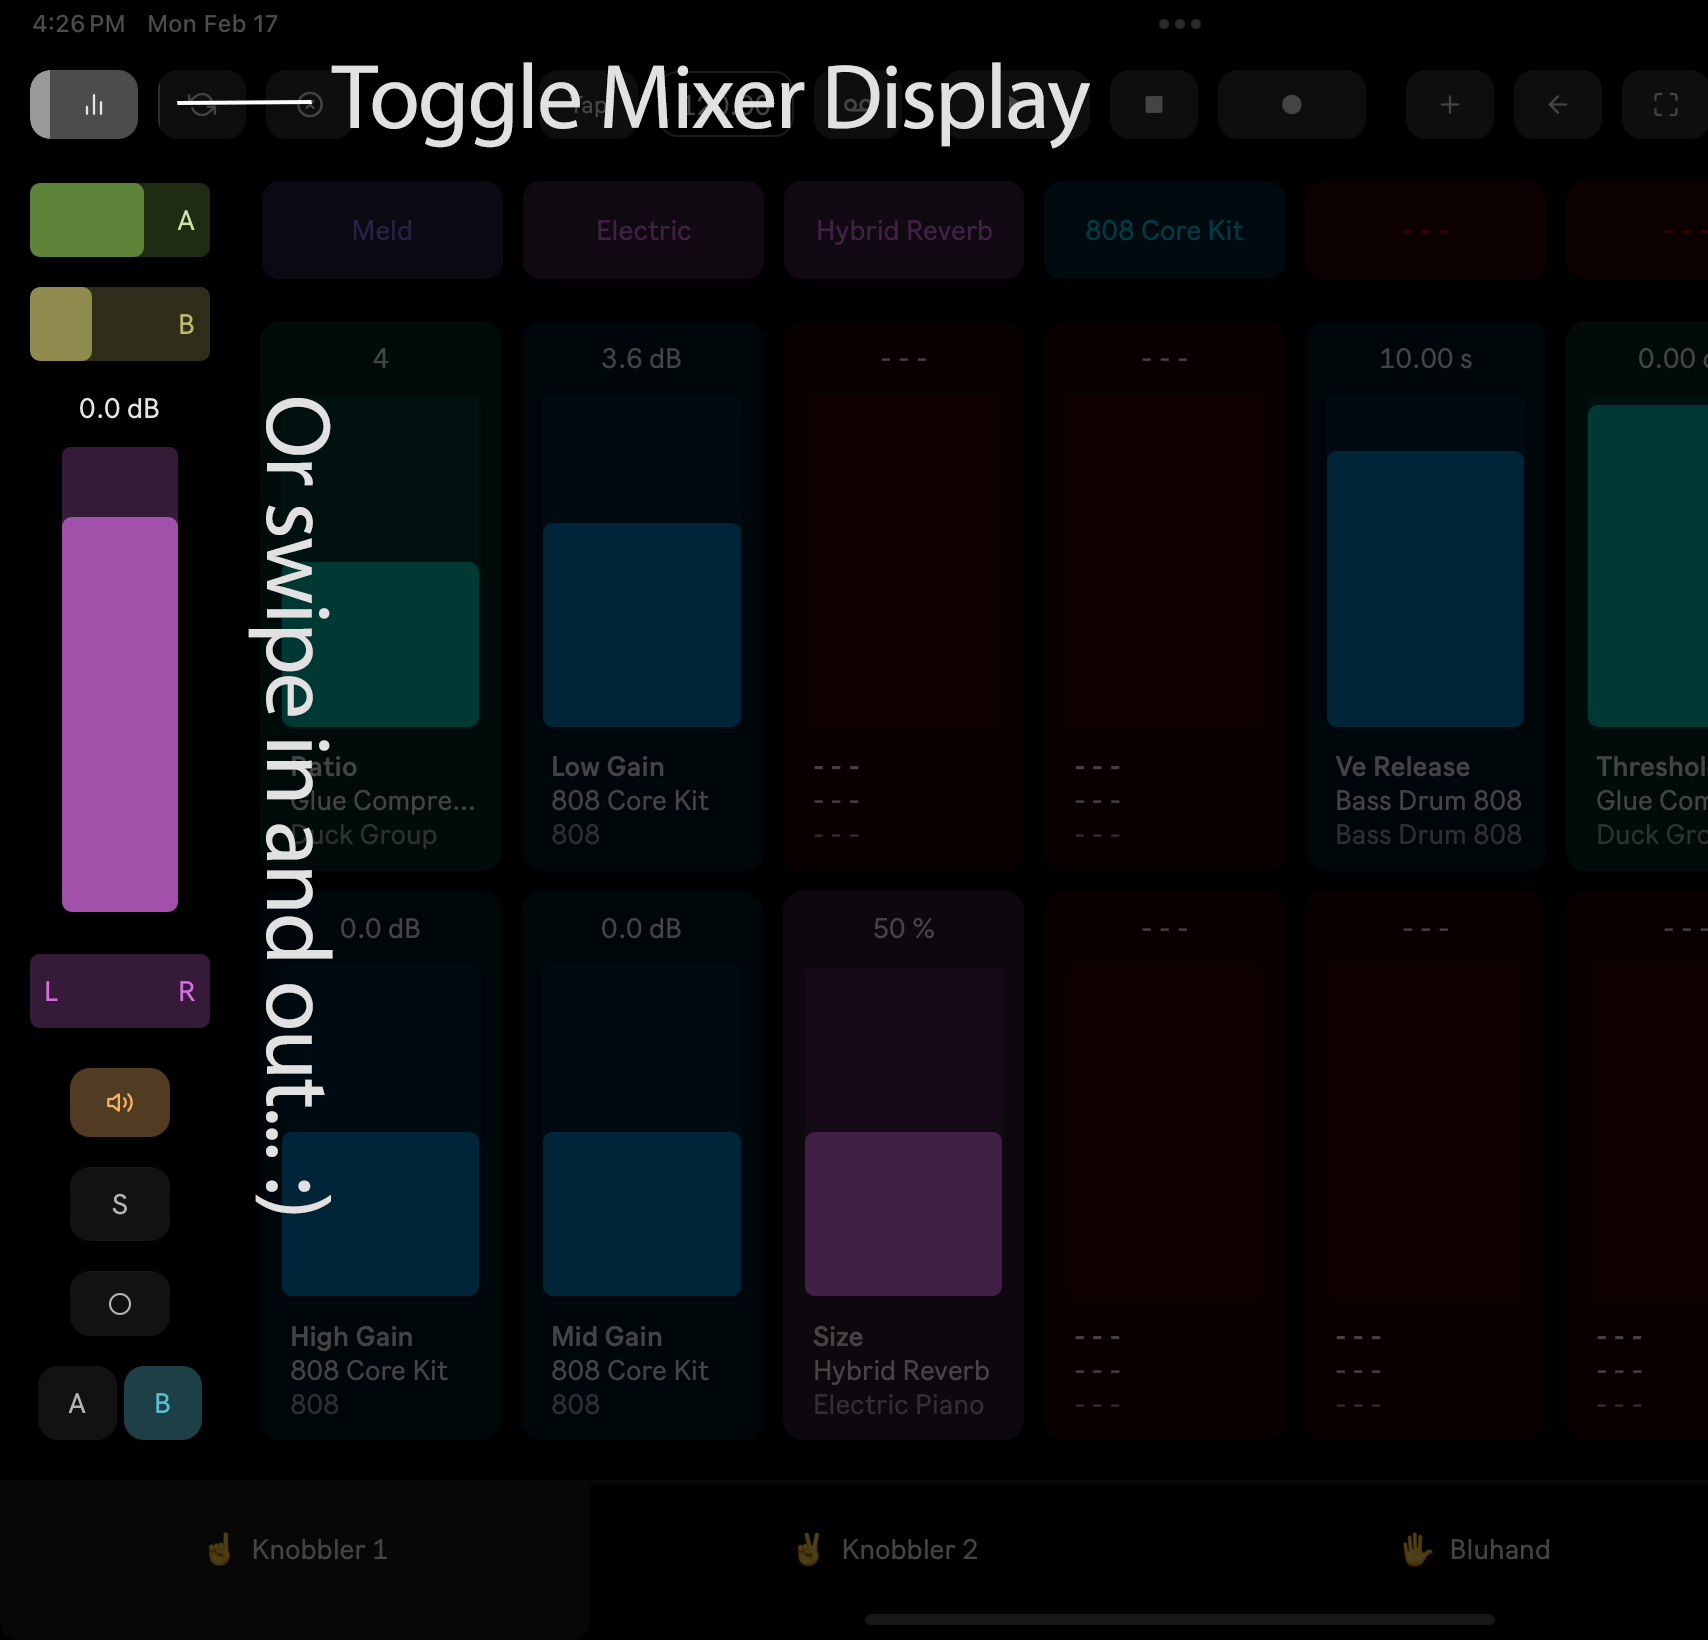
Show / Hide Channel Strip Mixer
Toggle the appearance of the channel strip on the left edge of the screen. You can also swipe sideways from the edge to show and hide it.
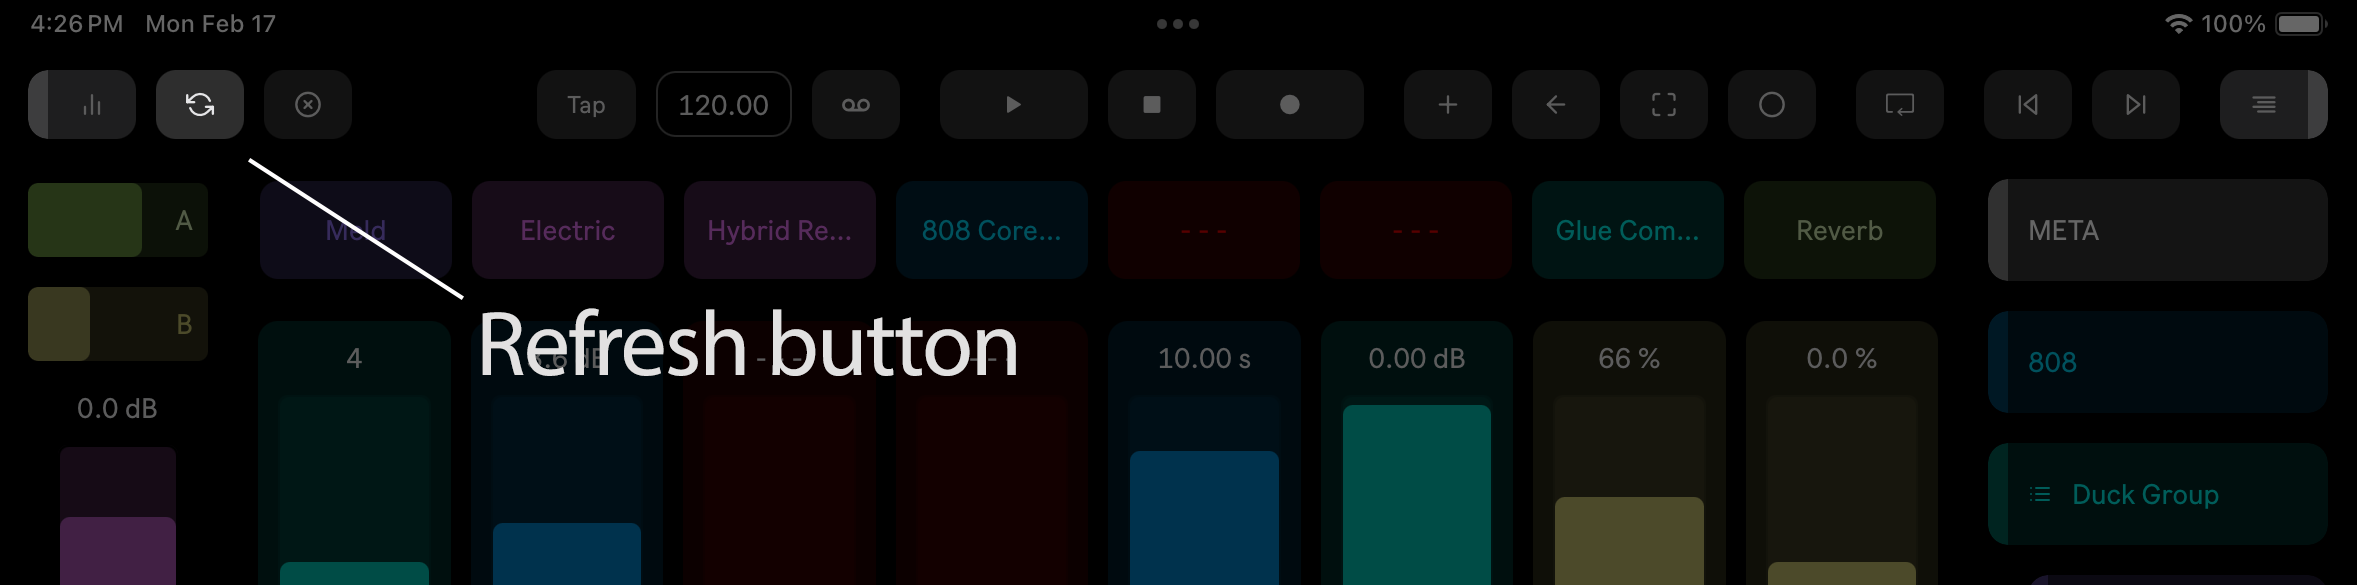
Refresh Display
Requests an update of all data from the computer.
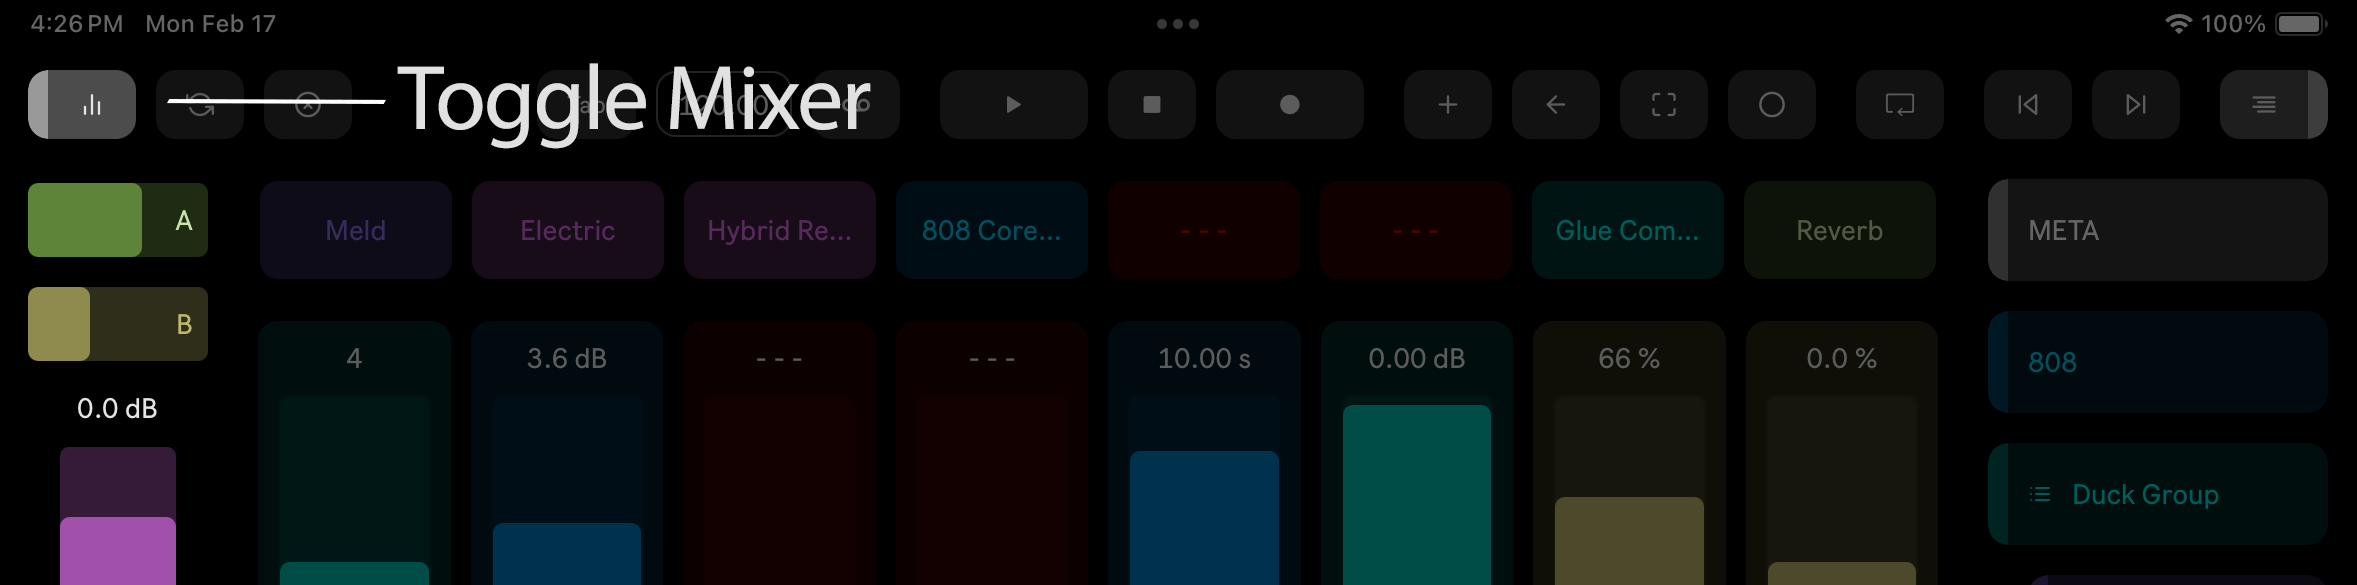
Unmapping Mode
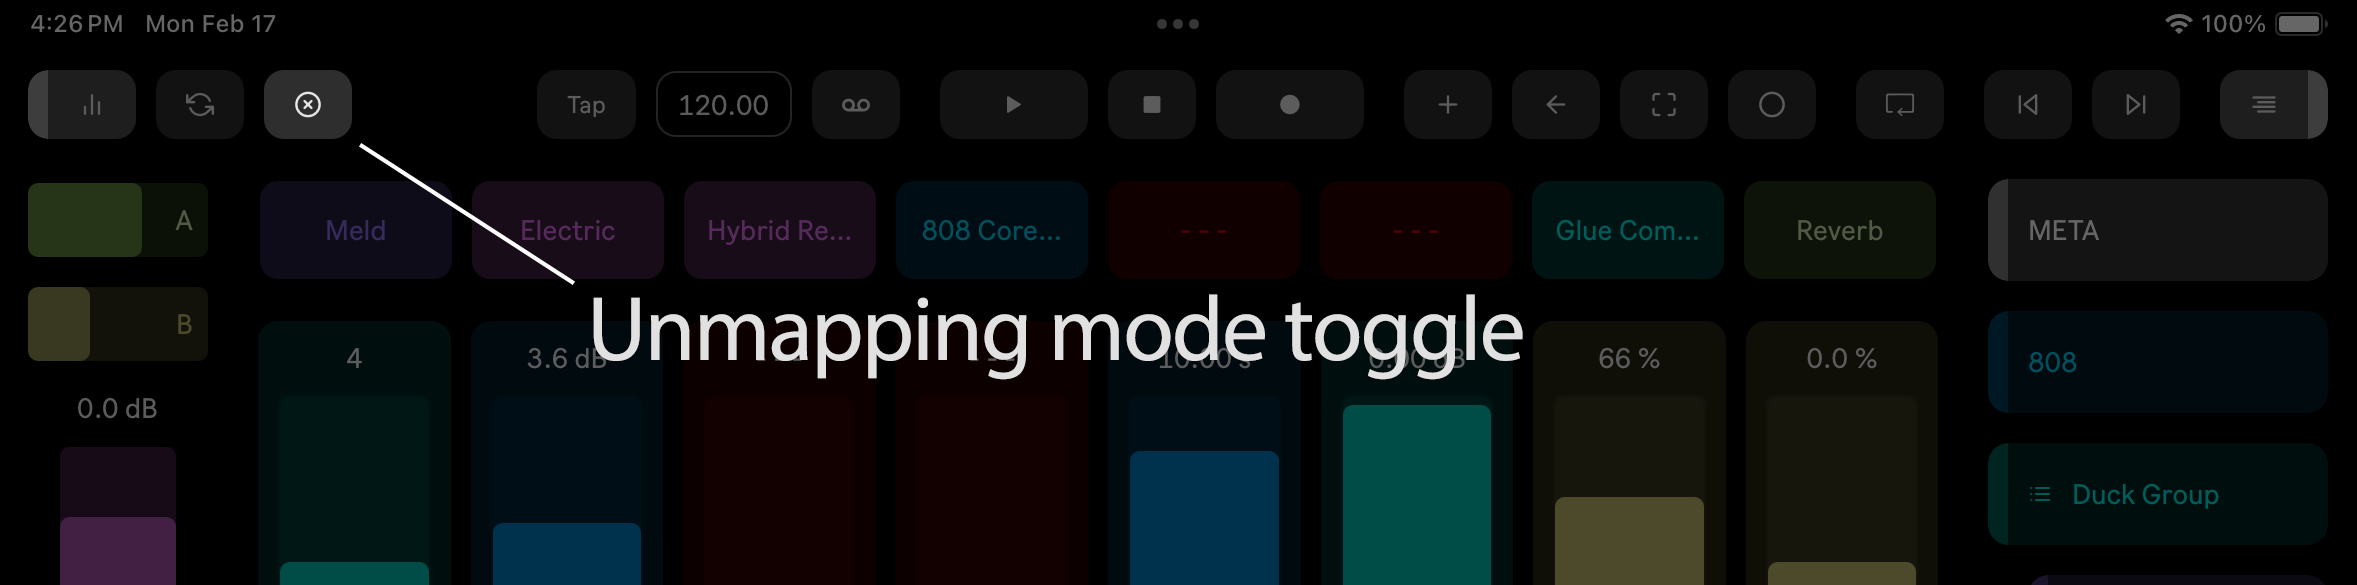
This button toggles Unmapping mode on and off. When Unmapping mode is engaged, then Knobbler sliders and Shortcut buttons have a red border. Tap the slider or button to unmap it.
Spring Mode
Tap to toggle Spring (momentary) mode on all sliders. With Spring on, any slider you drag will spring back to its touch-start value when you release. Works on Knobbler sliders, X-Y pads, and mixer faders. See Spring (Momentary) Mode above for details.
Long-press the Spring button to open the Spring Physics overlay (Time / Rubber / Gravity behaviors, with Weight, Pull, and Drag controls). See Experimental Spring Physics for the full walkthrough.
Tempo Section
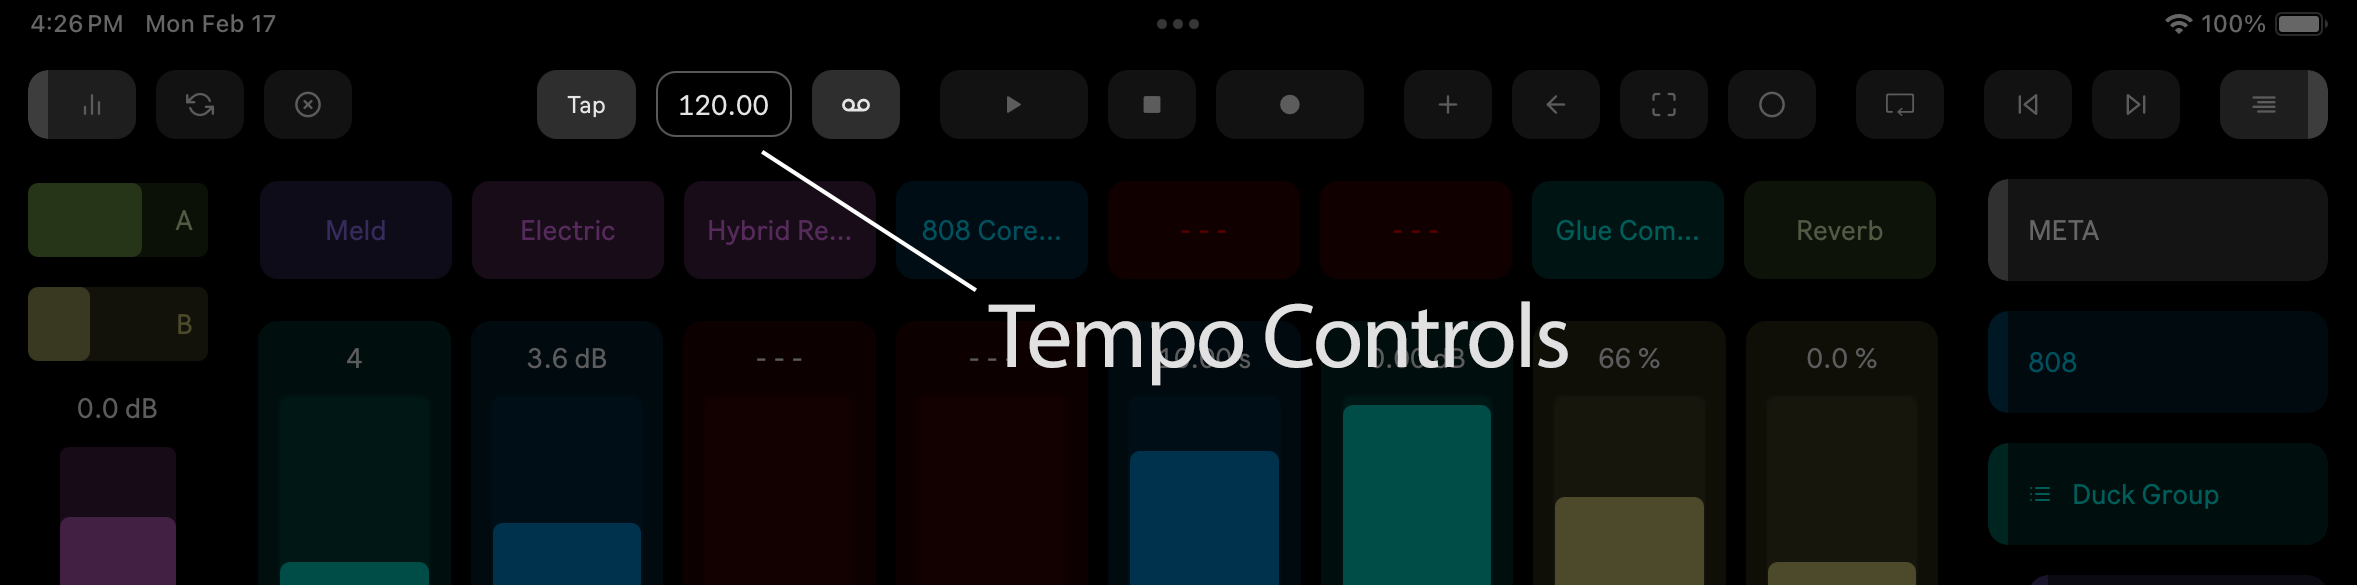
Tap tempo, tempo display and editing, and metronome control.
Transport Controls
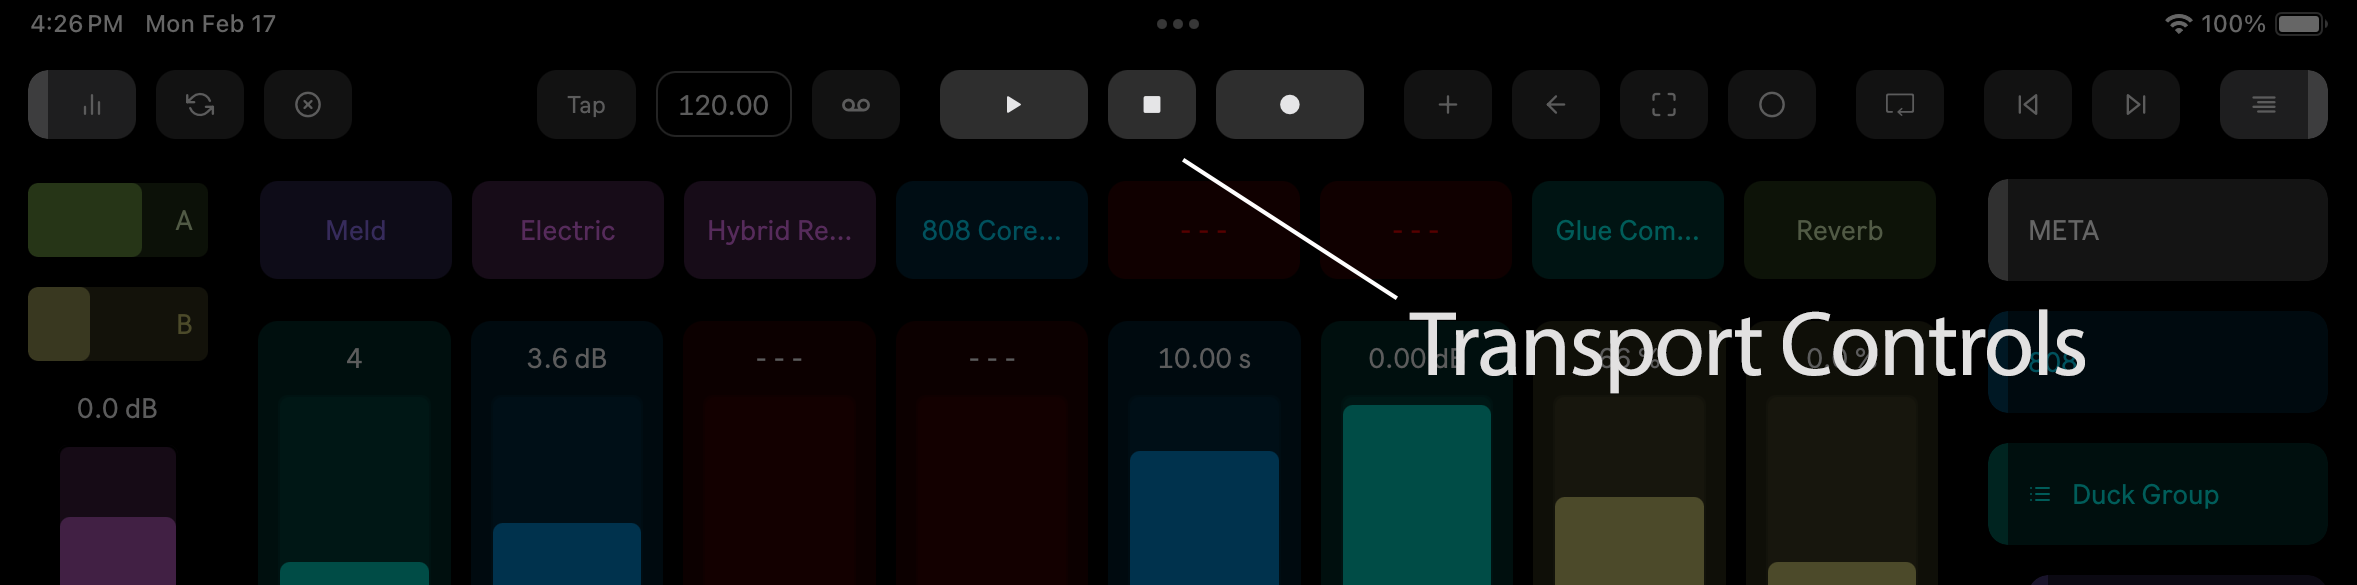
Play, stop, and record.
Pressing Stop a second time will send the playhead to the beginning of the song. Pressing a third time will silence anything that is playing.
The record button respects the "Start Transport With Record" preference.
Overdub MIDI
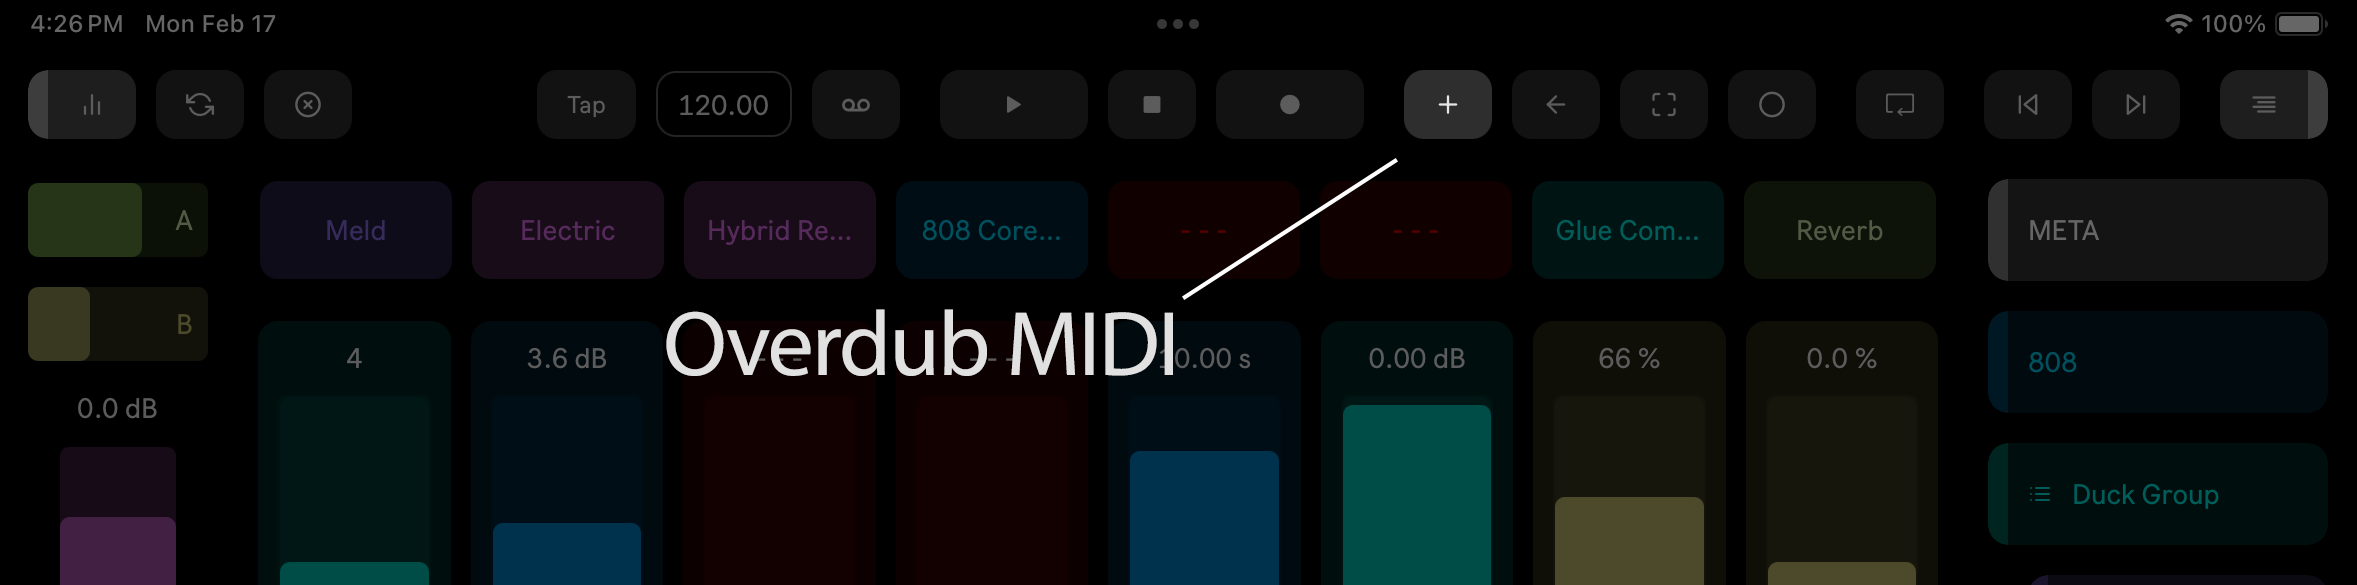
When enabled, recorded MIDI data is merged with existing MIDI clips. When disabled, recorded MIDI data will replace existing clips.
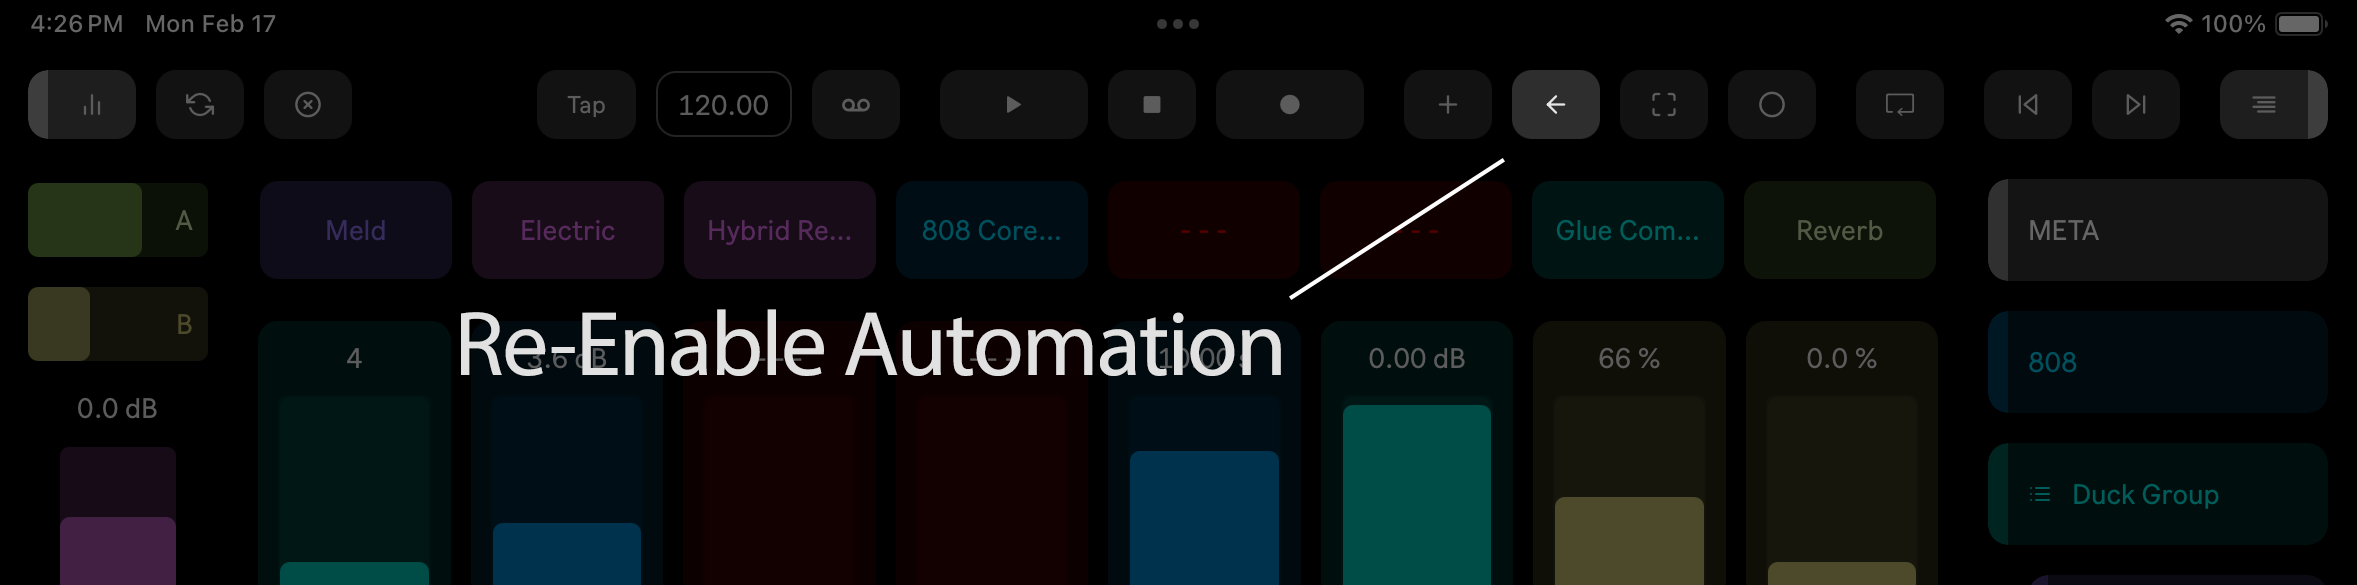
Re-Enable Automation
If automation is recorded for a parameter, but that parameter is manually adjusted, the automation will be disabled and shown in grey. Click this button to re-enable the automation everywhere that it is disabled.
Capture MIDI
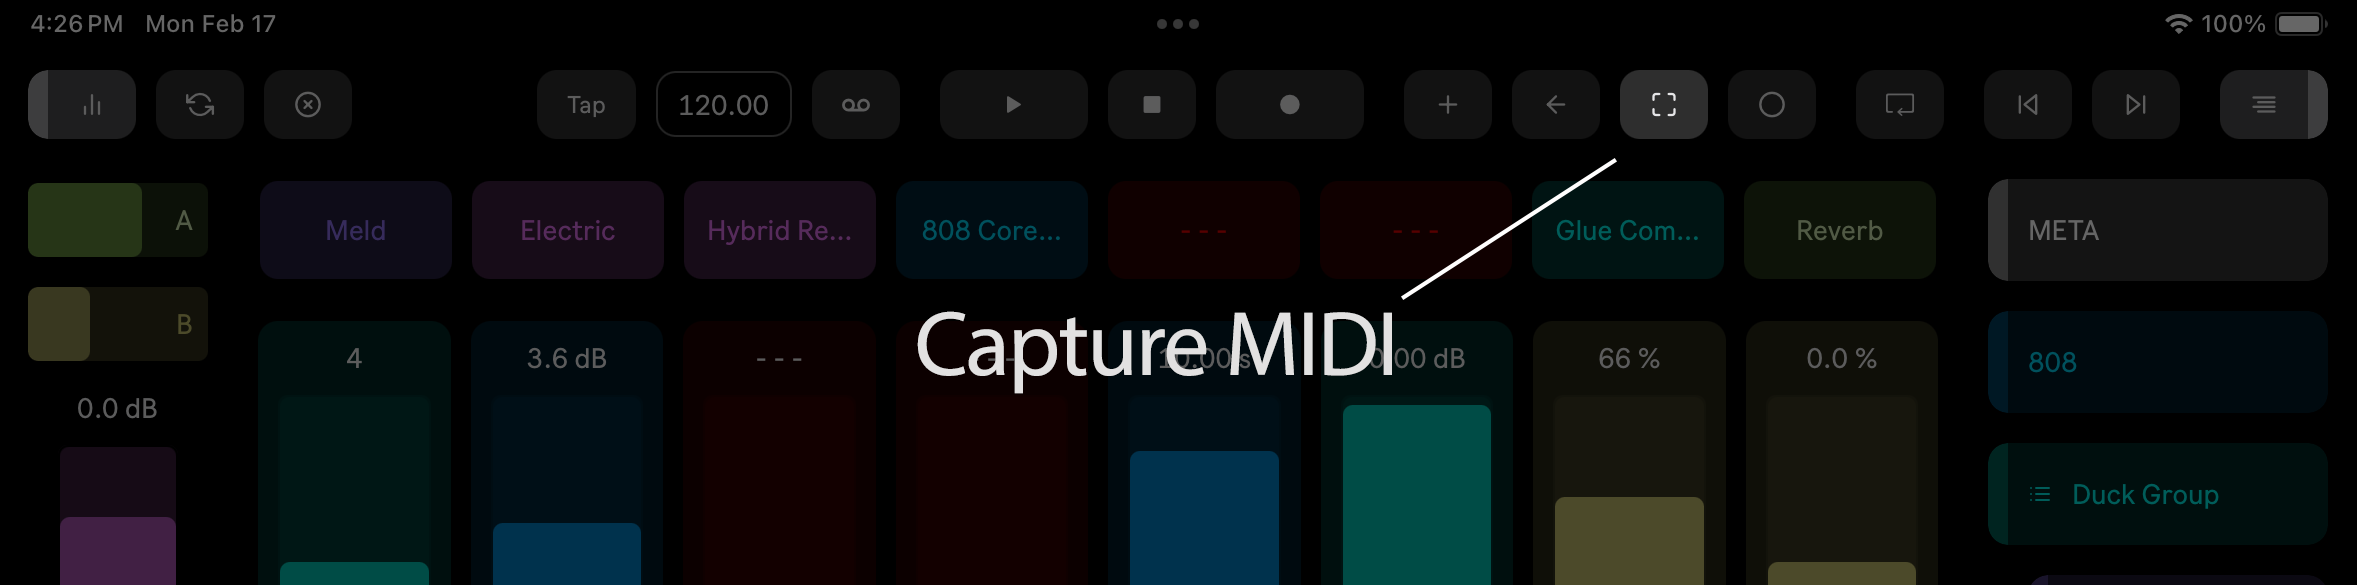
Perhaps the most under-appreciated feature of many DAWs. Click this button to capture all MIDI data captured since changing tracks. This is a great way to be noodling into some inspiration and not have to stop and record, which usually loses some of that zesty mojo.
Session Automation Overdub
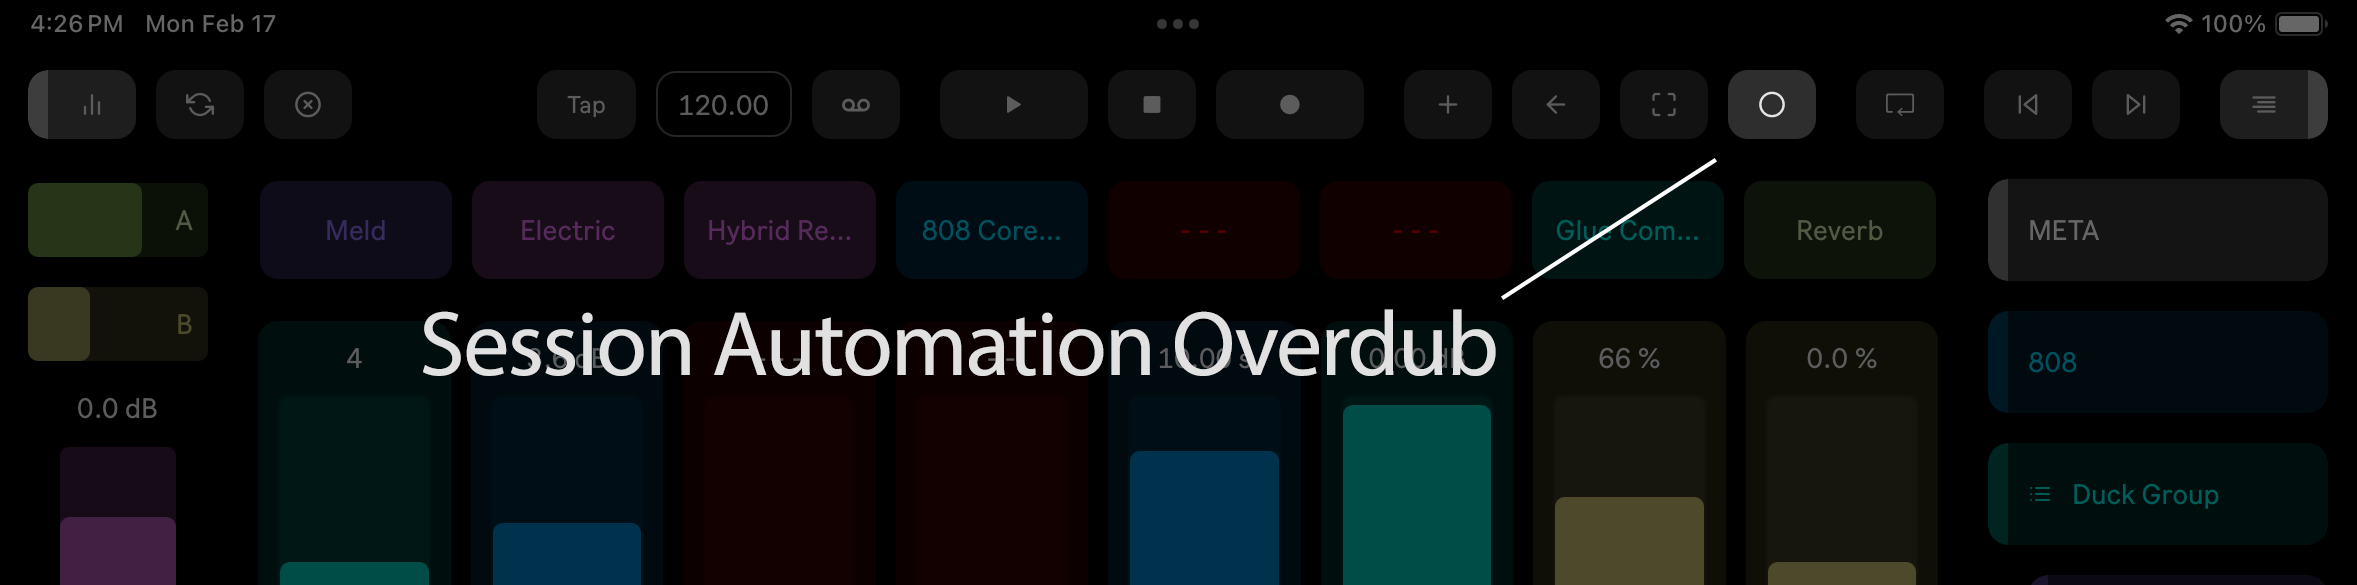
When enabled, any automation moves made while session clips are playing is recorded into the clip. This is an awesome way to build layers of evolution into your sounds.
Loop

Toggle whether the Arrangement view transport loop is enabled.
Back to Arrangement
Mirrors Ableton Live's Back to Arrangement button. When you launch Session clips while the Arrangement is playing, Live's arrangement playback is overridden — Live lights up its orange Back to Arrangement button to show the override is active. Tap this button to clear the override and return playback to what's written in the Arrangement. It lights up in the same orange whenever an override is in effect, and is otherwise dim. (Requires Knobbler device v65 or newer, and the matching app version.)
Previous / Next Locator
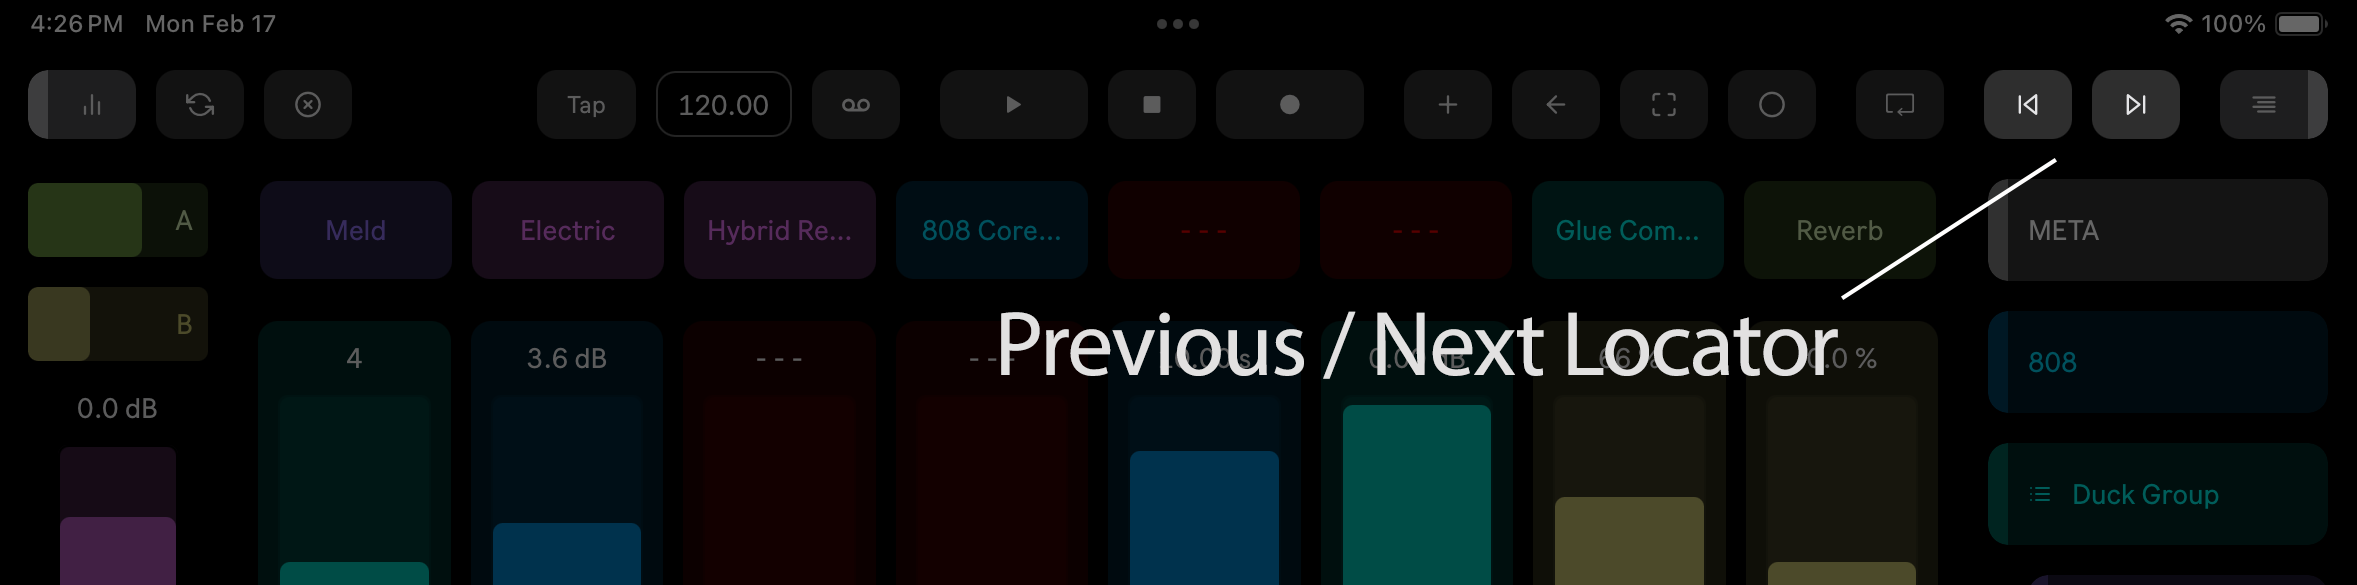
These buttons allow you to navigate to locators in your Live Set. The beginning of the song and the loop ending point are default locators.
Show / Hide Navigation
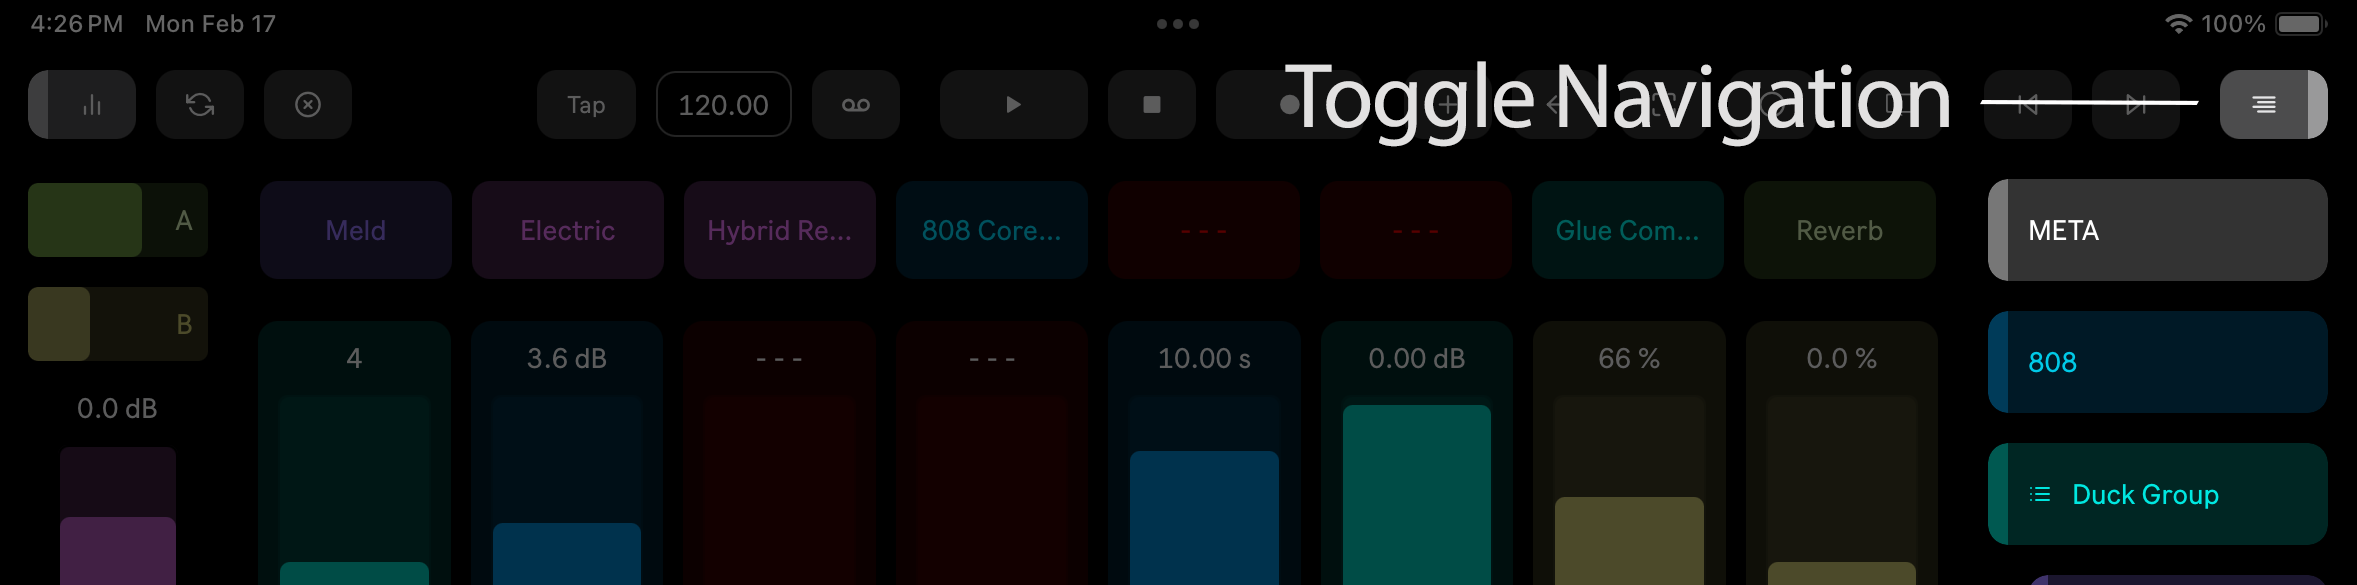
Toggles the display of the Navigation widget on the right side of the screen. You can also swipe in from the side to show it, and swipe from its left edge to hide it.
Setup Page
The Setup page has three sections: Connection, Settings, and Debug.
Connection
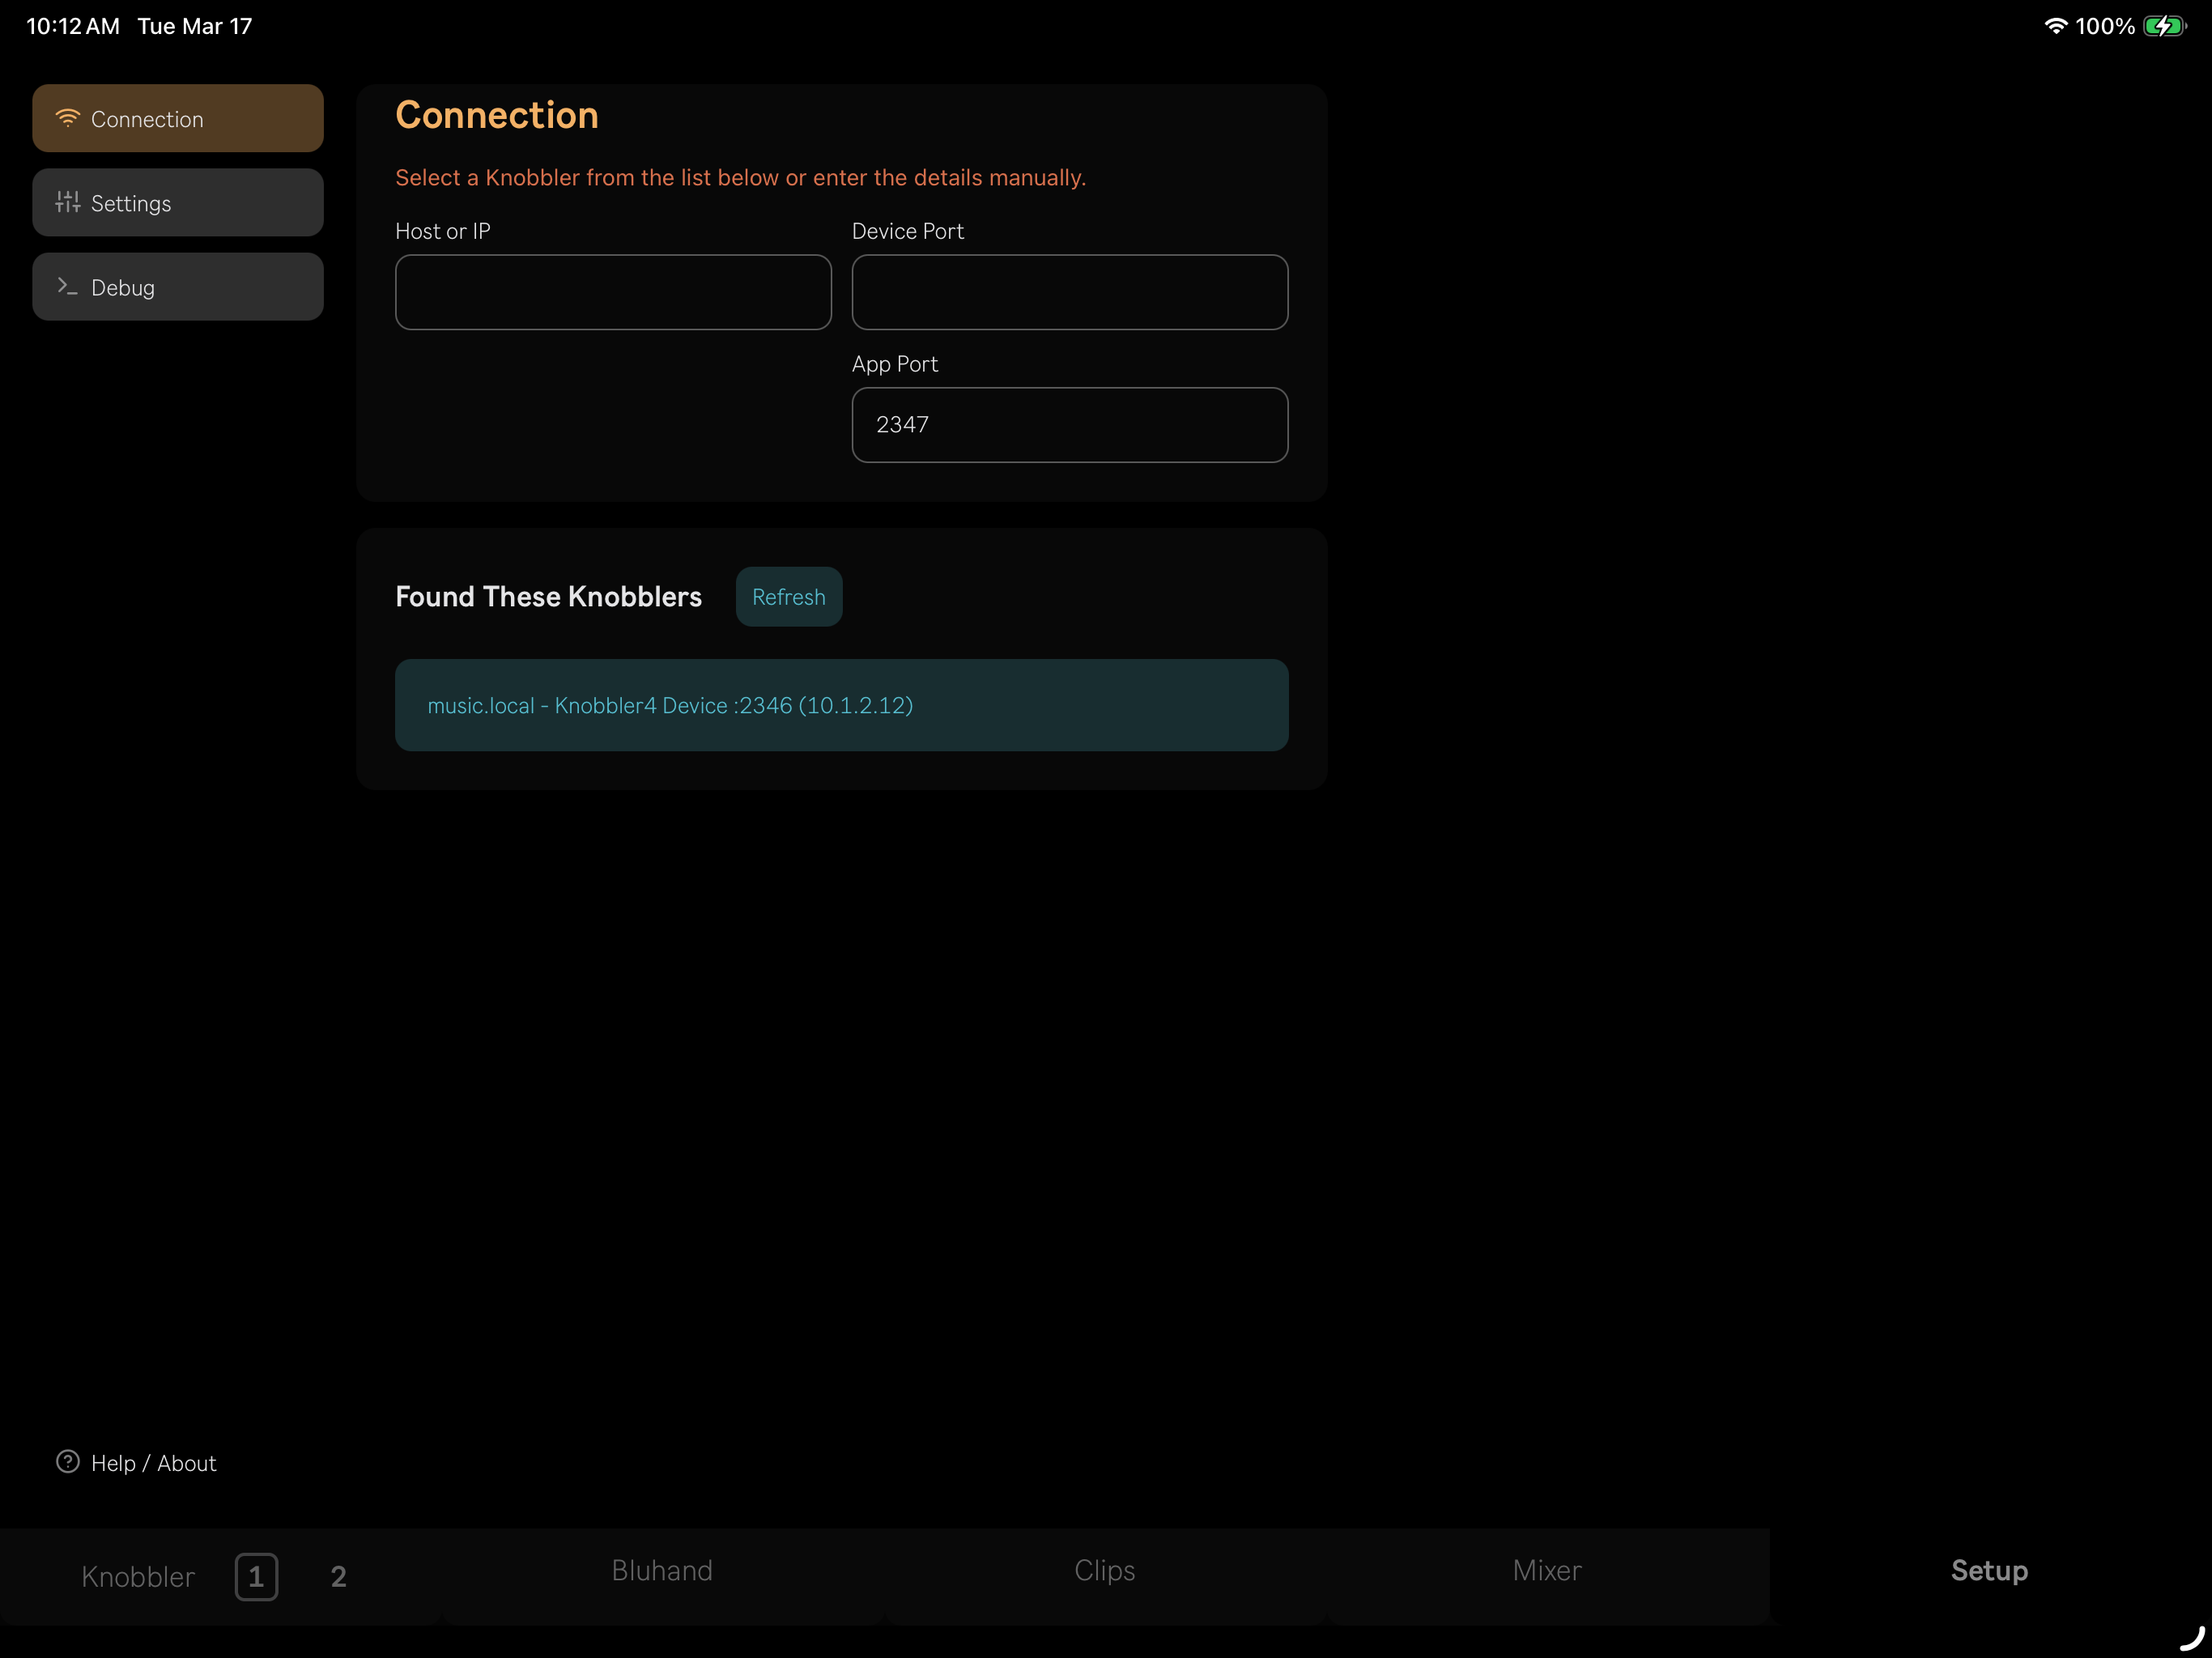
Knobbler advertises itself on your local network. Under "Found These Knobblers", tap the entry for your computer and the Host, Device Port, and App Port fields will be filled in automatically. Tap Refresh to rescan the network.
You can also enter the Host or IP and port numbers manually if you prefer.
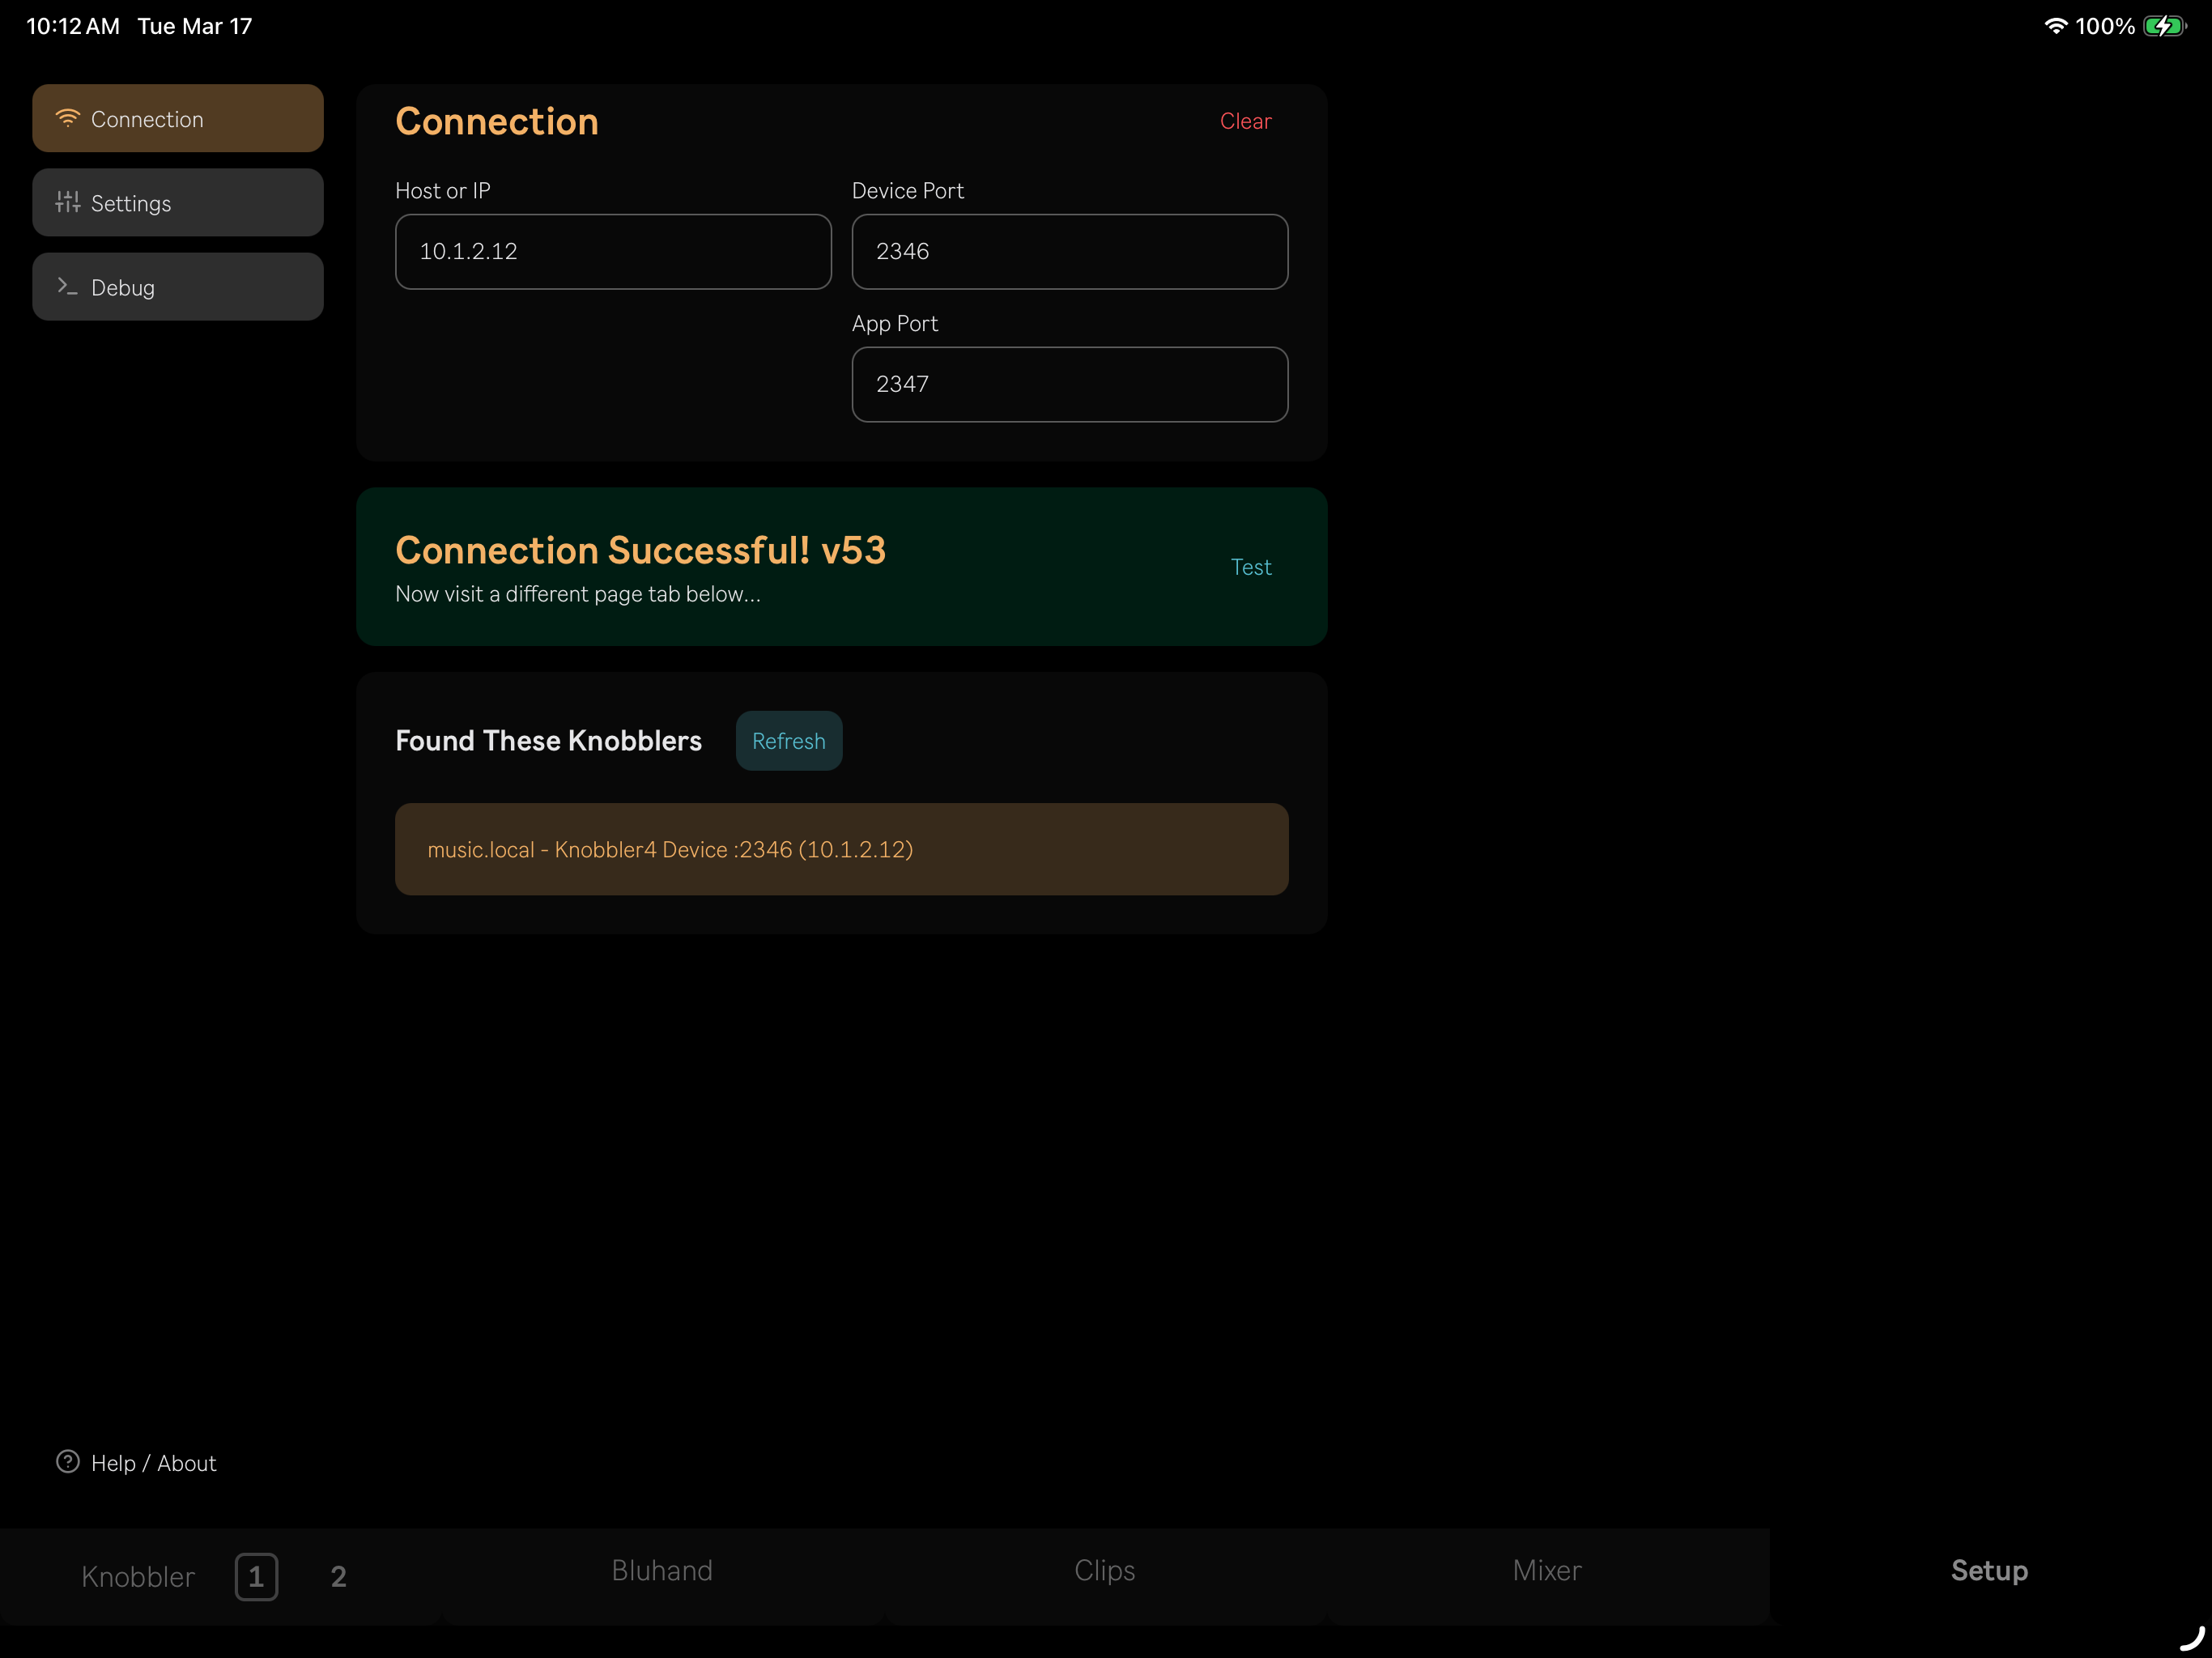
Once connected, you'll see a green "Connection Successful!" banner with the device version number. Tap Test to verify the connection, or Clear to reset the fields and start over.
If no Knobbler devices are found on the network, a "Nobody Home :(" message is shown with a link to download the Knobbler Max for Live device.
Settings
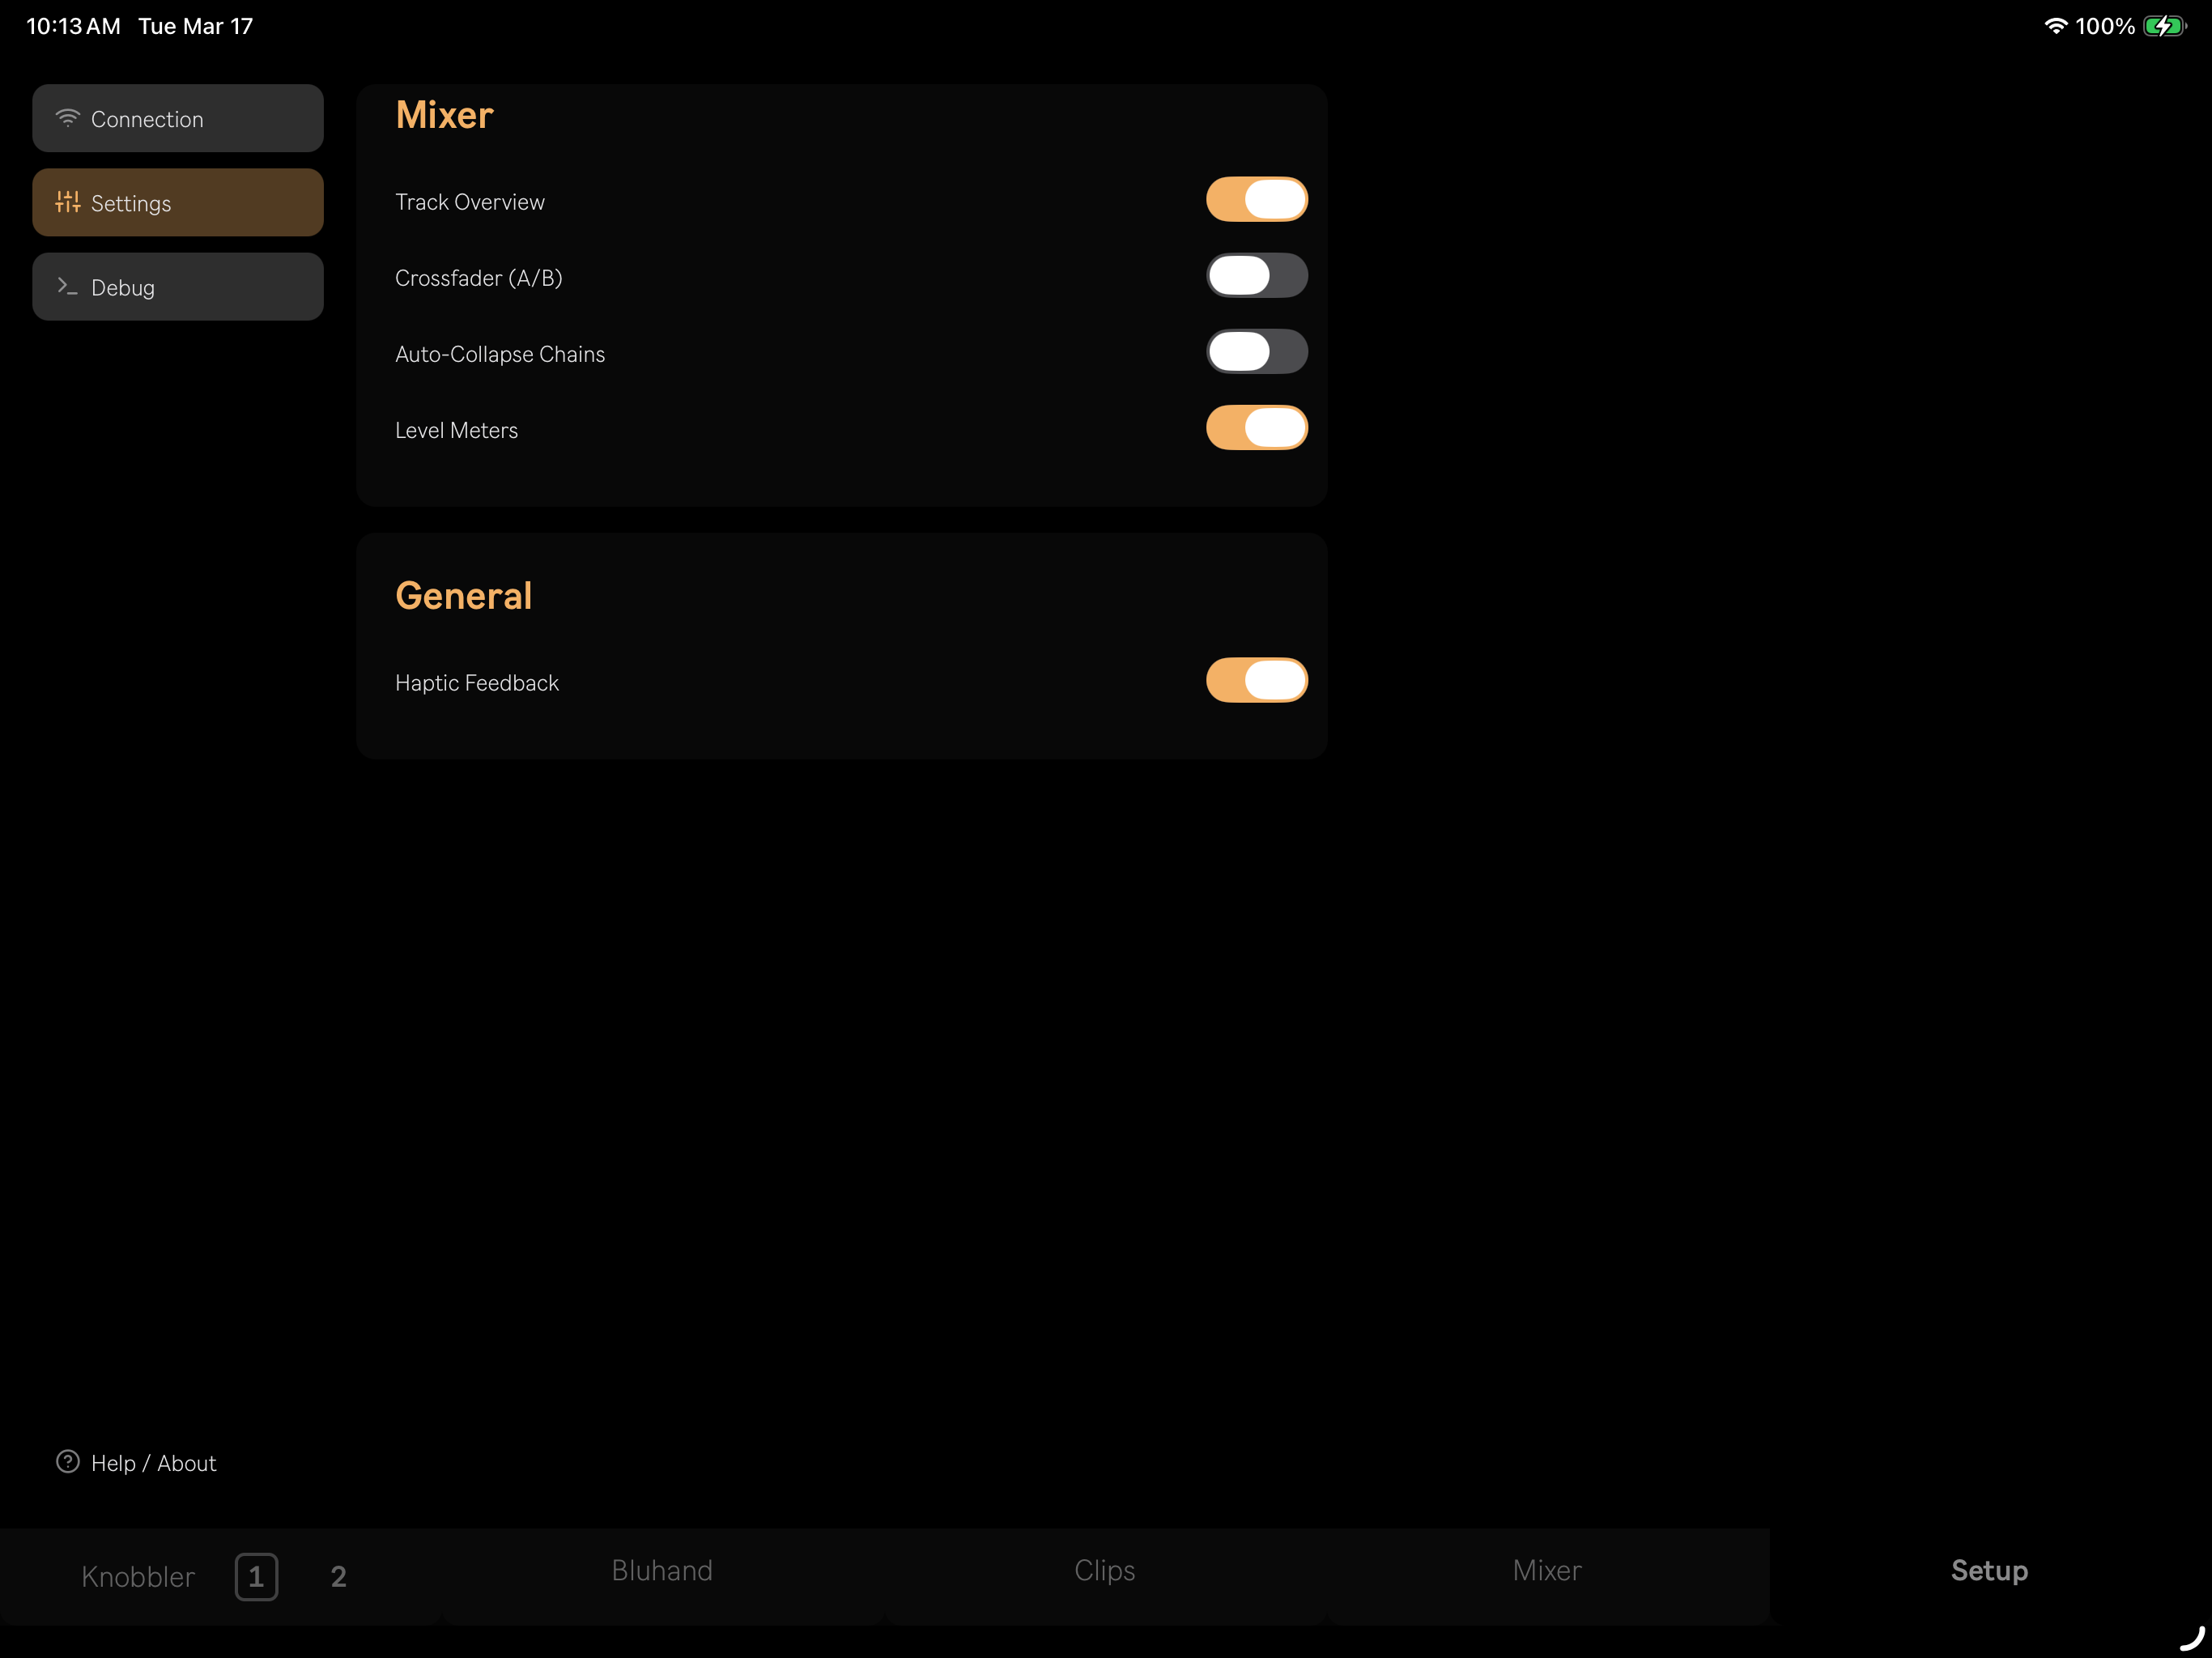
The Settings tab has options to customize Knobbler's behavior:
- Track Overview -- show the colored track overview bar in the mixer
- Crossfader (A/B) -- show crossfader assignment buttons on mixer strips
- Auto-Collapse Chains -- automatically collapse rack chains when navigating away
- Level Meters -- show real-time level meters on mixer strips
- Haptic Feedback -- enable haptic feedback on supported devices
Debug
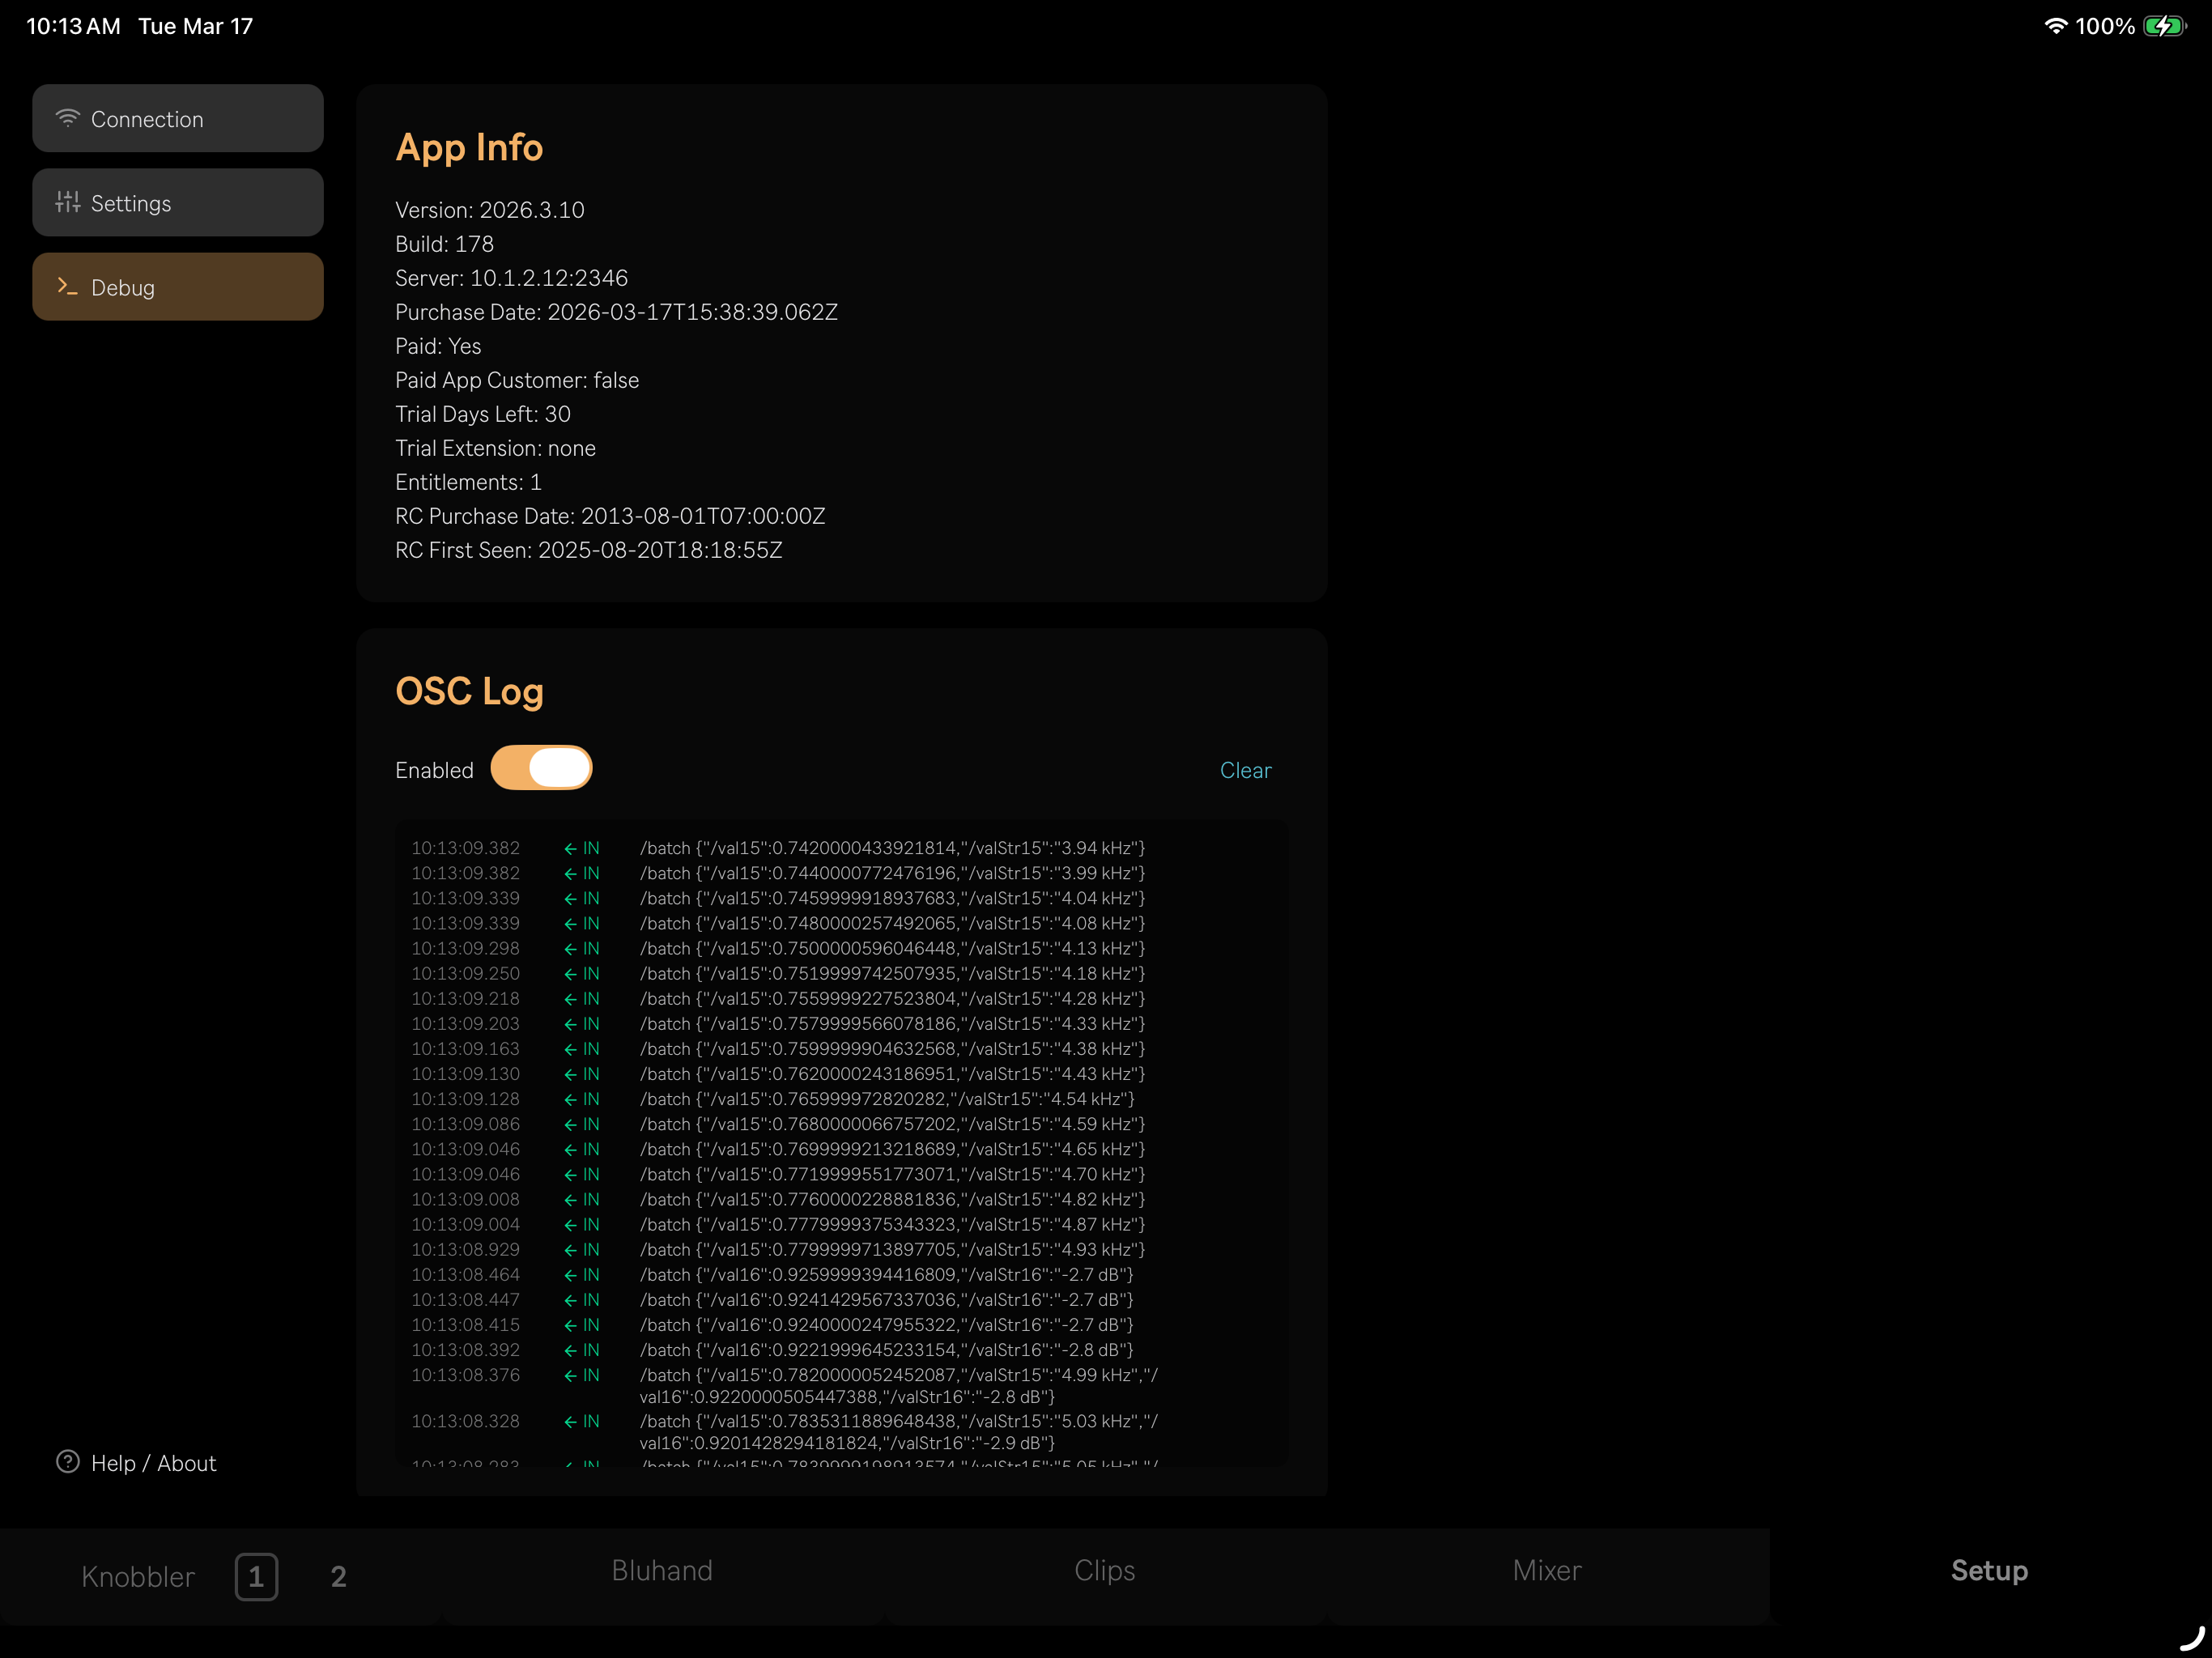
The Debug tab shows app version info, build number, server details, and subscription status. The OSC Log displays incoming and outgoing messages in real time — useful for troubleshooting connection issues.
Version Checks
If the Knobbler device that the app is communicating with is too old, a warning message will be shown. This message also includes a link to download the latest Knobbler device.
Light and Dark Themes
Knobbler ships with both light and dark themes so you can match your studio environment -- bright and easy to see at a glance during the day, or dim and unobtrusive when you're working with the lights down.
Multi-Device Support
You can use multiple phones and tablets simultaneously with multiple Knobbler instances. Add as many instances of the Knobbler device as you have devices, and ensure each instance has a unique "Device Port" setting. Each device operates independently — use one for faders, another for the mixer, a phone for clips, or whatever combination suits your workflow.
See Multiple Tablets / Phones for more.